ComfyUI regional prompting: control every region in 2026
ComfyUI regional prompting paints a different prompt onto each region of one image. Build the mask-and-sampler workflow, then run it as a hosted API.
Two people, two prompts, one image, and the model keeps painting one of them onto the other. That is the wall every prompt hits. ComfyUI regional prompting is the trick that gets you past it: you mask a region, you write a prompt that only applies inside that mask, and you do that for as many regions as the scene needs. The base prompt sets the scene, each masked region gets its own description, and a regional sampler stitches them into one coherent generation instead of two arguments.
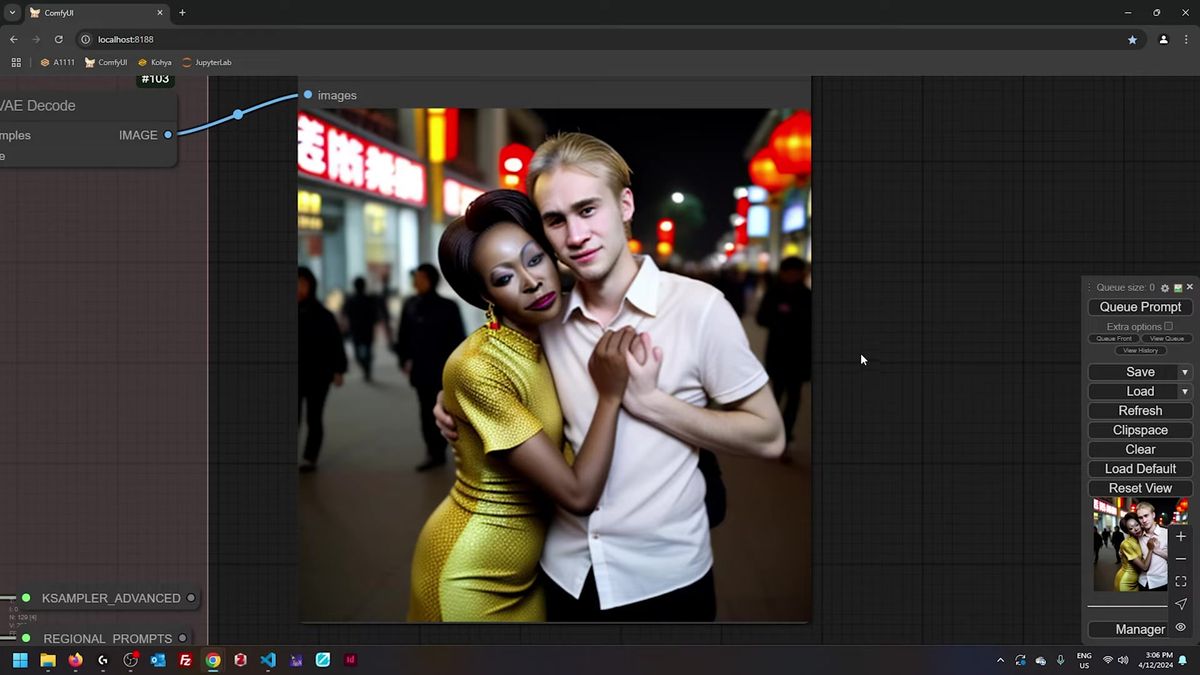
The technique came up clearly in Professor Lich's crash-course walkthrough, where he pushes it hard on purpose: two subjects, different race, age, gender, outfit, hairstyle, all in one frame on a 12-year-old Stable Diffusion 1.5 checkpoint. It works. The output holds up. That is the whole point of regional control, you stop fighting the prompt and start drawing boundaries.
We run this kind of layout in production, so the second half of this post is the part the tutorials skip: what changes when the same regional workflow has to serve a hundred users instead of one, and why the masking step is the thing that bites you at scale.
Why one prompt cannot hold two subjects
A diffusion model handles one subject well at a time, so a single prompt describing two people blurs their features together, and regional prompting fixes that by giving each subject its own prompt inside its own mask.
Here is the failure in plain terms. Write "an African woman and a blond man on a Beijing street" and the model averages them. Her hair drifts toward his, his outfit borrows from hers, eye colors swap. The model has no way to know which adjective belongs to which body, so it smears the description across both.
Regional prompting removes the ambiguity. You hand the model three things: a base prompt for the shared scene, a left mask with a prompt that only describes the left subject, and a right mask with a prompt that only describes the right one. Each prompt owns a region of the canvas. The model never has to guess whose hairstyle is whose.
One structuring detail from the walkthrough is worth stealing. Lich writes each regional prompt subject-first, scene-last. The left prompt opens with the woman, her hair, her outfit, and only at the very end mentions "she's with a man in Beijing." The right prompt does the mirror. Front-load the subject that owns the region, then add the scene context as an afterthought. The model spends its attention where the mask is.
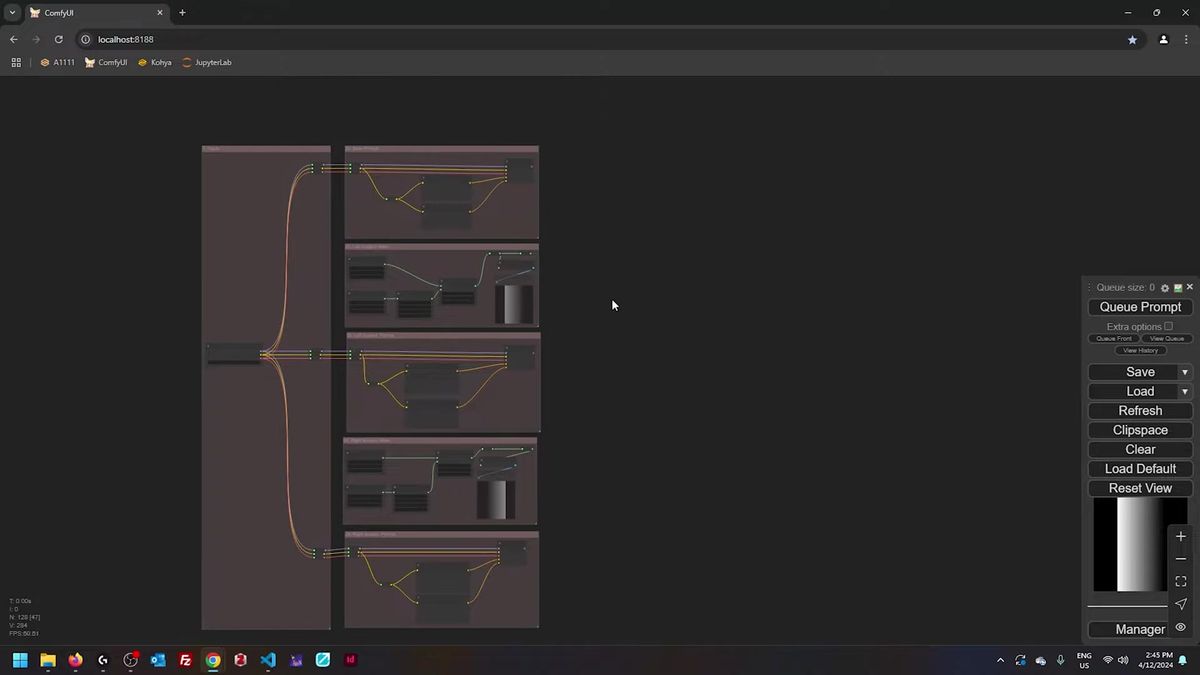
How the regional prompting workflow fits together
The workflow is a base prompt plus one mask-and-prompt pair per region, all routed into a regional sampler that conditions each masked area separately before blending them into a single latent.
Think of it as layers. The base prompt is the bottom layer, the scene everyone shares: the street, the lighting, the mood. Then each region sits on top as its own conditioning, scoped to a mask. A mask is a black-and-white image where white marks "apply this prompt here" and black marks "ignore."
In ComfyUI the plumbing looks busier than it is. Each region has a prompt node, a mask, and a conditioning step that pins the prompt to the mask. All of those flow into the regional sampler. The sampler is the node that knows how to take a stack of region-scoped conditionings and resolve them into one image without letting them fight.
A practical tip for keeping that graph readable: when connections cross the whole canvas, use Get and Set nodes (from the Easy Use pack or KJ Nodes) instead of dragging a wire across five groups. You Set a value on one side, Get it on the other, no spaghetti. Reroute nodes work too, but they change type dynamically, so a wrong connection there can break things further down the chain. We learned to label aggressively, because a regional graph with four subjects gets unreadable fast.
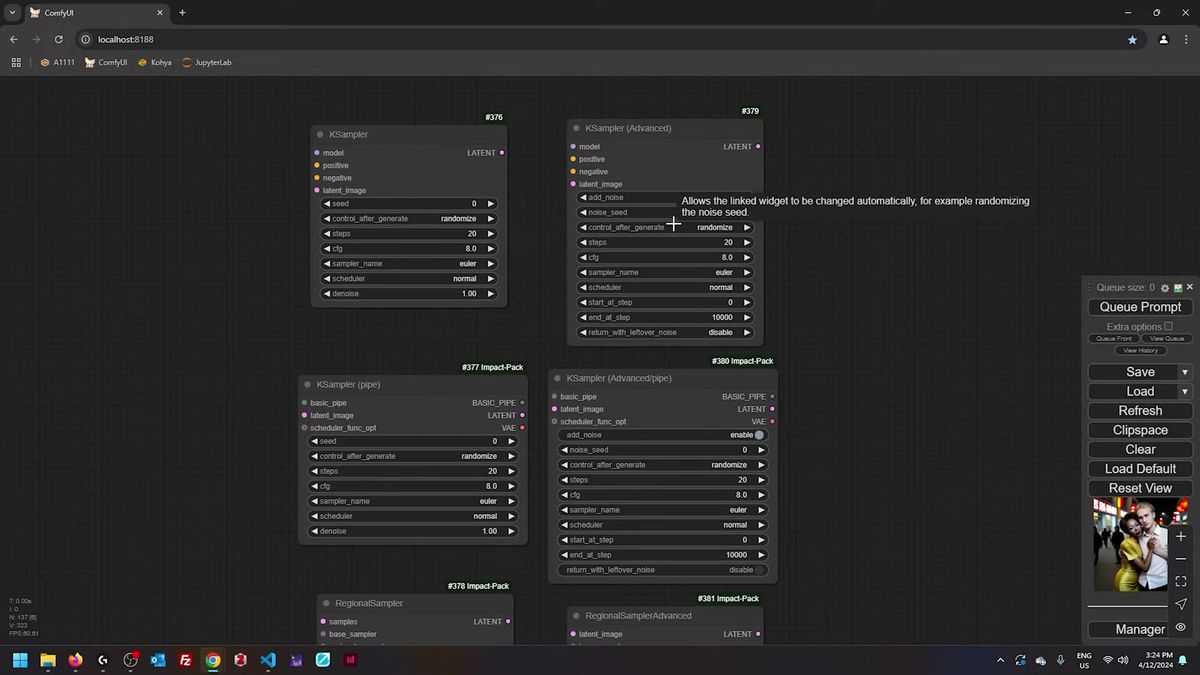
Regular sampler versus advanced regional sampler
The regular regional sampler finishes the background first and then samples the masked regions, while the advanced one alternates between background and regions on every step, which blends the seams far better.
This is the single setting that decides whether your regions look glued on or grown in. With the regular regional sampler, sampling of the masked regions only starts after the background is done. That ordering is why it exposes a base_only_steps parameter: you tell it how many steps to spend on the background before the regions kick in.
The advanced regional sampler drops base_only_steps entirely, because it does not need it. It alternates the sampling at each step, region and background interleaved, so the boundaries blend smoothly as the image forms instead of being patched in at the end. For two subjects standing close enough to touch, that per-step blending is what keeps the contact edge from looking like a collage.
This is the same difference between a regular KSampler and a KSampler Advanced, and it is worth understanding once because it shows up everywhere in ComfyUI. If you want the deeper version of how conditioning and sampling interact, we wrote a full piece on conditioning and sampling in ComfyUI that this builds directly on.
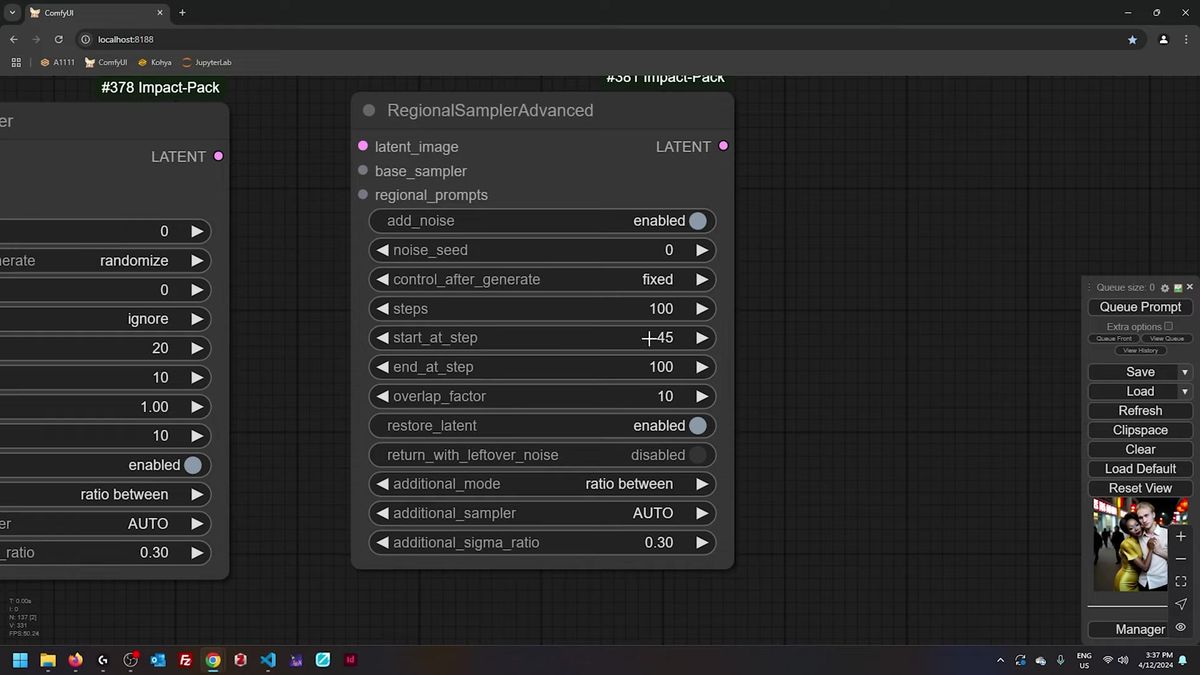
Working out denoise on the advanced node
On the advanced sampler there is no denoise slider, so you derive denoise yourself: take the steps that run after your start step, divide by the total steps, and that ratio is your effective denoise strength.
The advanced regional sampler hides the denoise control, which trips people up the first time. You do not set denoise directly. You set start_at_step and end_at_step, and the denoise falls out of the arithmetic.
The formula is simple. If the sampler runs 100 steps total and you start at step 45, then 55 steps actually run, and 55 over 100 is 0.55 effective denoise. Start later, denoise drops; start earlier, denoise climbs toward a full pass. Credit for that little calculation goes to the node developers' own documentation, and it is the kind of thing you compute once and never forget.
This matters most when you chain an upscale pass after the regional generation. A second sampler at, say, start step 45 gives you a 0.55 denoise refinement that sharpens detail without repainting the whole image and losing your hard-won regional layout. Latent-space upscaling wants a higher denoise than pixel upscaling, so expect to retune the start step when you switch methods.
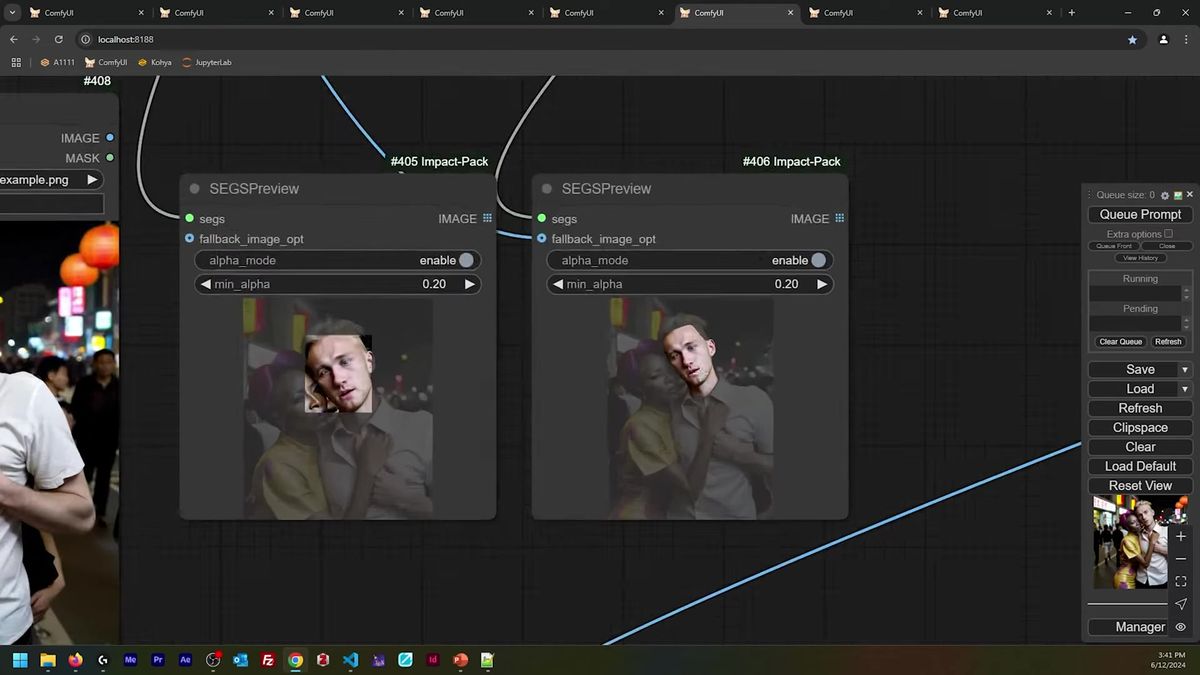
When masks bleed: SAM and contour fill
When two regions sit close together, rough bounding-box masks bleed into each other, so you switch to SAM segmentation for tight shape-accurate masks and turn on contour fill to seal any holes.
Crude rectangular masks are fine when subjects are far apart. Put them shoulder to shoulder and the boxes overlap, one region's prompt leaks into the other, and the bleed shows up worst when you prompt with a strong color. The fix is to stop using boxes.
SAM, the Segment Anything Model, traces the actual outline of a subject instead of a rectangle around it. You feed the image, SAM returns a mask that hugs the real silhouette, and now two subjects that touch keep clean, separate regions. That alone kills most of the bleed.
The second half of the fix is contour fill. A SAM mask sometimes comes back as an outline with gaps inside it, holes where the region should be solid. ComfyUI's SEGS nodes have a contour_fill toggle that closes those gaps, turning a hollow outline into a filled region. Flip it on whenever a mask looks like a ring instead of a blob. This is the boring preprocessing that decides whether regional prompting looks professional or amateur, and it is exactly the kind of step you want to automate rather than do by hand on every image.
Running regional prompting as a production API
A regional workflow that runs once on your 4090 is a long way from one that serves a hundred users at once, and the gap is the part nobody warns you about: GPU availability, cold starts, and keeping every region's mask preprocessing fast under load.
Here is the honest version of the scaling story. The workflow above is a graph with masks, two or three samplers, a SAM pass, and an upscale. On your own machine it takes thirty-something seconds per image with nobody else in the queue. The moment real users show up, that single machine becomes the bottleneck. Two people generate at the same time and one of them waits. Ten people show up and you are buying a second GPU. (We have run that math, and it does not end well for one machine.)
That is where running the workflow as a hosted API changes the shape of the problem. Instead of owning the GPU, you call an endpoint, and the capacity scales behind it. The same regional layout, the same base-plus-region structure, becomes a single POST request:
# Kick off a generation against a hosted model, same regional layout
curl -X POST https://api.runflow.io/v1/models/black-forest-labs/flux-dev/runs \
  -H "Authorization: Bearer $RUNFLOW_API_KEY" \
  -H "Content-Type: application/json" \
  -d '{
    "input": {
      "prompt": "two subjects on a busy Beijing street at night, cinematic",
      "width": 1024,
      "height": 1024,
      "steps": 28
    }
  }'

# Response returns a run id
# { "id": "run_3a91...", "status": "queued" }

# Poll until the run finishes
curl https://api.runflow.io/v1/runs/run_3a91... \
  -H "Authorization: Bearer $RUNFLOW_API_KEY"

# { "status": "succeeded", "output": { "images": ["https://..."] } }
For a custom regional graph with your own masks and SAM nodes, you deploy the whole ComfyUI workflow rather than calling a single model. We wrote up that path in ComfyUI deploy: self-host, serverless, or managed, and the ComfyUI API developer guide covers the request-and-poll pattern end to end. The pricing is simple fixed per-call, the GPUs stay available, and you do not need an AI infra team to keep it up. For us that worked out to roughly 70% cheaper than building the same reliability in-house.
The masking effort is the real cost
The generation is the cheap part of regional prompting, and the masking is the expensive part, so the workflow that wins is the one that automates mask creation rather than the one with the cleverest sampler.
A pattern shows up once you run this for real. Drawing masks by hand is fine for a hero shot you make once. It falls apart the instant you need it per user upload, because every new image needs its own masks, and a human cannot sit in that loop.
So the production version of regional prompting leans hard on SAM and automatic segmentation. Detect the subjects, segment them, fill the contours, route each region's prompt, generate. The cleverness moves out of the sampler settings and into the preprocessing, because that is the part that has to run unattended a thousand times a day.
This is the same lesson that shows up across ComfyUI work. If you are stacking reference images or transferring identity, the ComfyUI IPAdapter guide hits the same wall from a different angle: the technique is easy, the input preparation is the part that has to scale. Regional prompting just makes the lesson loud, because every region multiplies the preprocessing.
Frequently asked questions
What is regional prompting in ComfyUI?
Regional prompting is a technique where you split one image into masked regions and give each region its own prompt. A base prompt sets the shared scene, each masked region gets a separate description, and a regional sampler blends them into a single coherent generation. It lets you control distinct subjects or distinct styles in different parts of the same image.
Why does my prompt blur two subjects together?
A diffusion model handles one subject well at a time. When a single prompt describes two people, the model has no way to know which adjective belongs to which body, so it averages their features. Regional prompting fixes this by scoping each subject's prompt to its own mask.
What is the difference between the regular and advanced regional sampler?
The regular regional sampler finishes the background first and then samples the masked regions, which is why it exposes a base_only_steps parameter. The advanced sampler alternates between background and regions on every step, blending the seams more smoothly. The advanced node has no base_only_steps because it does not sample in two phases.
How do I set denoise on the advanced regional sampler?
The advanced node has no denoise slider. You derive denoise from the step range: divide the steps that run after your start step by the total steps. Starting at step 45 of 100 means 55 steps run, giving an effective denoise of 0.55.
Why do my regional masks bleed into each other?
Rough bounding-box masks overlap when subjects sit close together, and the bleed is worst when you prompt with a strong color. Switch from boxes to SAM segmentation so each mask hugs the real silhouette, and enable contour_fill on the SEGS node to close any holes in the mask.
What is SAM and why use it for masks?
SAM is Meta's Segment Anything Model. It traces the actual outline of a subject instead of a rectangle around it, so masks for adjacent subjects stay clean and separate. For regional prompting it is the difference between regions that bleed and regions that hold.
Does regional prompting work on SDXL and Flux?
Yes. The technique is model-agnostic because it works at the conditioning and sampling layer, not inside the checkpoint. The crash-course walkthrough demonstrates it on Stable Diffusion 1.5, and the same node structure carries over to SDXL and Flux workflows with the matching sampler nodes.
Can I run a regional prompting workflow as an API?
Yes. You deploy the full ComfyUI graph, masks and SAM nodes included, to a hosted runner and call it with a single request. That moves the GPU capacity off your machine so the workflow holds up when many users generate at once, instead of queueing behind one card.
How much VRAM does regional prompting need?
It depends on the checkpoint and the number of regions, not the technique itself. The masking and conditioning add little overhead, so a workflow that runs on Stable Diffusion 1.5 stays light, while an SDXL or Flux regional graph carries the same VRAM cost as any SDXL or Flux generation plus a small SAM pass.
Where to go next
- Build the base layout first: one base prompt, two masks, two region prompts, wired into a regional sampler. Get two subjects holding their own features before you add a third.
- Structure each region prompt subject-first, scene-last, so the model spends attention where the mask is.
- Switch to the advanced regional sampler when seams between regions look glued on, and derive denoise from your start step instead of hunting for a slider.
- Replace bounding-box masks with SAM segmentation the moment two subjects touch, and turn on contour_fill to seal any holes.
- When you outgrow one GPU, read ComfyUI deploy: self-host, serverless, or managed and the ComfyUI API developer guide to move the workflow behind an endpoint.
- Browse the Runflow model catalog to see which base models you can call directly versus deploy as a custom graph.
Start free at runflow.io.
Want custom benchmarks for your workload?
We'll run our evaluation pipeline against your production data, for free.
Talk to Founders