ComfyUI IPAdapter: style and identity transfer in 2026
ComfyUI IPAdapter copies style and identity from a reference image. Build the v2 workflow node by node, then run reference-image pipelines as a hosted API.
Six dropdowns, four model files, one wrong filename, and the whole graph errors out. That was IPAdapter before the v2 rewrite. ComfyUI IPAdapter is the node pack that copies the style or the face from a reference image into a new generation, no LoRA training, no fine-tune, just feed it a picture and it carries the look across. The v2 update collapsed that model-picking mess into a single unified loader, and it also broke every old workflow in the process.
We learned the second half the expensive way. We had IPAdapter wired into a reference-image pipeline, the update landed, and a graph that ran clean on Friday threw node-not-found on Monday. (The author of the pack says it plainly in the video: do not update mid-project unless you want to rebuild.) So this guide rebuilds it the right way, from the v2 nodes up.
It does two things. First it walks the new ComfyUI IPAdapter workflow node by node, the way the Latent Vision walkthrough lays it out: unified loader, FaceID, weight types, multi-image embeds, tiled mode. Then it shows the production path, calling a reference-image pipeline as an API so the workflow holds up when a hundred users hit it at once instead of just you.
What ComfyUI IPAdapter actually does
ComfyUI IPAdapter takes a reference image and pushes its style or identity into a new generation through the model's attention, so you steer output with a picture instead of a paragraph of prompt.
The plain version: text prompts are bad at "make it look like this." You can describe a painting style in fifty words and still miss it. IPAdapter skips the description. You hand it the reference image, it encodes that image with a CLIP vision model, and it injects those features into the diffusion model so the generation inherits the look.
Two jobs people reach for it most. Style transfer: feed an anime frame or a watercolor, generate something new in that style. Identity transfer: feed a face, get the same person in a new scene. The FaceID variants are the ones tuned for the second job.
That is the whole pitch. No training run, no waiting on a LoRA. One reference image, applied live. The v2 rewrite did not change what IPAdapter does. It changed how painful it is to set up.
How the v2 unified loader works
The unified loader replaces the old stack of separate model, CLIP vision, and LoRA pickers with one node that reads your checkpoint and loads only what that IPAdapter type needs.
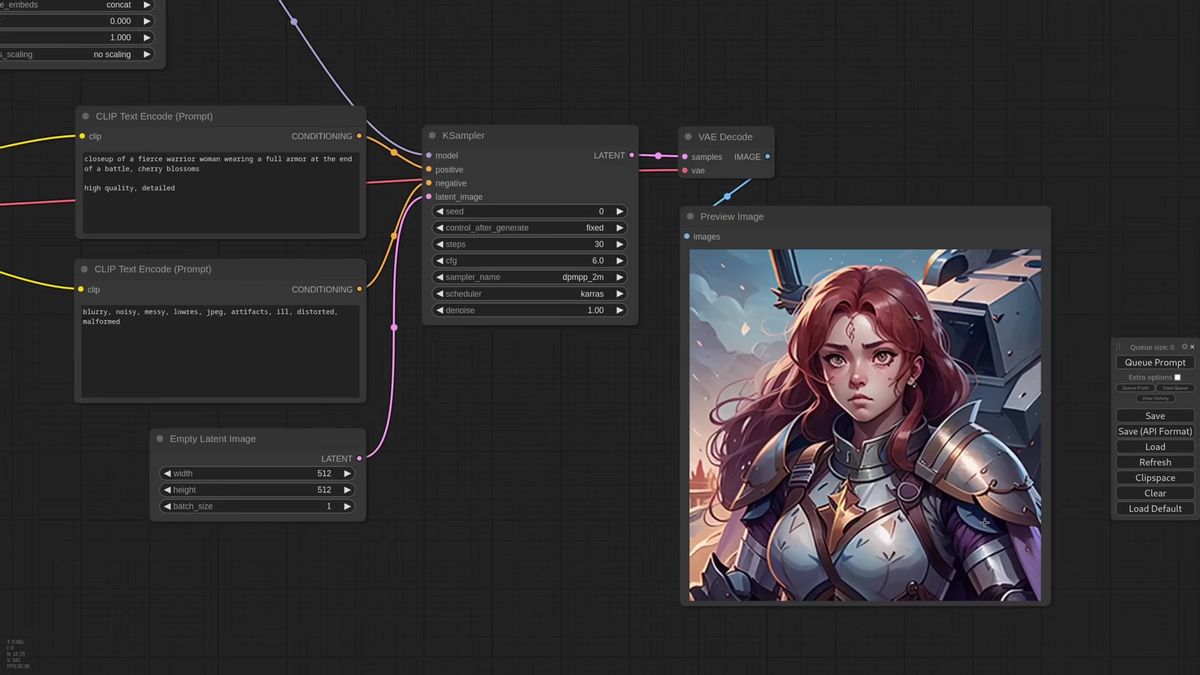
Old IPAdapter made you select every model by hand: the IPAdapter model, the matching CLIP vision encoder, sometimes a LoRA. Pick the wrong pair and the graph errored with nothing useful in the message. The v2 loader fixes that. You connect it to your model pipeline so it knows the checkpoint, then you pick one thing: the kind of IPAdapter you want, like Plus or Standard.
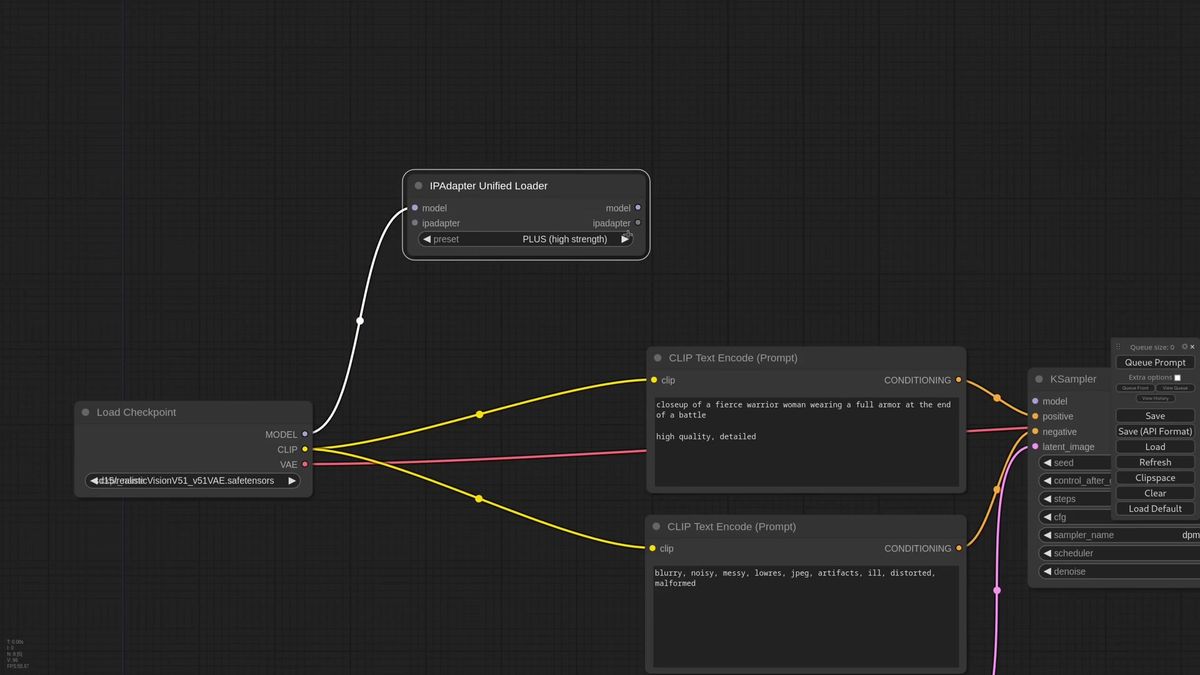
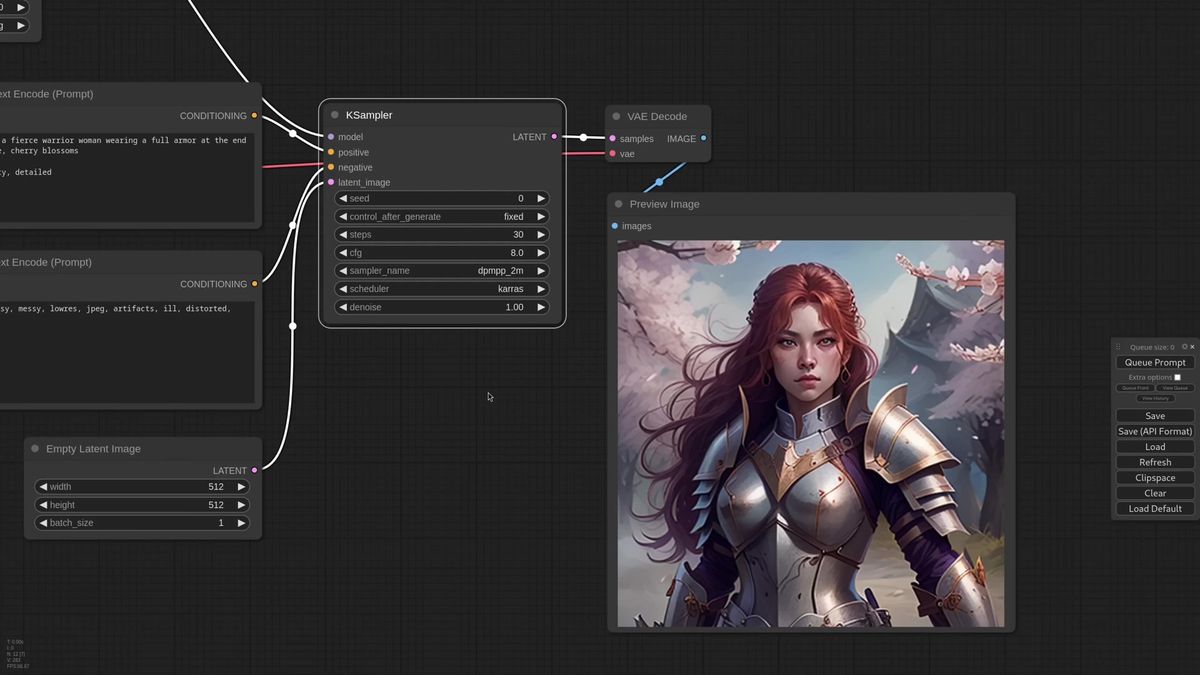
From there the chain is short. Connect the loader to the main IPAdapter node, drop the weight a little, wire the model through, then the KSampler. Pick a reference image. Generate. That is the entire baseline workflow.
One detail the walkthrough flags is worth copying: automated loaders tend to load more than you need. If a graph uses two IPAdapter types, daisy-chain the second loader off the first instead of starting fresh. Shared models load once, not twice, which keeps VRAM honest when your graph grows.
How FaceID and identity transfer work
FaceID models live behind a dedicated loader because they pull in an extra LoRA and the InsightFace model, and you stack two of them when one pass does not hold the likeness.
FaceID does not appear in the unified loader dropdown. It has its own loader, and that loader also handles the LoRA and the InsightFace dependency that face models need. One setting trips people up: set the provider to CPU even on a strong GPU. It runs InsightFace on the processor to save VRAM for the actual generation, and the video calls that out directly.
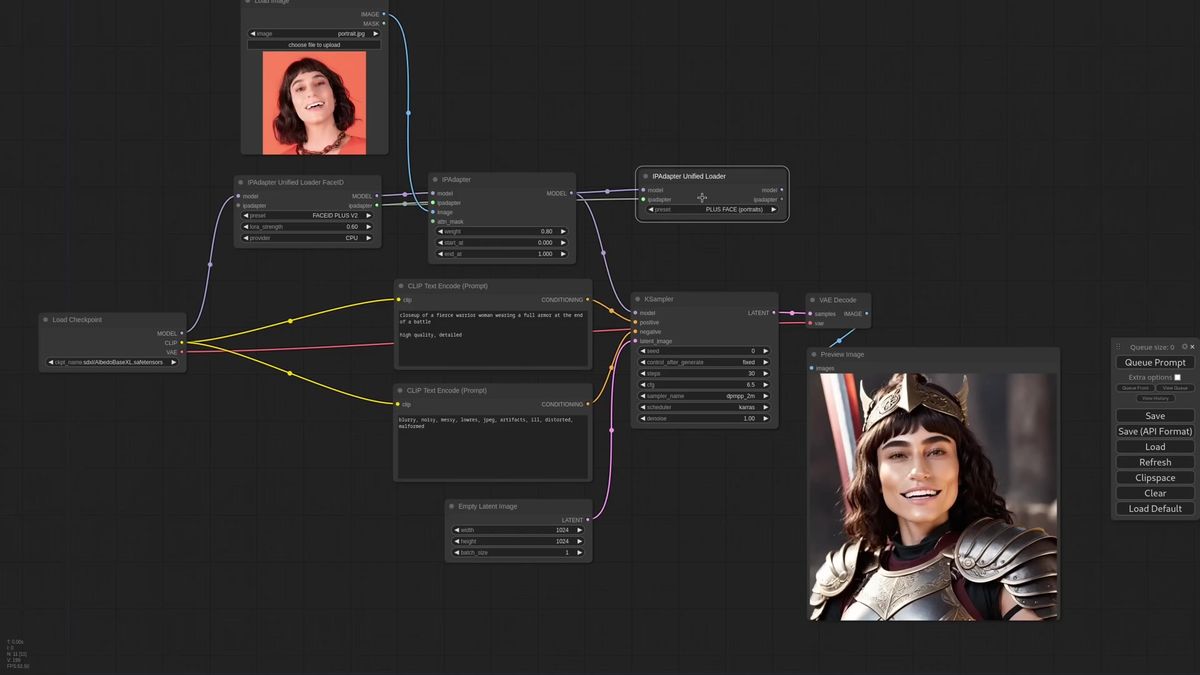
Swap the pipeline to a FaceID model, give it a face as the reference, generate. For a stronger likeness you stack a second IPAdapter, a Plus FaceID model wired in after the first so the two effects add up. Keep the second weight low, around 0.5, so it nudges the identity rather than fighting the first pass.
The reference image matters more here than anywhere else. The Plus FaceID model wants a tight face crop, framed close, not a full-body shot. Feed it a wide photo and the encoder sees mostly background and gets confused. We hit this in practice: identity pipelines live and die on the quality of the input crop, which is exactly the kind of preprocessing that is fine to do once by hand and a real chore to do for every user upload.
Weight types, noise, and multi-image control
The Advanced node exposes weight types and a separate noise node, and the embeds nodes let you blend several reference images with per-image weight instead of one flat reference.
Past the simple setup, the IPAdapter Advanced node is where the control lives. The weight type changes how the reference is applied across the model's blocks. A strong model like Plus can ignore a lower weight entirely, so your prompt additions never show up. Switch the weight type, say to a reverse in-out pattern, and the same weight suddenly lets prompt and reference share the frame. There are many weight types and the honest advice is to test them on your own images, because the right one depends on the model and the look.
Noise moved out of the main node into its own generator. Connect a preview to see what it produces, feed it as a negative image, and you get cleaner results. The trick the walkthrough shows: you can send any image as the negative noise. A comic-book frame as negative pushes output more realistic. A manga frame pushes it the other way.
For multiple references you have two paths. The quick one batches images and merges their embeds, with options to average or normalize them. The precise one drops the plain IPAdapter node for the embeds nodes: encode each image separately with an IPAdapter Encoder, then combine the embeds with a chosen method. That second path is the one that lets you weight one reference heavier than another, say 60 percent sci-fi and 40 percent fantasy. If you are building this into a product and want that control without wiring it yourself, the Runflow model catalog hosts reference-image models behind one request shape.
Tiled mode for tall and wide references
CLIP vision encodes square crops, so tall or wide references lose their edges, and the tiled IPAdapter node splits the image into tiles and applies each so the whole frame counts.
Here is the failure most people hit without knowing why. The CLIP vision encoder works on square images. Feed it a tall portrait and it sees the middle, crops off the top and bottom, and the reference you carefully chose is half ignored. Padding the sides with bars does not help much, the results go soft.
The fix is the IPAdapter Tiled node. It splits the reference into tiles, encodes each, and applies them so the full image contributes instead of just the center square. The node also exposes a tiles-and-masks output you can preview, so you see exactly which regions it pulled. It builds an attention mask over the whole frame automatically, and you can hand it a custom mask to focus the result, say on the subject in the center rather than the busy background.
This is the kind of detail that is obvious in a tutorial and silent in production. A user uploads a vertical phone photo, your square-cropping pipeline quietly throws away the top and bottom, and the output looks wrong with no error to explain it. The tiled node is the difference between a demo that works on your hand-picked references and a feature that works on whatever a real user sends.
Why local IPAdapter cracks under real traffic
A desktop ComfyUI install runs one graph at a time on one card, which is the right tool for building an IPAdapter workflow and the wrong tool to put behind a live feature.
Nothing above is a knock on ComfyUI. It is the best place to design and tune a reference-image workflow, full stop. The trouble starts when that graph becomes a button in software other people use.
Concurrency. ComfyUI runs one job at a time. Ten users uploading reference images at once means a queue nine deep, and the last person waits minutes for a generation that took seconds for you.
Uptime. A live feature needs an endpoint that answers when your laptop is asleep. Your app cannot depend on your machine being awake and your GPU being free at 3am.
Operations and cost. Keeping a high-end card warm for spiky traffic burns money, and the second you add a card you are running a GPU fleet, not shipping product. The AI and DevOps headcount to babysit that fleet is the line item most teams forget to price. Running this as a service is roughly 70 percent cheaper than building the same in-house, and it needs no AI team to keep it alive.
How to call a reference-image pipeline as an API
You POST your prompt and reference image to a model run endpoint, poll the run ID until it finishes, and never touch a GPU.
Runflow runs reference-image models as hosted endpoints you call over HTTP. Disclosure: Runflow is our product, but the ComfyUI workflow above works with or without us. The request shape is the same for every model: POST inputs, get a run ID, poll until done.
# Submit a reference-image run
curl -X POST https://api.runflow.io/v1/models/runflow/style-reference/runs \
  -H "Authorization: Bearer rf_live_your_key" \
  -H "Content-Type: application/json" \
  -d '{
    "input": {
      "prompt": "portrait of a woman, cinematic lighting, 1950s",
      "reference_image_url": "https://yourapp.com/uploads/style.jpg",
      "weight": 0.7
    }
  }'
You get back a run ID. Poll it until the status reads succeeded:
curl https://api.runflow.io/v1/runs/RUN_ID \
  -H "Authorization: Bearer rf_live_your_key"
Wrapped in a small loop, that is the whole integration:
import requests, time

BASE = "https://api.runflow.io/v1"
HEAD = {"Authorization": "Bearer rf_live_your_key"}
MODEL = "runflow/style-reference"

run = requests.post(
    f"{BASE}/models/{MODEL}/runs",
    headers=HEAD,
    json={"input": {
        "prompt": "portrait of a woman, cinematic lighting, 1950s",
        "reference_image_url": "https://yourapp.com/uploads/style.jpg",
        "weight": 0.7,
    }},
).json()

run_id = run["id"]
while True:
    r = requests.get(f"{BASE}/runs/{run_id}", headers=HEAD).json()
    if r["status"] in ("succeeded", "failed"):
        print(r)
        break
    time.sleep(2)
Concurrency, retries, and failover are handled for you, so the tenth user is not stuck behind nine others. Pricing is simple fixed per call, so cost stays predictable per generation instead of per GPU hour. The ComfyUI API developer guide is the pillar to read next for integration patterns, and 20 production-ready ComfyUI workflows shows more graphs worth running this way.
If your real IPAdapter graph is more than one node, an encode, a tiled pass, a FaceID stack, a face fix, you can run the whole thing instead of rebuilding it call by call. ComfyUI Deploy takes your exported workflow JSON and runs it as a hosted endpoint on a real GPU, so the graph you tuned locally ships as is.
Frequently asked questions
What is IPAdapter in ComfyUI?
IPAdapter is a ComfyUI node pack that copies the style or identity from a reference image into a new generation. It encodes the reference with a CLIP vision model and injects those features through the diffusion model's attention, so you steer output with a picture instead of a long text prompt.
Why did my old IPAdapter workflow break?
The v2 update is not backward compatible with workflows built on the old nodes. You have to rebuild graphs with the new nodes, starting from the unified loader. The pack author recommends not updating mid-project if you are on a deadline.
What is the unified loader in IPAdapter v2?
The unified loader is one node that reads your checkpoint and loads the right IPAdapter model, CLIP vision encoder, and any LoRA automatically. It replaces the old workflow where you picked every model file by hand and got cryptic errors on a mismatch.
How does IPAdapter FaceID work?
FaceID models use a dedicated loader that also pulls in a LoRA and the InsightFace model. Set the provider to CPU to save VRAM, feed a tight face crop as the reference, and stack a second Plus FaceID model at low weight when one pass does not hold the likeness.
How do I blend multiple reference images?
Batch the images and merge their embeds with an average or normalize method for a quick mix. For per-image control, encode each one with an IPAdapter Encoder and combine the embeds with a chosen method, which lets you weight one reference heavier than the other.
What are IPAdapter weight types?
Weight types change how the reference is applied across the model's blocks. A strong model can ignore a low flat weight, so switching to a pattern like reverse in-out lets your prompt and the reference share the frame. The right type depends on the model, so test a few on your own images.
Why does IPAdapter ignore the edges of a tall image?
CLIP vision encodes square crops, so a tall or wide reference loses its top and bottom. The IPAdapter Tiled node splits the image into tiles, encodes each, and applies them so the whole frame contributes instead of only the center square.
Is there an IPAdapter API?
You can call reference-image models over HTTP by posting your prompt and reference image to a run endpoint and polling for the result, with no local GPU. Runflow hosts reference-image models alongside the rest of its catalog with the same request shape.
Can I run a full IPAdapter workflow as an API, not just one model?
Yes. ComfyUI Deploy runs your exported workflow JSON as a hosted endpoint, so a multi-step graph with an encode, a tiled pass, and a FaceID stack ships without being rebuilt as separate API calls.
Do I need to train a model to copy a style or face?
No. That is the point of IPAdapter. It transfers style or identity from a single reference image at generation time, with no LoRA training or fine-tune. The FaceID variants are the ones tuned specifically for keeping a face consistent.
Where to go next
You have both halves now: the ComfyUI build for designing an IPAdapter workflow, and the API for shipping it. The workflow was never the slow part. The real question is whether your own card is still the thing answering when the tenth reference image lands at 3am.
- Update ComfyUI and rebuild the baseline graph from the v2 unified loader, starting with one reference image and Plus.
- Add a FaceID loader with the provider on CPU and a tight face crop to test identity transfer.
- Experiment with weight types on the Advanced node until prompt and reference share the frame the way you want.
- Switch to the embeds nodes when you need per-image weight across several references.
- Use the tiled node for tall or wide references so the whole image counts, edges included.
- When real traffic shows up, call a reference-image model through the Runflow model catalog so concurrency and failover are handled for you.
- For multi-step graphs, run the whole thing with ComfyUI Deploy and read the ComfyUI API developer guide for integration patterns.
Start free at runflow.io.
Want custom benchmarks for your workload?
We'll run our evaluation pipeline against your production data, for free.
Talk to Founders