ComfyUI attention masking with IPAdapter in 2026
ComfyUI attention masking pins each IPAdapter reference to a region of the image, so two styles share one frame. Build the workflow, then run it as an API.
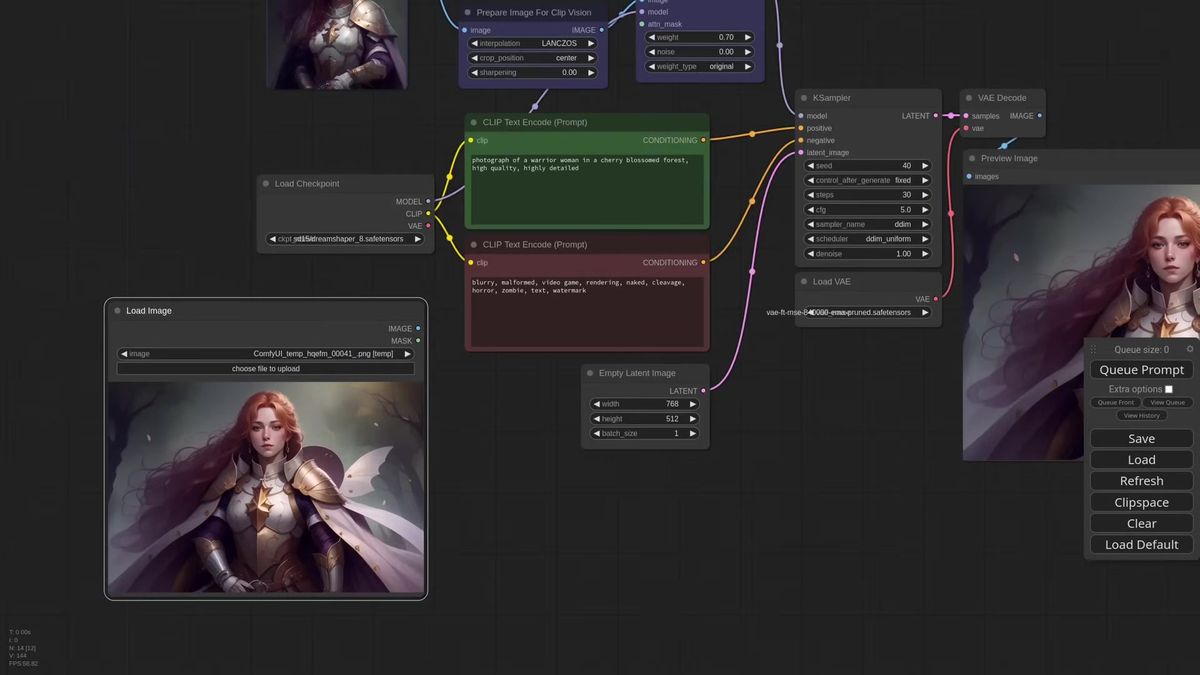
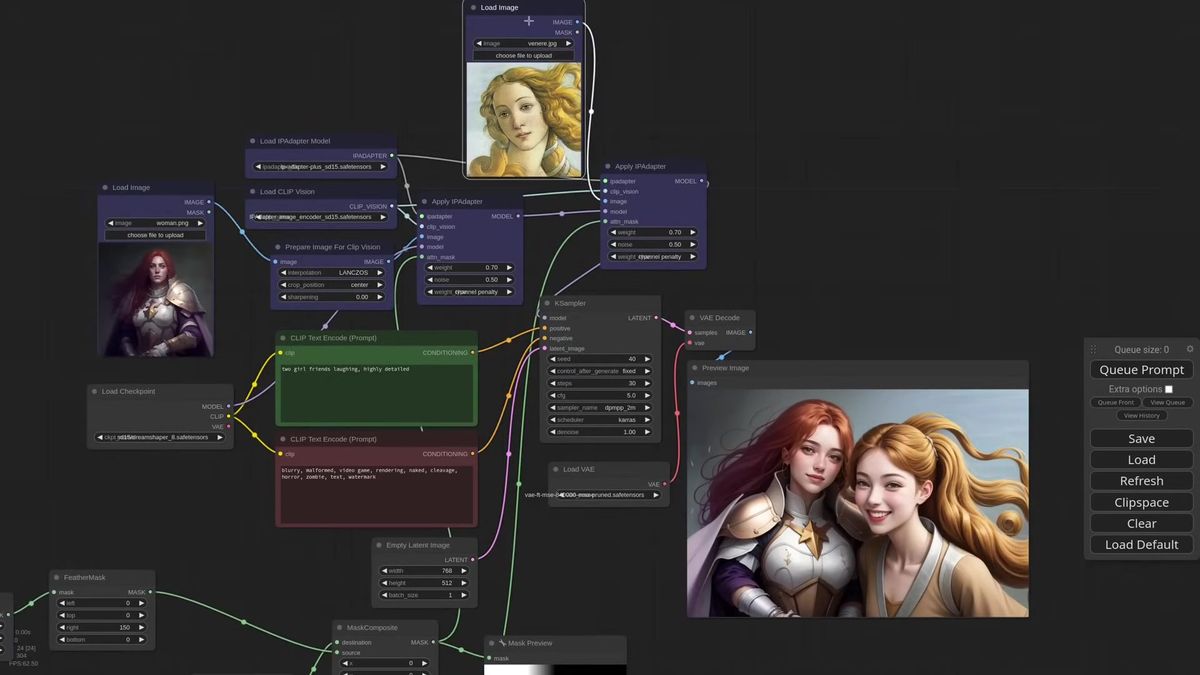
One reference image, and the character it carries floods the whole frame. Cloak in the corners, face smeared edge to edge, no room left for a background. That is what a strong IPAdapter does by default, and for a long time the only fix was a second sampler and an inpaint pass. ComfyUI attention masking ends that. You hand the IPAdapter a mask, and the reference only renders where the mask is white. Everything outside the mask comes from your text prompt and the checkpoint instead. One reference, scoped to one region, in a single pass.
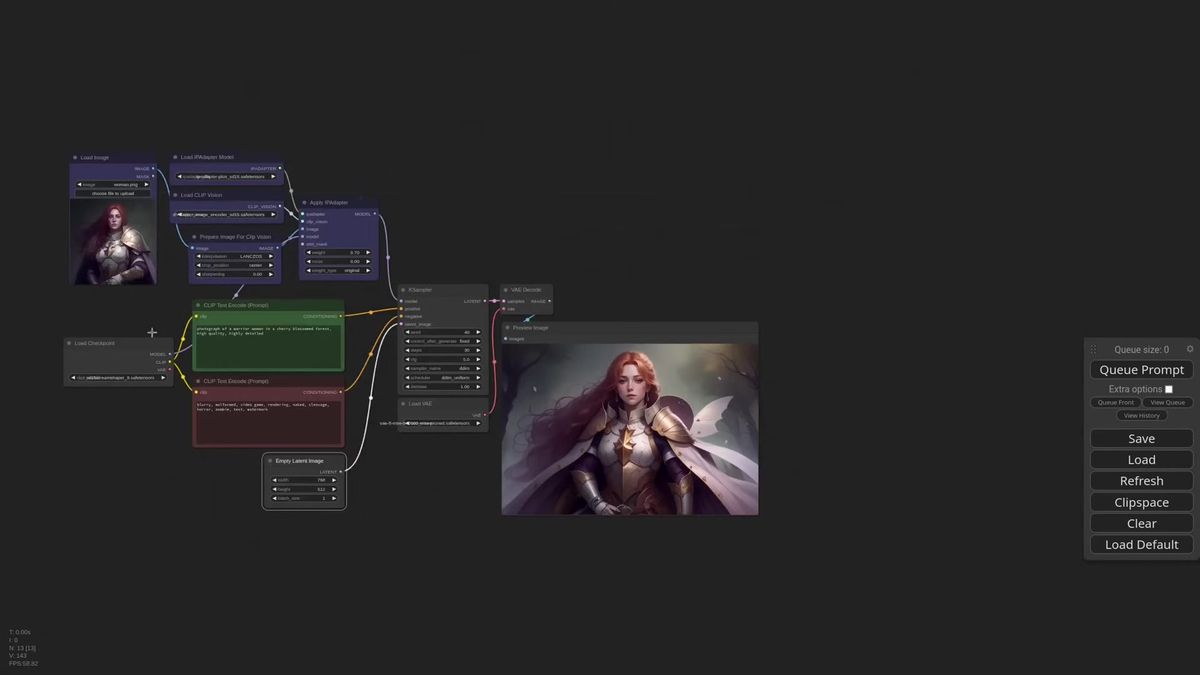
Matteo, the developer of the ComfyUI IPAdapter Plus extension, called this the most important update to IPAdapter since its introduction, and he is the person who would know. The walkthrough below is where he first showed it: a warrior-woman reference confined to the center of the frame, cherry blossoms filling the background the model invented on its own. The seam between the two is invisible. That is the whole pitch for masking at the attention level instead of the prompt level.
We run IPAdapter workflows in production, so the back half of this post is the part the tutorial leaves out: what attention masking costs you when the same graph has to serve a hundred users at once, and why the mask step is the thing that decides whether it holds up.
What attention masking actually does
Attention masking feeds a black-and-white mask into the IPAdapter's attn_mask input, so the reference image only influences the pixels under the white area, and the rest of the frame is generated from your text prompt and checkpoint.
This is the distinction that trips people up, so it is worth being precise. A normal IPAdapter pushes its reference across the entire image. A masked IPAdapter pushes it only where you say. The mask is a single-channel image, white means "apply the reference here," black means "leave this to the prompt." You wire that mask into the attn_mask slot on the Apply IPAdapter node, and the model does the rest in one pass.
Here is the part that feels like a trick. In Matteo's first example the prompt contains the word "photograph," so the masked-out background renders as a photo while the reference character stays an illustration. The model takes the background straight from the checkpoint and the prompt, and the foreground from the reference. Two different styles, one generation, no inpainting.
It is not surgically clean. There is always some bleed between elements, so the background is never a literal one-hundred-percent photograph and a little of the reference leaks out. But getting this result from a single KSampler pass, with no second sampler and no inpaint, is the thing that used to be hard.
Attention masking versus regional prompting
Attention masking scopes an image reference to a region, while regional prompting scopes a text prompt to a region. They operate on different inputs, and the strongest workflows stack them.
These two get confused constantly because both end with masks and both give you per-region control. The difference is what gets masked. With regional prompting you paint a different text prompt onto each masked area: "blond woman" on the left, "redhead in armor" on the right. With attention masking you paint a different image reference onto each area: this face here, that style there.
So one controls description, the other controls appearance. Regional prompting answers "what is in this region," attention masking answers "what does this region look like." If you want a specific person's face on the left and a specific painting's style on the right, prompts alone cannot get you there, because a prompt cannot encode a face. The image reference can, and the mask keeps it in its lane.
The reason to learn both is that they compose. Toward the end of his walkthrough Matteo masks two image references into a frame, then layers a conditioning set mask node on top to change just one of them with a text prompt. The reference sets the face, the regional prompt recolors the hair. We use exactly this stack in production: attention masking for identity and style, regional prompting for the local tweaks. If you are new to the underlying node, the ComfyUI IPAdapter guide covers how the Apply IPAdapter node works before you start masking it.
Building a single-subject mask
The fastest mask uses a Load Image node holding a copy of your reference at the final image size, opened in the mask editor, where you paint the region the reference should occupy.
You do not need Photoshop for this. Drop a Load Image node, paste your reference into it, and use it purely as a sizing reference so the mask matches the composition you already have in mind. Right-click, open the mask editor, and paint white over the area where the character should land. Center of the frame, left third, a corner, wherever the layout wants it.
Connect that mask to the Apply IPAdapter attn_mask input and generate. The reference now renders only inside the painted area. Bump the image width out to a wide canvas and the effect gets obvious: without a mask the character spreads to fill the whole frame, with a mask it stays put and the model fills the rest from the prompt.
One sizing rule saves you a debugging session. The mask should match the dimensions of the final image. The Apply IPAdapter node tries to rescale a mismatched mask, and for simple masks it usually works, but you are gambling on the resize being clean. Give it the right size and stop guessing.
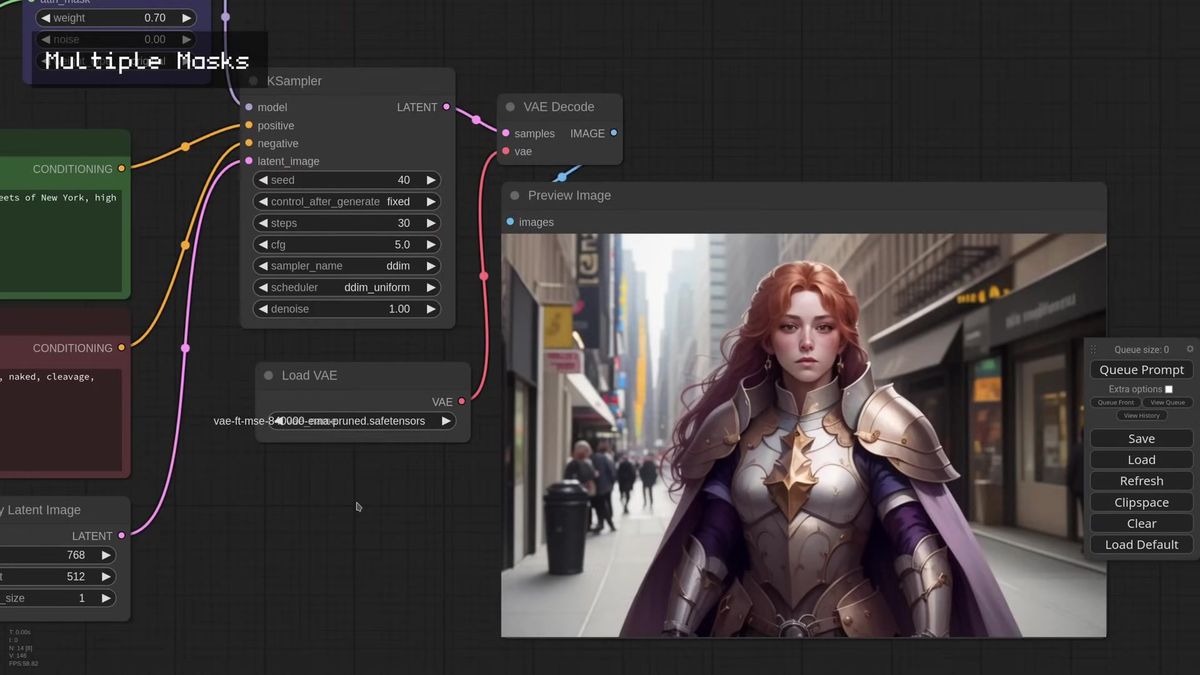
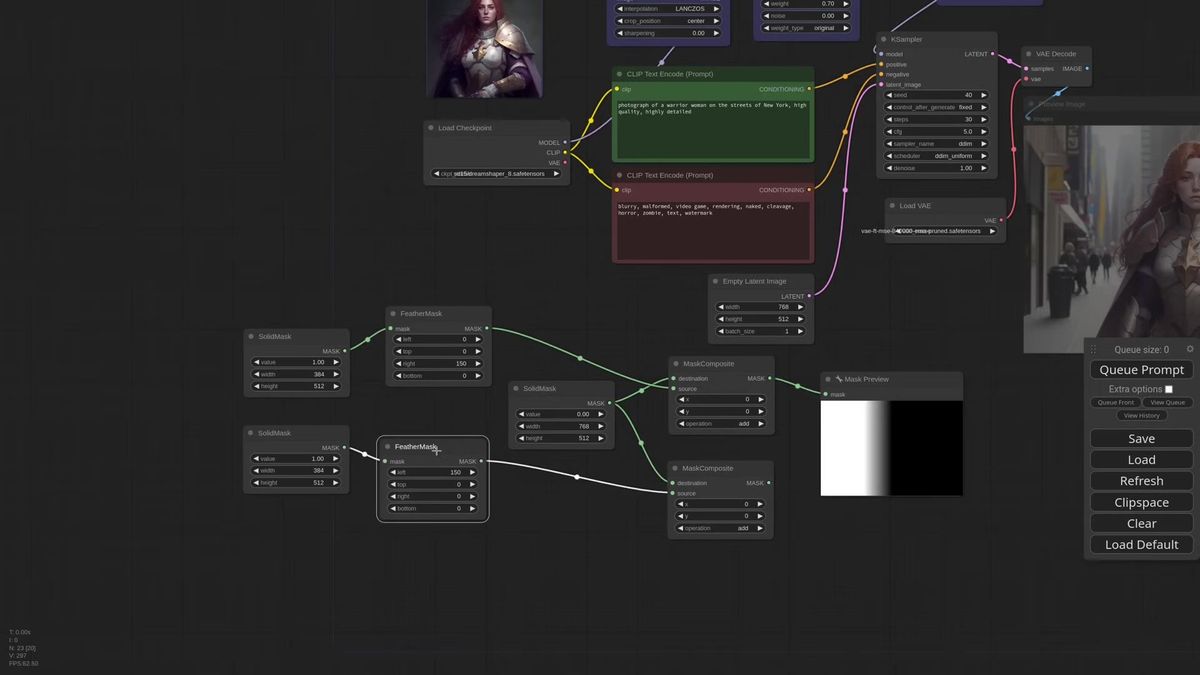
Swap the prompt and the masked-out background changes with it. Ask for a warrior woman on the streets of New York and the model fills everything outside the mask with a photoreal street while the reference character stays an illustration, the two joined without a visible seam.
Two subjects, two references, two masks
To place two different references in one frame, chain two Apply IPAdapter nodes, give each its own mask, and feather the inner edges so the two subjects blend instead of butting against a hard line.
This is where masking earns its keep. Copy the Apply IPAdapter node, connect the first into the second and the second into the KSampler, and point each at a different reference image. Now you need two masks, one for the left half, one for the right.
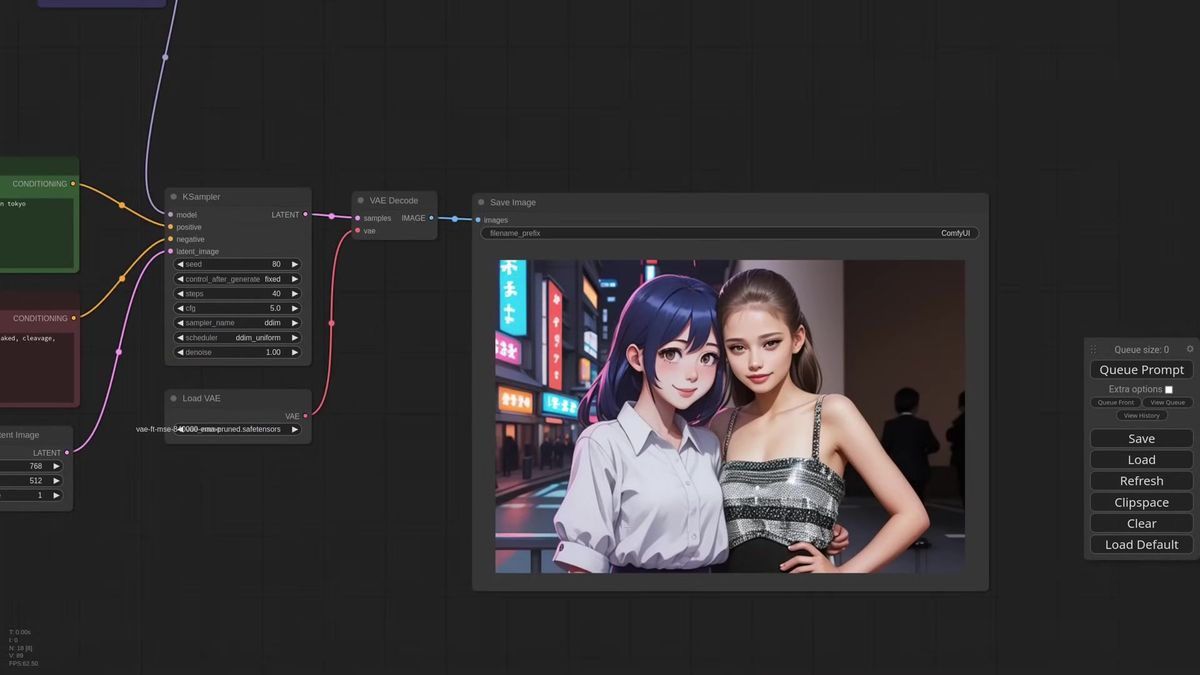
You can build them inside ComfyUI without leaving the graph. A Solid Mask node gives you a filled rectangle at half the canvas width, a Feather Mask softens its inner edge, and a Mask Composite node stamps it onto a full-size black mask at the right offset. Feathering the seam by something like 150 pixels is what makes the transition between the two subjects read as one photo instead of a split screen. Drop in a Preview Mask node while you build so you can see what you are composing.
Tell the model what it is looking at with a shared prompt, "two girlfriends laughing," and the two references resolve into one coherent frame with a clean join down the middle. The masks can come from Photoshop if you prefer, but building them in-graph means the whole thing stays reproducible and parameterized, which matters the moment you want to run it as an endpoint.
Color-coded masks for three or more references
For three or more regions, a single color-coded image acts as the mask source, and a Mask From Color node extracts one mask per color so each IPAdapter gets its own region from one file.
Hand-compositing masks gets tedious past two subjects. The shortcut is one flat image painted in solid colors, one color per region: blue for the left subject, red for the right, green for the background. Feed it into a node that pulls a single color out as a mask, do that once per color, and wire each extracted mask to its own Apply IPAdapter.
Now you have three references placed by one mask file. Left character from the blue region, right character from the red, and a scenic background, say an iceberg, from the green. Matteo's own description fits: at this point the compositing is close to cheating. You are assembling a scene from parts the way you would in a layout tool, except the model blends the seams for you.
This is the form that scales to busy compositions, and it is the form we reach for when a customer wants several fixed elements in a templated layout. One mask image, one prompt, predictable regions every time.
Weight types: a smaller knob worth knowing
The weight type setting on Apply IPAdapter picks how the reference weight is applied: original is strongest, linear gives the text prompt more room, and channel penalty is sharp with more detail.
Alongside masking, the same update added three weight-application algorithms, and they are worth a paragraph because they change the masking result. Original is the strong setting you already know, the reference dominates and the prompt nearly disappears at high weight. Linear pulls back, so the background and prompt elements come through more, which is often what you want once a mask is already containing the reference. Channel penalty lands close to original in strength but tends to render sharper with more detail.
There is no single right answer here. Matteo himself calls them experimental and expects them to shift. The practical move is to keep them on copies of the same node and compare side by side, because the difference shows up most clearly on a tricky prompt. Try forcing "green hair" across all three and watch linear apply it fully while the others hedge.
Running attention masking as an API
A masked IPAdapter graph runs as a hosted endpoint by deploying the full workflow, masks and all, to a GPU runner you call with one request, which moves the capacity off your machine so the workflow holds up under concurrent load.
Here is what the tutorials skip, and what we learned the expensive way. A masking graph is heavier than it looks. You are loading a checkpoint, a CLIP Vision encoder, an IPAdapter model, and running two or three IPAdapter passes plus mask compositing, all in one generation. On your own card, fine. With ten people hitting it at once, every request queues behind the last one, and a single 4090 turns a four-second generation into a forty-second wait. We have run that math, and it does not end well for one machine.
Moving it behind an API fixes the queue, not the workflow. The graph stays identical, the masks stay identical, you just call it instead of clicking Queue Prompt. The pattern is a POST to start a run and a GET to poll for the result.
# Start a run against a deployed ComfyUI workflow
curl -X POST https://api.runflow.io/v1/models/{owner}/{slug}/runs \
  -H "Authorization: Bearer $RUNFLOW_API_KEY" \
  -H "Content-Type: application/json" \
  -d '{
    "input": {
      "prompt": "two girlfriends laughing, highly detailed",
      "reference_left": "https://example.com/anime.png",
      "reference_right": "https://example.com/photo.png",
      "mask": "https://example.com/two-region-mask.png"
    }
  }'

# Poll for the result
curl https://api.runflow.io/v1/runs/{id} \
  -H "Authorization: Bearer $RUNFLOW_API_KEY"
The reason this matters once it stops being a hobby is cost. Standing up your own GPU fleet means renting cards, writing the queue, handling cold starts, and keeping it all alive. Running the same graph on a managed runner is roughly 70 percent cheaper than building that in-house, with no AI team to hire and simple fixed pricing per call. For the full deployment shape, the ComfyUI API developer guide walks through wiring a custom graph to an endpoint end to end.
How does attention masking compare to other regional methods
| Method | What it masks | Best for | Where it lives |
|---|---|---|---|
| Attention masking | An image reference | Placing a specific face or style in a region | IPAdapter attn_mask input |
| Regional prompting | A text prompt | Describing different subjects per region | conditioning set mask + regional sampler |
| Inpainting | A region to regenerate | Fixing or replacing part of a finished image | A second sampler pass |
| ControlNet | Pose or structure | Constraining layout and composition | A separate ControlNet node |
Attention masking and regional prompting are the two that compose cleanly into one pass. Inpainting and ControlNet stack on top when you need them, and Matteo notes you can add OpenPose or a style ControlNet to guide the composition even further. The possibilities run deep once the masks are in place.
Frequently asked questions
What is attention masking in ComfyUI?
Attention masking feeds a black-and-white mask into the IPAdapter's attn_mask input so the reference image only influences the masked region. Everything outside the white area is generated from the text prompt and the checkpoint, which lets one image reference occupy a specific part of the frame instead of the whole thing.
How is attention masking different from regional prompting?
Attention masking scopes an image reference to a region, while regional prompting scopes a text prompt to a region. One controls appearance, the other controls description. They work on different inputs and stack together in a single workflow, with masking setting identity and style and regional prompts handling local tweaks.
Where do I connect the mask in the IPAdapter node?
Wire your mask into the attn_mask input on the Apply IPAdapter node. White marks where the reference applies and black marks where the prompt and checkpoint take over. Match the mask dimensions to the final image so the node does not have to rescale it.
Can I use two different image references in one image?
Yes. Chain two Apply IPAdapter nodes, give each its own mask, and feather the inner edges so the two subjects blend. The shared prompt ties the scene together, and the model resolves both references into one frame with a clean join.
How do I make masks without Photoshop?
Build them inside ComfyUI. A Load Image node plus the mask editor handles single regions, Solid Mask and Feather Mask and Mask Composite nodes handle two, and a color-coded image with a per-color mask extractor handles three or more. Keeping masks in-graph also makes the workflow reproducible as an API.
What does the weight type setting change?
Weight type picks how the IPAdapter weight is applied. Original is the strongest, linear gives the text prompt more room, and channel penalty is close to original in strength but renders sharper with more detail. They are experimental, so compare them side by side on the same reference.
Does the mask size have to match the output?
It should. The Apply IPAdapter node tries to rescale a mismatched mask and usually succeeds on simple masks, but matching the mask to the final image dimensions removes the guesswork and avoids soft or misplaced edges.
Why do my two references clash in style?
Attention masking generates everything from one checkpoint, so a checkpoint that cannot render both styles will fight you. If your references span very different styles, pick a checkpoint capable of handling all of them, or the merge looks forced no matter how clean the masks are.
Can I run an attention masking workflow as an API?
Yes. Deploy the full ComfyUI graph, IPAdapter nodes and masks included, to a hosted GPU runner and call it with a single request. That moves the capacity off your machine so the workflow stays fast when many users generate at once instead of queueing behind one card.
Where to go next
- Start with one reference and one mask: paint a center region in the mask editor, wire it to the IPAdapter
attn_mask, and confirm the reference stays inside the white area. - Match the mask dimensions to your final image so the node never has to rescale, then widen the canvas to see masking contain the reference.
- Add a second reference and a second Apply IPAdapter, build the two masks in-graph with Solid, Feather, and Mask Composite nodes, and feather the seam so the subjects blend.
- Move to a color-coded mask image once you need three or more regions, extracting one mask per color into its own IPAdapter.
- Stack regional prompting on top to recolor or re-describe a single masked subject, and lean on the ComfyUI IPAdapter guide and ComfyUI style transfer walkthroughs for the reference-and-style basics.
- When one GPU starts queueing, read the ComfyUI API developer guide to move the graph behind an endpoint, and browse the Runflow API to see which solutions you can call without deploying anything.
Start free at runflow.io.
Want custom benchmarks for your workload?
We'll run our evaluation pipeline against your production data, for free.
Talk to Founders