ComfyUI style transfer with IPAdapter: the 2026 guide
ComfyUI style transfer copies the look of a reference image onto any new subject. Build the IPAdapter workflow, then run it as a hosted style endpoint.
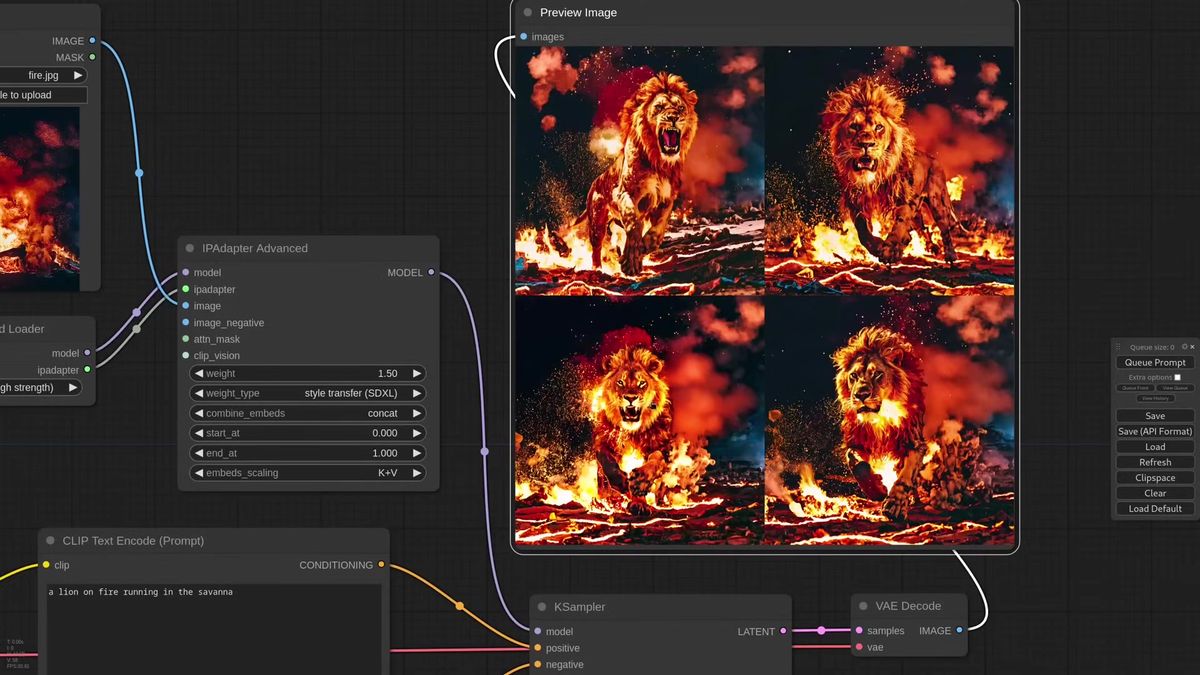
One reference image. One line of prompt. A lion on fire painted in the exact look of an abstract canvas you fed it five seconds earlier. That's ComfyUI style transfer with IPAdapter, and it lands the result without a single LoRA, without training, and without you describing the style in words at all. You hand the model a picture, say "lion running in the savanah," and it borrows the brushwork.
We found out the hard way that the trick is the weight slider, not the node. A 0.1 change flips a usable image into mush. Style transfer is the kind of feature that looks like magic in a demo and turns into a tuning grind the moment you want it to be repeatable across a hundred different inputs (we've watched that grind eat an afternoon).
So this guide does two things. First it walks through how ComfyUI style transfer and composition transfer actually work, node by node, the way the Latent Vision walkthrough lays it out. Then it shows the production path: running that same behavior as a hosted endpoint when the demo becomes a feature real users hit.
What style transfer means in ComfyUI
Style transfer copies the overall look and feel of a reference image onto a new subject, without dragging the reference's actual content along with it.
The old way to get a "make it look like this" result was a LoRA you trained for hours or a heavy prompt full of adjectives. IPAdapter skips both. You point it at one image, and it reads the colors, texture, lighting, and mood straight from the pixels, then applies that signature to whatever you prompt for.
The distinction that matters: style is the paint, composition is the layout. A reference photo carries both. Plain IPAdapter pulls in everything at once, which is why feeding it an abstract painting and asking for a lion gives you a vaguely feline blob with two tails. Style transfer isolates the paint and leaves the subject to your prompt. Composition transfer does the reverse. The IPAdapter update covered in the walkthrough exposes both as weight types you pick from a dropdown, plus a combined node that does both at once.
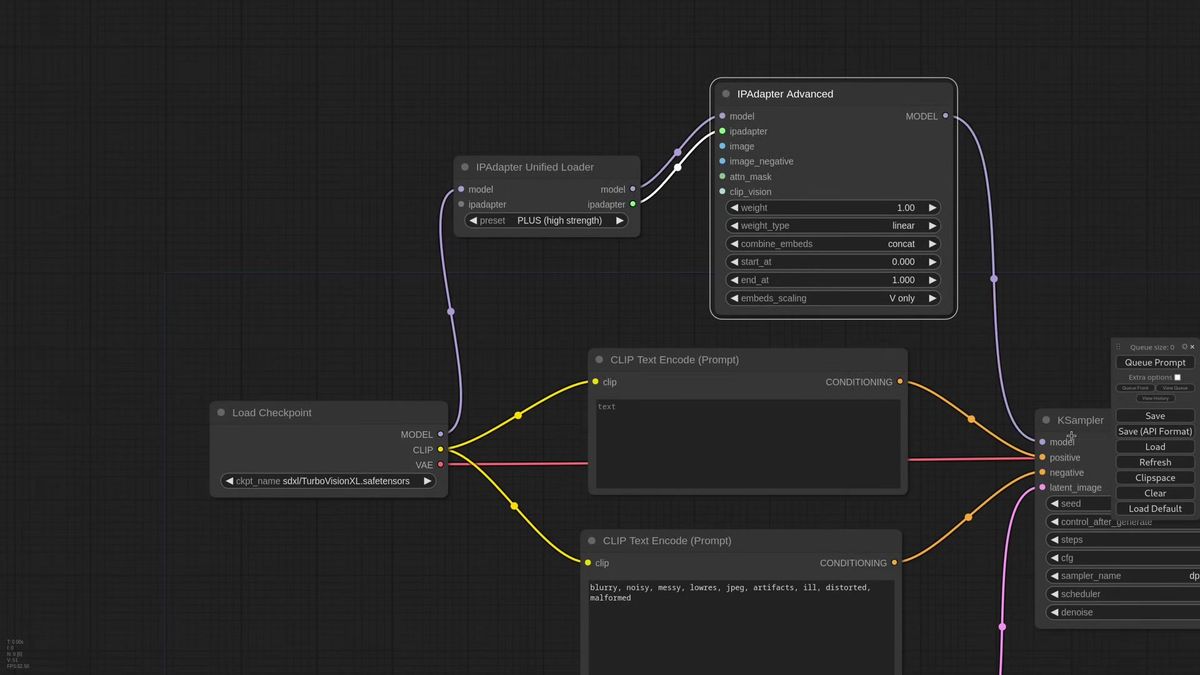
How to set up the IPAdapter style transfer workflow
You load an SDXL checkpoint, add a Unified Loader and an IPAdapter Advanced node, feed in your reference image, and switch the weight type to style transfer.
The base is a standard SDXL graph. The walkthrough uses Turbo Vision, an SDXL checkpoint, because the few-step sampling makes the weight-tuning loop fast. Any SDXL model works.
The IPAdapter side is three connections. Add an IPAdapter Unified Loader and pick a Plus model. Add an IPAdapter Advanced node and wire the model pipeline through it. Connect your reference image to the node. That's the whole rig: model in, model out, reference image in.
With the weight type left on its default, IPAdapter behaves like a full image clone and your prompt fights the reference for control. Open the weight-type dropdown and choose style transfer. Now the node reads only the look of the reference and hands the subject back to your prompt. The same option lives on the simpler IPAdapter node too, so the Advanced node is optional if the extra inputs intimidate you.
How to dial in style strength
The weight and the embed scaling are the two knobs that decide whether the style barely registers or completely takes over, and they are sensitive enough that 0.1 matters.
Drop a style transfer node in at default weight and the result usually lands soft. The reference look is present but faint. Bump the weight up and the style asserts itself: stronger color, more obvious texture, fewer stray artifacts. In the walkthrough, raising the weight is what cleaned up an extra pair of tails on a generated lion.
Embed scaling is the second lever. Switching the scaling mode alongside a higher weight is what took a flat result and gave it real character. The two interact, so you tune them together rather than maxing one.
Here's the honest part: this is fiddly. A 0.1 weight change has an outsized effect on the final image, so you generate, nudge, regenerate. For one hero image that's fun. For a product that needs the same recipe to hold across a thousand different reference images and prompts, that sensitivity is the thing you have to design around, because a setting tuned on one input can break on the next.
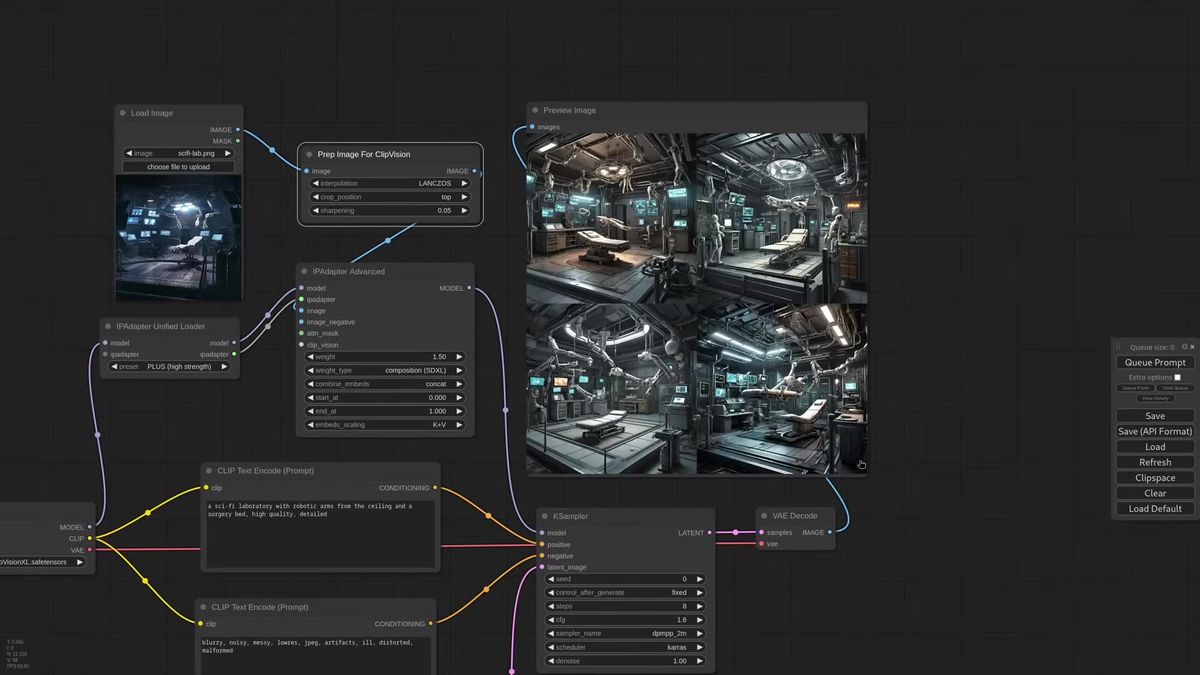
How composition transfer works and when to use it
Composition transfer pulls the spatial layout of a reference, where the major elements sit, while letting your prompt and the checkpoint repaint the actual style.
Flip the weight type to composition and the behavior inverts. Now the reference donates structure rather than paint. The walkthrough generates a sci-fi laboratory with robotic arms and a surgery bed, then feeds that image back as a composition reference. The next generation keeps the bed, the arms, the side screens, and the floor step, but happily relocates the whole scene into a messy old barn or a steampunk lab when the prompt asks.
For a complex reference, add a Prep Image for ClipVision node before the IPAdapter and turn up sharpness so the structure reads cleanly.
Why reach for this instead of a ControlNet? A ControlNet pins the model hard to the reference geometry, and when the prompt and the constraint disagree the model sometimes freezes, unsure what to do. Composition transfer is looser. The major features come through, but the checkpoint stays free to interpret the subject, so its own character leads. You get the layout as a strong suggestion rather than a cage. That freedom is exactly what you want when the goal is "same kind of scene, different world."
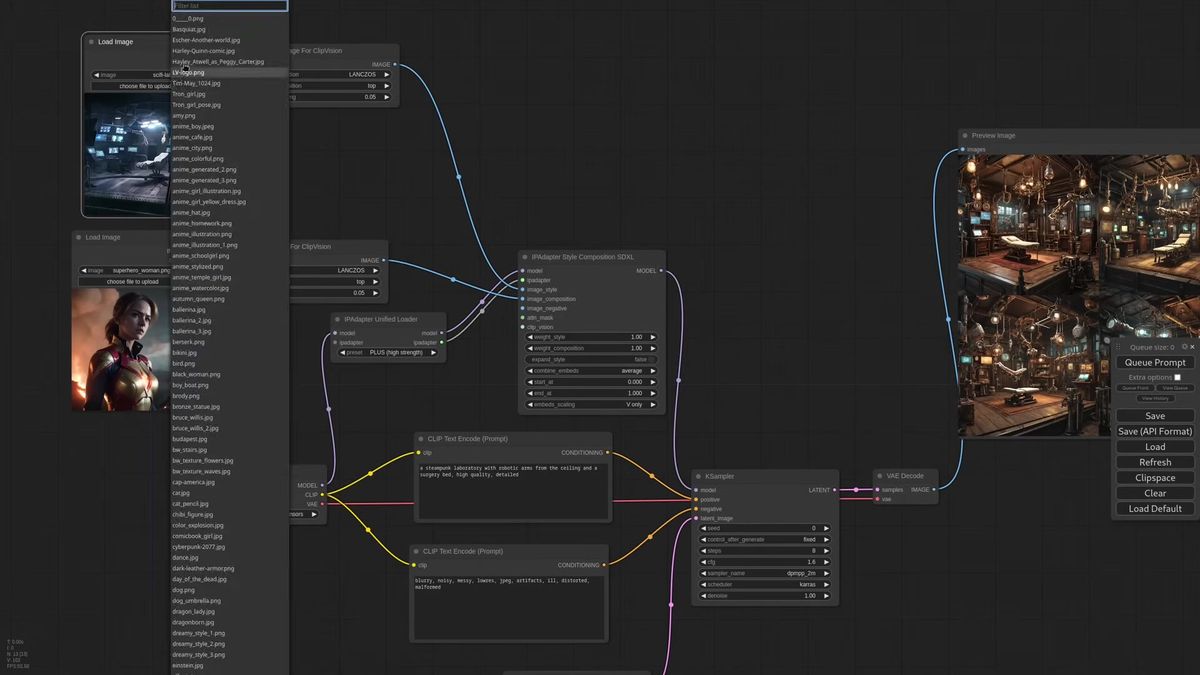
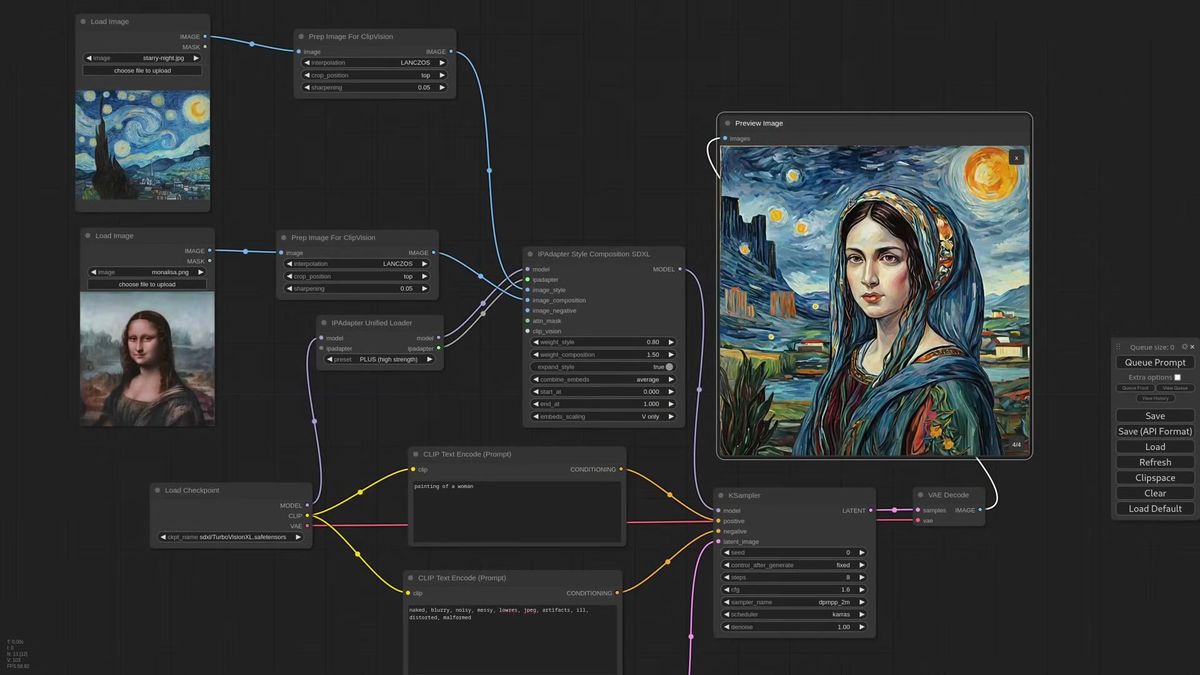
The combined style and composition node
A single IPAdapter Style and Composition node takes a style image and a composition image on separate inputs and blends both with independent weights, instead of chaining two IPAdapters.
The obvious move once you understand both modes is to chain them: one IPAdapter for style, one for composition. That works. It also clones the model pipeline twice and wastes compute. The walkthrough bakes the two into one node built for the job.
Zoom in and you see two inputs, image style and image composition, each with its own weight. Feed an abstract painting as the style and a generated scene as the composition, set the style weight near 1.5 and composition near 1.1, prompt "painting of a woman," and you get the layout of one image wearing the paint of the other from a single node with no extra model loaded.
One option worth knowing: expand style. With it on, the style image is sent to every SDXL layer except the composition layer, which pushes the look much harder. The walkthrough uses the same image as both style and composition reference, lowers style weight to 0.8, raises composition to 1.5, turns on expand style, and lands a Van Gogh treatment strong enough that the brush strokes show up under a zoom. Add "monet" to the prompt and crank composition to 2.0 and you've blended two painters into one frame. The control you have over both axes from a single node is what makes this the piece that was missing from IPAdapter.
Why local style transfer breaks under real traffic
A desktop ComfyUI install runs one graph at a time on your card, which is perfect for tuning and falls over the moment a real app sends concurrent requests.
Three things change when this stops being a hobby and becomes a feature in software.
Concurrency. ComfyUI processes one job at a time. Ten users uploading reference images at once means a queue nine deep, and the run that took six seconds for you becomes a minute-long wait for the last person in line.
Uptime. A live style endpoint has to answer at 3am whether or not your machine is awake and your GPU is free. Your app cannot depend on your desk.
The tuning problem multiplies. Remember that a 0.1 weight change reshapes the output. In a workflow you babysit, you eyeball each result and nudge. In an API your users drive, you cannot eyeball anything. You need defaults that hold across wildly different references, retries when a generation lands wrong, and someone watching the GPU fleet. That last line, the AI and DevOps headcount, is the cost most teams forget to price in.
None of this is a knock on ComfyUI. It is the right place to design and tune a style transfer recipe. It is the wrong thing to be the live backend other people's software depends on.
How to run style transfer as a production API
You POST your prompt and reference image to a model's run endpoint, poll the run ID until it finishes, and never touch a GPU.
Runflow runs SDXL, the Flux family, Qwen, WAN, and the rest as hosted models you call over HTTP. Disclosure: Runflow is our product, but the ComfyUI method above works with or without us. The shape is the same for every model: POST inputs, get a run ID, poll until done.
# Submit a style transfer run
curl -X POST https://api.runflow.io/v1/models/stability-ai/sdxl/runs \
  -H "Authorization: Bearer rf_live_your_key" \
  -H "Content-Type: application/json" \
  -d '{
    "input": {
      "prompt": "a lion running in the savanah",
      "style_image_url": "https://yourapp.com/uploads/abstract-painting.jpg"
    }
  }'
You get back a run ID. Poll it until the status reads finished:
curl https://api.runflow.io/v1/runs/RUN_ID \
  -H "Authorization: Bearer rf_live_your_key"
Wrapped in a small loop, that is the whole integration:
import requests, time

BASE = "https://api.runflow.io/v1"
HEAD = {"Authorization": "Bearer rf_live_your_key"}
MODEL = "stability-ai/sdxl"

run = requests.post(
    f"{BASE}/models/{MODEL}/runs",
    headers=HEAD,
    json={"input": {
        "prompt": "a lion running in the savanah",
        "style_image_url": "https://yourapp.com/uploads/abstract-painting.jpg",
    }},
).json()

run_id = run["id"]
while True:
    r = requests.get(f"{BASE}/runs/{run_id}", headers=HEAD).json()
    if r["status"] in ("succeeded", "failed"):
        print(r)
        break
    time.sleep(2)
Concurrency, retries, and failover are handled for you, so the tenth user is not waiting behind nine others. Pricing is simple fixed per call, which keeps cost predictable per image instead of per GPU hour, and running it this way comes in around 70% cheaper than standing up the same GPU fleet in-house with no AI team required. If "edit this picture by typing a sentence" is closer to what you want than full style transfer, Runflow's prompt-based image editing solution packages that behavior behind one endpoint. Style models sit alongside the rest of the Runflow model catalog, and the same request shape works against any of them by swapping the slug.
If your real workflow is more than one node (a style transfer, then an upscale, then a face fix), you can deploy the entire ComfyUI graph instead of rebuilding it. ComfyUI Deploy takes your exported workflow JSON and runs it as a hosted endpoint on a real GPU, so the IPAdapter recipe you tuned locally ships as-is. For the wider integration picture, the ComfyUI API developer guide is the pillar to read next, and the ComfyUI Flux Kontext editing guide covers the same jump for instruction-based editing.
Frequently asked questions
What is style transfer in ComfyUI?
Style transfer is an IPAdapter weight type that copies the look and feel of a reference image, its colors, texture, and lighting, onto a new subject defined by your prompt. It reads the style straight from the reference pixels, so you skip training a LoRA or describing the style in words.
How do I do style transfer with IPAdapter?
Load an SDXL checkpoint, add an IPAdapter Unified Loader with a Plus model and an IPAdapter Advanced node, wire the model pipeline through it, connect your reference image, and set the weight type dropdown to style transfer. Then tune the weight and embed scaling until the look is right.
What's the difference between style transfer and composition transfer?
Style transfer copies the paint, the colors, texture, and mood, while leaving the subject to your prompt. Composition transfer copies the layout, where the major elements sit, while letting the prompt and checkpoint repaint the style. One borrows the look, the other borrows the structure.
Why does plain IPAdapter give bad results for style transfer?
Plain IPAdapter pulls in both the style and the content of the reference at once. Ask it for a lion in the style of an abstract painting and it mixes the painting's subject into your lion. The style transfer weight type isolates the look so your prompt controls the subject.
How sensitive is the IPAdapter weight?
Very. A 0.1 change in the weight can move a result from clean to unusable. Tune weight and embed scaling together, generate, and nudge. This sensitivity is the main reason a recipe tuned on one reference image can break on the next.
Can I transfer style and composition at the same time?
Yes. The IPAdapter Style and Composition node takes a style image and a composition image on separate inputs, each with its own weight, and blends both from a single node with no extra model loaded, instead of chaining two IPAdapters and cloning the pipeline twice.
What does the expand style option do?
Expand style sends the style image to every SDXL layer except the composition layer, which pushes the look much harder. Pair it with a lower style weight and a higher composition weight to get a strong painterly treatment while holding the layout from the composition reference.
When should I use composition transfer instead of a ControlNet?
Use composition transfer when you want the layout as a strong suggestion rather than a strict cage. A ControlNet pins the model hard to the reference geometry and can freeze when the prompt and constraint disagree. Composition transfer keeps the major features but lets the checkpoint interpret the subject freely.
Is there an API for style transfer?
Yes. You can call style transfer over HTTP by posting your prompt and reference image to a model run endpoint and polling for the result, with no local GPU. Runflow hosts SDXL and the rest of the catalog this way with simple fixed per-call pricing.
Can I run a full ComfyUI style workflow as an API, not just one model?
Yes. ComfyUI Deploy runs your exported workflow JSON as a hosted endpoint, so a multi-step graph with style transfer, an upscale, and a face fix ships without being rebuilt as separate API calls.
Where to go next
You've got both halves now: the ComfyUI build for designing a style transfer recipe, and the API for shipping it. The tuning was never the hard part. The real question is whether your own GPU is still the thing answering at 3am, eyeballing a 0.1 weight change, when the tenth user shows up.
- Build the basic IPAdapter graph in ComfyUI and set the weight type to style transfer with a single reference image.
- Tune weight and embed scaling together until the look holds, then save the recipe.
- Try composition transfer on a generated scene to feel the difference between borrowing paint and borrowing layout.
- Combine both with the IPAdapter Style and Composition node and test the expand style option.
- When real traffic shows up, call a style model through the Runflow model catalog so concurrency and failover are handled for you.
- For multi-step graphs, deploy the whole workflow with ComfyUI Deploy.
- Read the ComfyUI API developer guide for integration patterns at scale.
Start free at runflow.io.
Want custom benchmarks for your workload?
We'll run our evaluation pipeline against your production data, for free.
Talk to Founders