ComfyUI Flux Kontext: inpainting and editing in 2026
ComfyUI Flux Kontext handles prompt-based editing, inpainting, and character consistency. Build the workflow locally, then run it as an API in production.
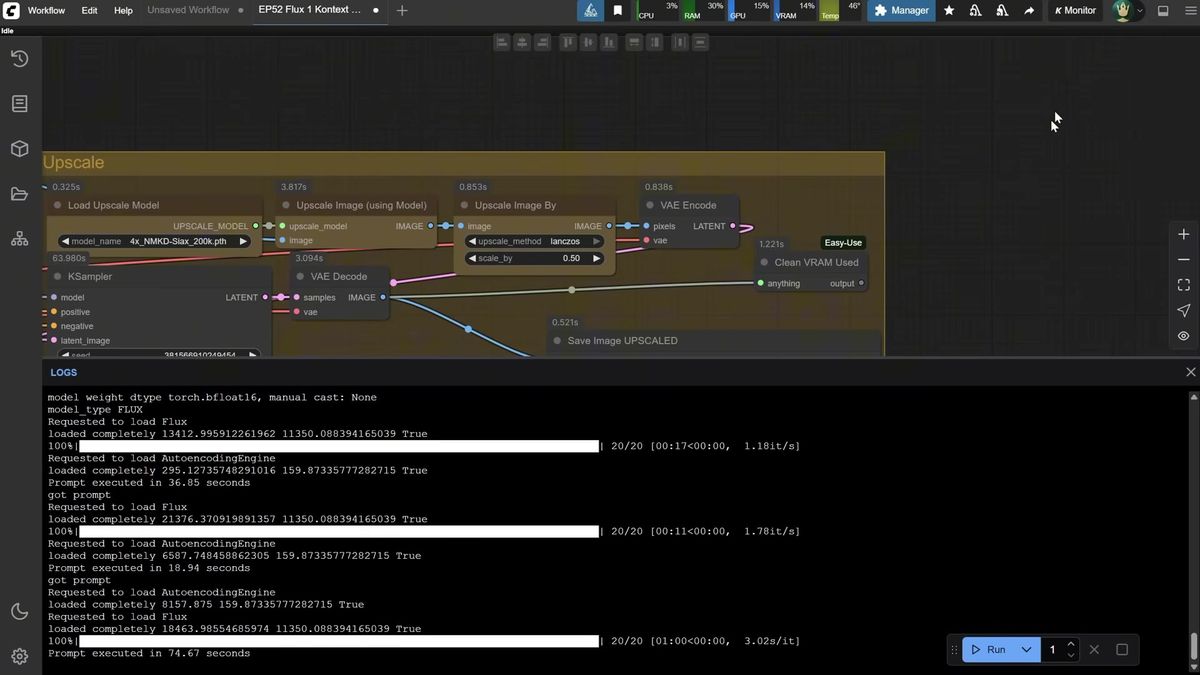
36 seconds for one image. On a 4090. With nobody else in the queue. That's ComfyUI Flux Kontext running on your own card, and it's the closest the open-weight world has come to editing a photo by typing a sentence. You load an image, write "change the eyes to red" or "replace the background with a winter landscape," and it regenerates the picture with that one change applied while holding the rest steady.
We learned where that breaks the expensive way. Flux Kontext is a Flux-family diffusion model, so the weights run to gigabytes and the VRAM bill punishes anything short of a high-end GPU. Brilliant on your desk. A problem the second a hundred users hit the same workflow at once (we've run that math, and it doesn't end well for one machine).
So this guide does two things. First it walks through how ComfyUI Flux Kontext editing and inpainting actually work, node by node, the way the pixaroma walkthrough lays it out. Then it shows the production path: calling Flux Kontext as an API so the workflow keeps up when your own GPU can't.
What is Flux Kontext and what is it good at
Flux Kontext is Black Forest Labs' instruction-driven image model that edits an existing picture from a text prompt instead of generating one from scratch.
It takes a reference image plus an instruction and returns a new image where the requested change is applied and everything else stays close to the original. It is the open-weight answer to the editing people first saw in ChatGPT's image tool.
Where it shines: changing eye or hair color, swapping a season, turning a portrait into watercolor or line art, replacing a background while keeping the subject in pose, and dropping a product into a new scene. The walkthrough shows a bunny getting red vampire eyes and a building moved to a purple winter sunset, each from a one-line prompt.
Where it struggles: it regenerates the whole image every time, so even a tiny edit shifts the background or framing a little. Text on small product labels can get squashed, and some art styles it does not know yet.
How to set up Flux Kontext in ComfyUI
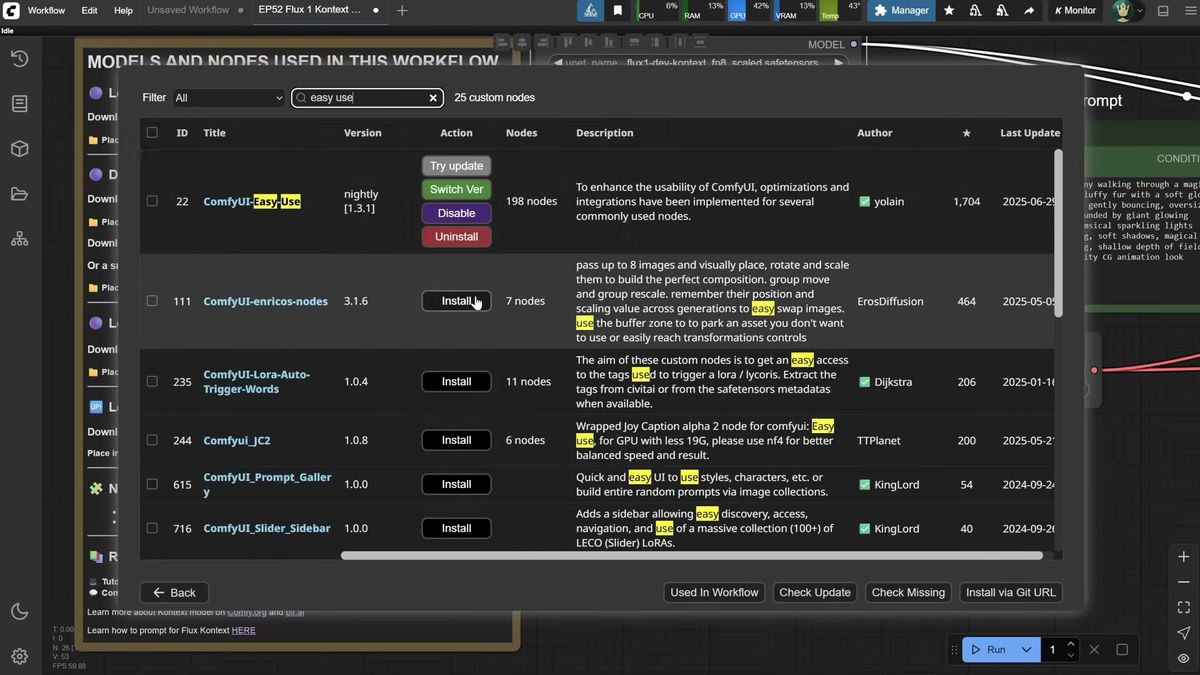
You update ComfyUI for the new Kontext nodes, then load the Flux Kontext diffusion model with the same dual CLIP and VAE you already use for regular Flux.
Run the update_comfyui.bat file in your update folder so the Kontext nodes are available, then restart. The graph looks almost identical to a standard Flux setup: swap the Load Diffusion Model node to point at the Flux Kontext checkpoint instead of plain Flux Dev. The Dual CLIP Loader and Flux VAE stay the same, so there is nothing new to download.
A few settings matter for Kontext: Flux guidance around 2.5 (lower than Flux's usual 3.5), CFG at 1 with a ConditioningZeroOut node standing in for the unsupported negative prompt, and around 20 steps.
If your card is short on VRAM, the GGUF route swaps in Unet Loader (GGUF) and the GGUF Dual CLIP Loader. Smaller Q-numbers shrink the model to fit weaker cards at the cost of prompt accuracy. That tradeoff is the whole story of running this model locally.
How Flux Kontext editing works node by node
Editing adds a Load Image node and a Reference Latent node so the encoded source image guides the new generation, plus a tidy prompt that names one change at a time.
The editing graph differs in two places. A Flux Kontext Image Scale node resizes your input before encoding, and a Reference Latent node feeds it in as the reference the sampler edits against.
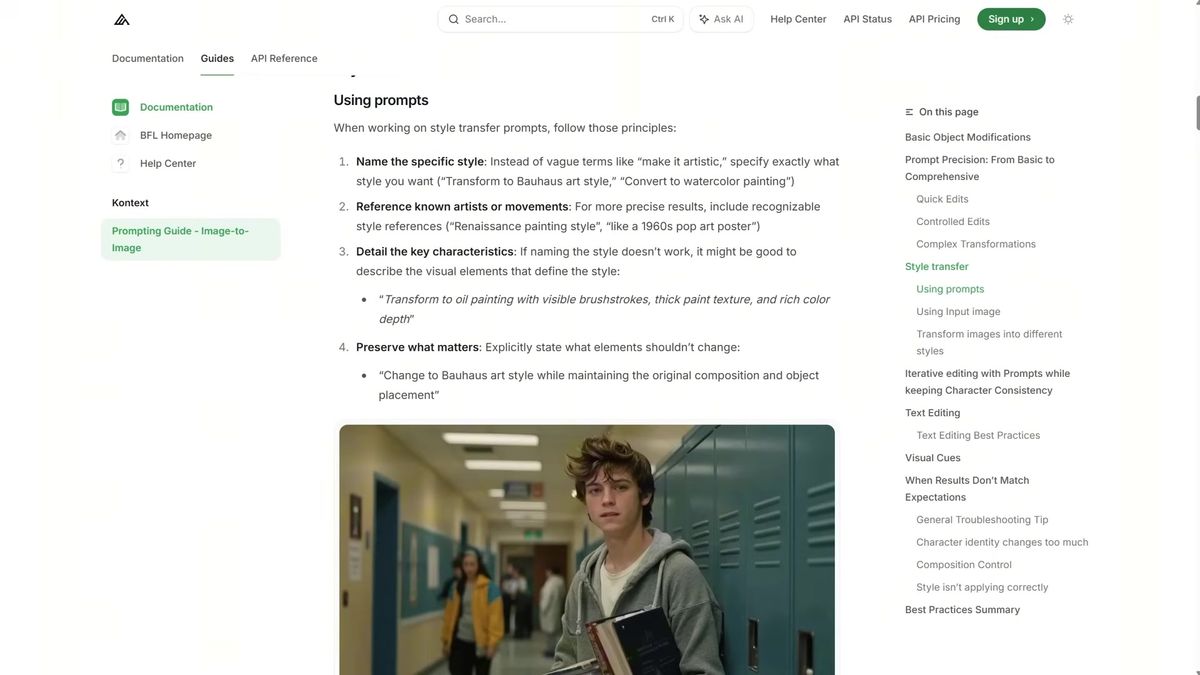
Prompting is the skill that separates good results from mush. The pattern from the walkthrough: state the change first ("change the eye color"), name the subject ("of the bunny"), then add detail about the desired look. Make one edit per pass, feeding each result back in, rather than cramming a new background, outfit, and pose into one prompt. Prompts cap around 512 tokens, and phrases like "while maintaining the same pose" tell the model what to preserve.
One trick worth copying: wire the encoded image into both the Reference Latent and an Empty Latent connected to the sampler. That lets you pick a different output size and aspect ratio while keeping the reference, so a square portrait can render wide without losing the subject.
How to combine images and transfer style with Flux Kontext
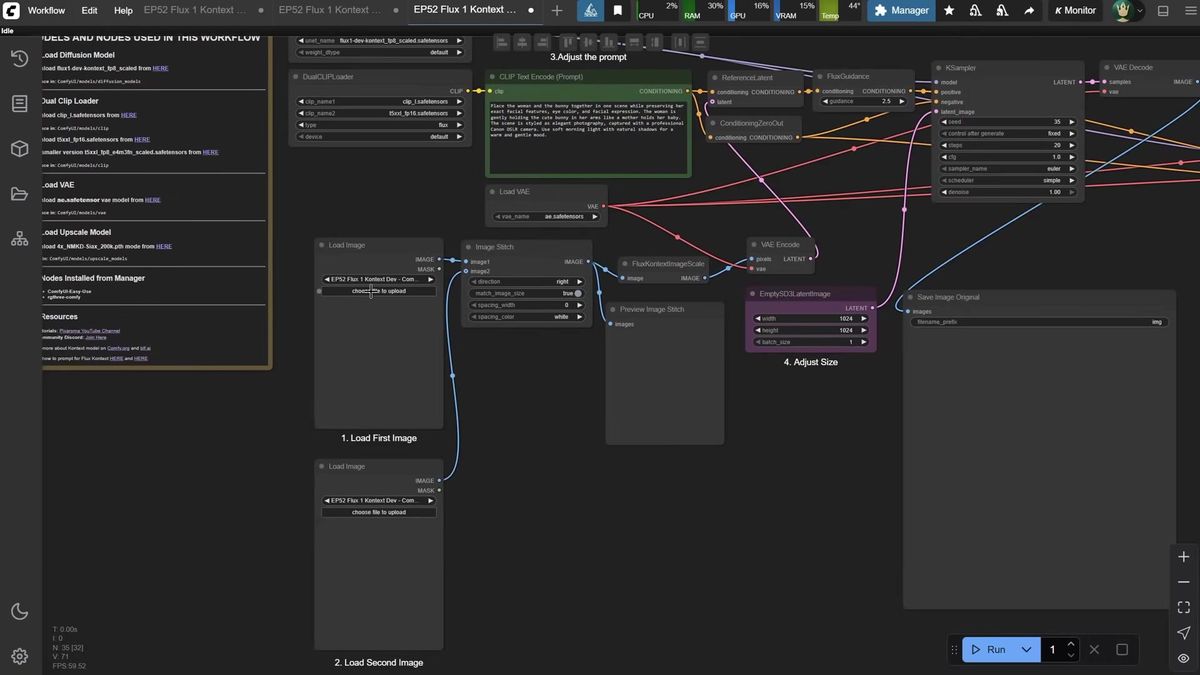
Flux Kontext only accepts one image, so you stitch multiple inputs into a single canvas with an Image Stitch node, then prompt the model to merge them.
The Image Stitch node from Comfy Core places two images side by side or stacked. You prompt "place the woman and the bunny in the same scene" and let Kontext blend them, or chain a second stitch node to merge three characters into one image.
Style transfer works the same way: load an image in the style you want, then prompt "use this art style and create a new image with [subject]." The reference feeds both the reference latent and the sampler, so the output inherits the style while changing the content. If you would rather not wire any of this, Runflow's prompt-based image editing solution packages this "edit by instruction" behavior behind one endpoint, and reference-based inpainting covers the masked-edit case.
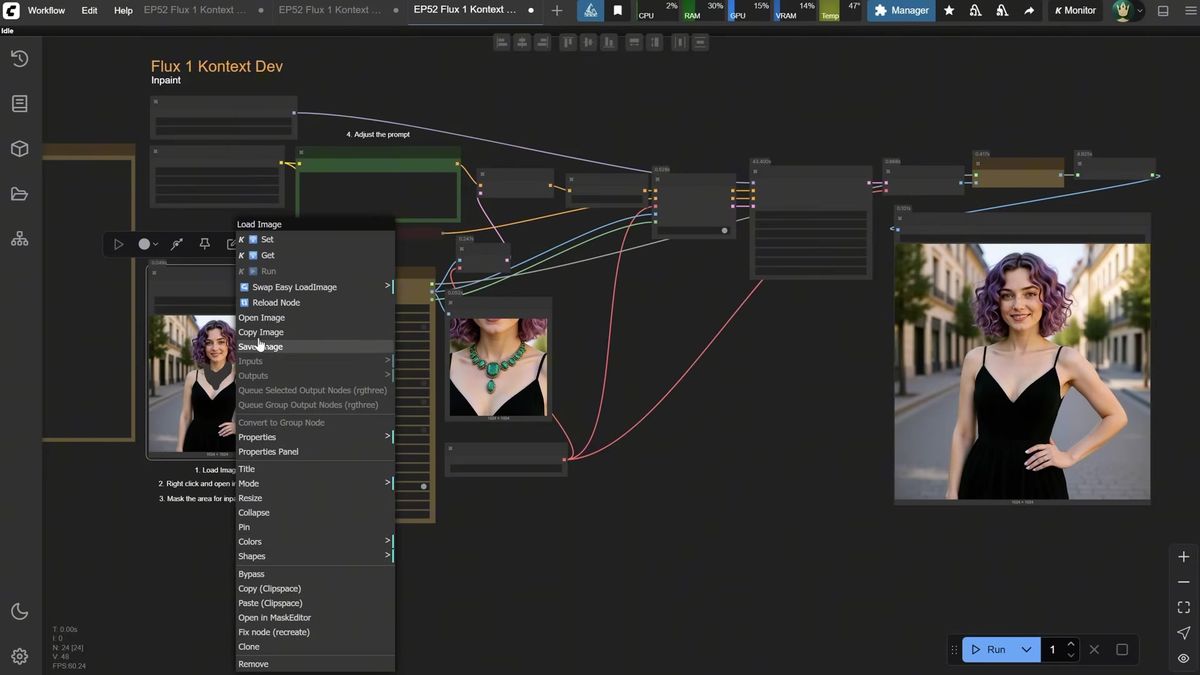
How to inpaint and keep character consistency with Flux Kontext
Inpainting masks the exact region you want changed, edits only that area, and pastes it back, fixing Kontext's habit of altering the whole image on a plain edit.
The honest limitation: a plain "remove the green necklace" prompt does remove the necklace, but it also regenerates the background and shirt because the model rebuilds the entire frame. For surgical edits you want inpainting.
The flow: open the image in the Mask Editor and paint over the region a little larger than the target, run it through an Inpaint Crop node that edits only the masked area, and the result pastes back so everything outside the mask is byte-for-byte the same (the Blending Pixels value controls how hard the patch fuses). This is how you cleanly remove a necklace, add a tiara, or swap a product's background without touching the product.

Character consistency comes from the editing path, not a separate feature. Feed a portrait, prompt for new clothes, a new angle, or a street setting, and the face comes back recognizable across all of them. It is not pixel-identical (the same caveat as LoRA training), but a few seeds gets a usable set. Background replacement is where Kontext is strongest: "replace the background with a winter landscape, keep the bunny in the same pose" can come back near-perfect.
Why local Flux Kontext breaks when you put it behind real users
A desktop ComfyUI install runs one graph at a time on your card, which is fine for you and falls apart the moment real traffic arrives.
Three things change when a hobby workflow becomes a product feature.
Concurrency. ComfyUI processes one job at a time, so ten users uploading at once means a queue nine deep, and your 36-second run becomes a five-minute wait for the last person in line.
Uptime. Your app cannot depend on your machine being awake and your GPU being free. A live feature needs an endpoint that answers at 3am.
Cost and operations. Keeping a 4090-class card warm for spiky traffic is wasteful, and the moment you need a second card you are running infrastructure, not building product. The AI and DevOps team to manage a GPU fleet is the line item most teams underestimate.
None of this is a fault in ComfyUI. It is the right place to design and tune a Flux Kontext workflow, and the wrong thing to be the live backend for software other people use.
How to call Flux Kontext as a production API
You POST your prompt and source image to the model's run endpoint, poll the run ID until it finishes, and never touch a GPU.
Runflow runs Flux Kontext (and the rest of the Flux family, plus nano-banana, Qwen, and WAN) as hosted models you call over HTTP. Disclosure: Runflow is our product, but the ComfyUI method above works with or without us. The shape is the same for every model: POST inputs, get a run ID, poll until done.
# Submit a Flux Kontext edit
curl -X POST https://api.runflow.io/v1/models/black-forest-labs/flux-kontext/runs \
  -H "Authorization: Bearer rf_live_your_key" \
  -H "Content-Type: application/json" \
  -d '{
    "input": {
      "prompt": "change the hair from purple to natural red, keep the same face and pose",
      "image_url": "https://yourapp.com/uploads/portrait.jpg"
    }
  }'
You get back a run ID. Poll it until the status reads finished:
curl https://api.runflow.io/v1/runs/RUN_ID \
  -H "Authorization: Bearer rf_live_your_key"
Wrapped in a small loop, that is the whole integration:
import requests, time

BASE = "https://api.runflow.io/v1"
HEAD = {"Authorization": "Bearer rf_live_your_key"}
MODEL = "black-forest-labs/flux-kontext"

run = requests.post(
    f"{BASE}/models/{MODEL}/runs",
    headers=HEAD,
    json={"input": {
        "prompt": "remove the green necklace, keep everything else identical",
        "image_url": "https://yourapp.com/uploads/portrait.jpg",
    }},
).json()

run_id = run["id"]
while True:
    r = requests.get(f"{BASE}/runs/{run_id}", headers=HEAD).json()
    if r["status"] in ("succeeded", "failed"):
        print(r)
        break
    time.sleep(2)
Concurrency, retries, and failover are handled for you, so the tenth user is not waiting behind nine others. Pricing is simple fixed per call, which keeps cost predictable per edit instead of per GPU hour. Flux Kontext sits alongside the other 700-plus models in the Runflow model catalog, and the same request works against any of them by swapping the slug. The ComfyUI API developer guide is the pillar to read next, and the nano-banana API walkthrough covers the same jump for a sibling model.
If your real workflow is more than one node (an upscale, a face fix, a background swap), you can deploy the entire ComfyUI graph instead of rebuilding it. ComfyUI Deploy takes your exported workflow JSON and runs it as a hosted endpoint on a real GPU, so the graph you tuned locally ships as-is.
Frequently asked questions
What is Flux Kontext in ComfyUI?
Flux Kontext is Black Forest Labs' instruction-based image model that edits an existing image from a text prompt. In ComfyUI you load it through a Load Diffusion Model node with the same CLIP and VAE you use for regular Flux, then feed a reference image and an instruction.
How much VRAM does Flux Kontext need?
The full FP8 model wants a high-end card and takes about 36 seconds for a first run on an RTX 4090. GGUF builds shrink the model to fit weaker cards, some as small as 4GB, but lower quantization reduces prompt accuracy.
How do I do inpainting with Flux Kontext?
Open the image in the Mask Editor, paint over the region you want changed slightly larger than the target, and run the edit through an Inpaint Crop node. Only the masked area is regenerated and pasted back, so the rest stays untouched.
Can Flux Kontext keep a character consistent across images?
Yes. Feed a portrait and prompt for new clothes, a new angle, or a new setting, and the face comes back recognizable across shots. It is not pixel-identical, but a few seeds usually gets a usable set.
How do I combine two images with Flux Kontext?
Flux Kontext only takes one image, so you stitch your inputs into a single canvas with an Image Stitch node, then prompt the model to place both subjects in one scene. Chaining a second stitch node lets you combine three at once.
Is there a Flux Kontext API?
Yes. You can call Flux Kontext over HTTP by posting your prompt and source image to a model run endpoint and polling for the result, with no local GPU. Runflow hosts it alongside the rest of the Flux family, nano-banana, Qwen, and WAN.
What prompt structure works best for Flux Kontext?
State the change first, name the subject second, then add detail about the desired look. Make one edit per pass instead of stacking instructions, and use phrases like "while maintaining the same pose" to tell the model what to keep.
Can I run a full ComfyUI workflow as an API, not just one model?
Yes. ComfyUI Deploy runs your exported workflow JSON as a hosted endpoint, so a multi-step graph with upscaling, inpainting, and background swaps ships without being rebuilt as separate API calls.
Where to go next
You've got both halves now: the ComfyUI build for designing Flux Kontext, and the API for shipping it. The workflow was never the hard part. The real question is whether your own GPU is still the thing answering at 3am when the tenth user shows up.
- Watch the pixaroma walkthrough and build the editing graph in ComfyUI, starting with a single one-change prompt.
- Add the Reference Latent and empty-latent setup so you can edit at any aspect ratio.
- Move to inpainting with the Mask Editor and Inpaint Crop node for surgical edits like object removal.
- Test character consistency by feeding one portrait through several prompts.
- When real traffic shows up, call Flux Kontext through the Runflow model catalog so concurrency and failover are handled for you.
- For multi-step graphs, deploy the whole workflow with ComfyUI Deploy.
- Read the ComfyUI API developer guide for integration patterns at scale.
Start free at runflow.io.
Want custom benchmarks for your workload?
We'll run our evaluation pipeline against your production data, for free.
Talk to Founders