ComfyUI Z-Image: the fast 6B model setup for 2026
ComfyUI Z-Image setup: the three files, the 5 to 9 step settings, BF16 vs FP8, ControlNet, online LoRA training, and the API path for production.
6 to 7 seconds for one image. On a single card. After the first warm-up run, with the same prompt sitting in the queue. That is Z-Image Turbo in ComfyUI once the three files are in the right folders and the model is loaded into VRAM.
Z-Image Turbo, or ZIT as people started calling it, is a 6-billion-parameter text-to-image model from Tongyi-MAI. Only the Turbo variant shipped first. The base and edit versions are still coming. What landed already is fast enough that it became the default model in a lot of ComfyUI graphs the week it dropped, for one boring reason: 5 to 9 steps, CFG of 1, and you get a sharp realistic image before Flux has finished its first pass.
This guide does two things. First it walks the real Z-Image ComfyUI setup from the pixaroma demo: the files, the folders, the sampler settings, BF16 versus FP8, ControlNet, and training a LoRA online for a consistent character. Then it covers the production path, because a new 6B model that runs in 7 seconds at your desk is a different animal from that same model answering 200 requests an hour through an app. That gap is where most teams get stuck.
What is Z-Image Turbo and what do you download for ComfyUI
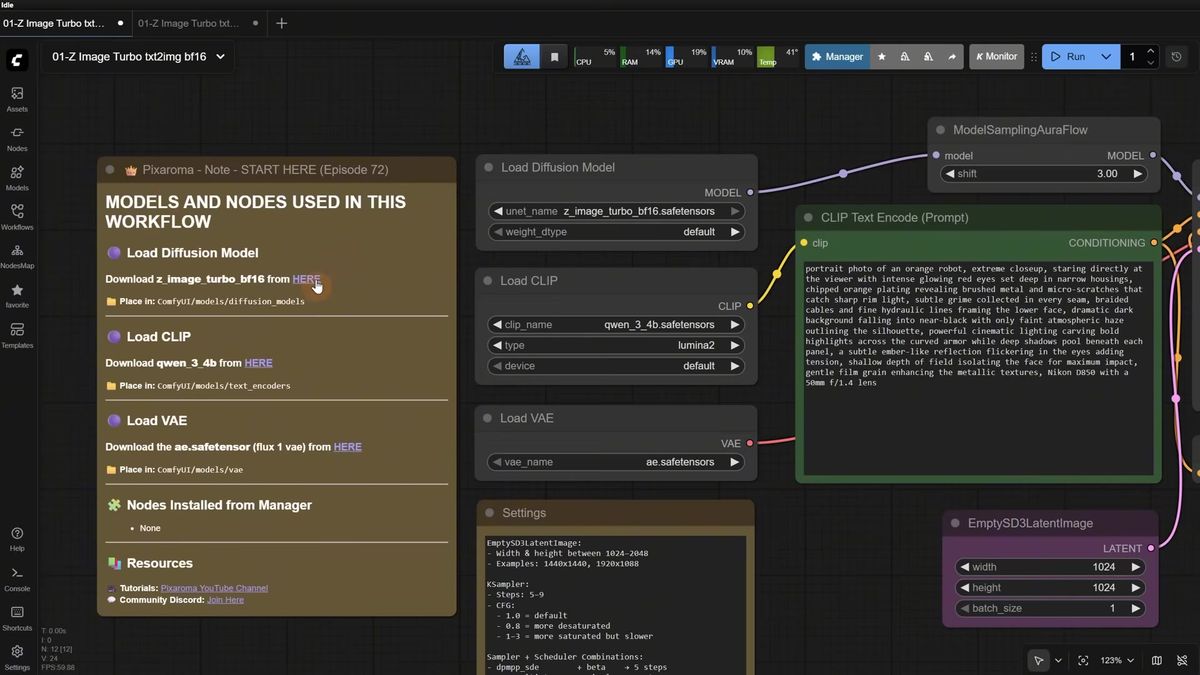
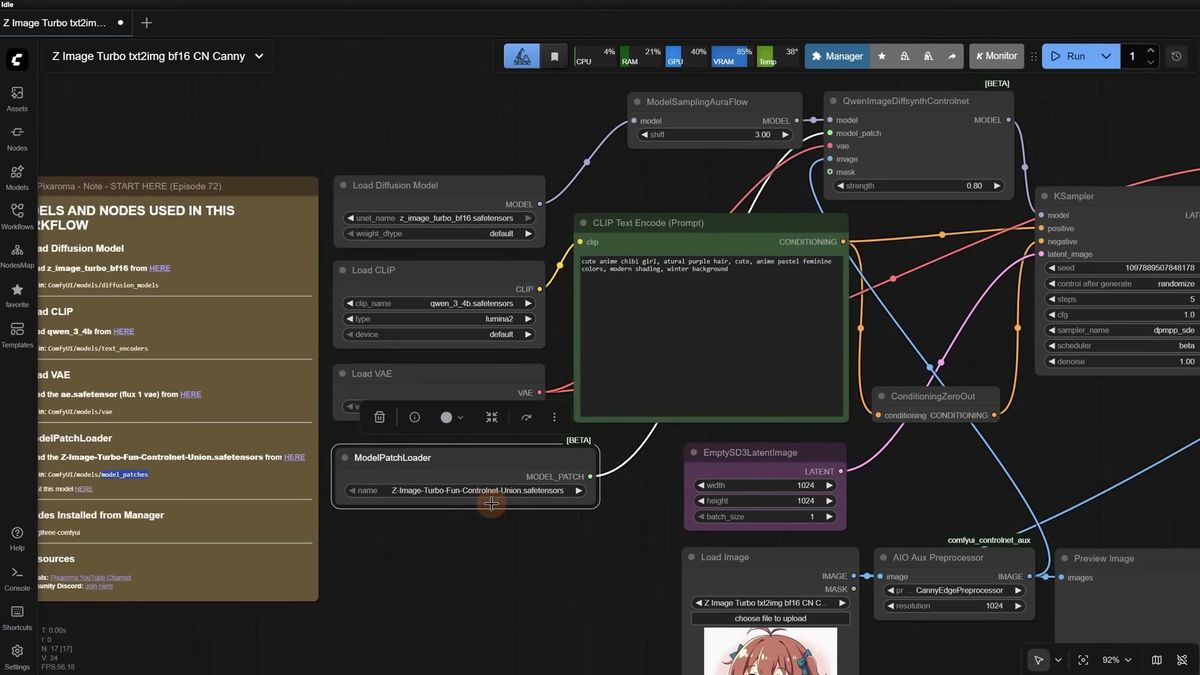
Z-Image Turbo is a 6-billion-parameter text-to-image model from Tongyi-MAI that runs in roughly 5 to 9 steps, and the ComfyUI setup needs three files: the diffusion model, a Qwen text encoder, and a VAE. Get those three into the right folders and the first workflow runs with zero custom nodes.
Here is the file list and where each one goes:
| File | What it does | ComfyUI folder |
|---|---|---|
| z_image_turbo_bf16.safetensors | The diffusion model (image generation) | ComfyUI/models/diffusion_models |
| qwen_3_4b.safetensors | Qwen text encoder, reads and understands your prompt | ComfyUI/models/text_encoders |
| ae.safetensors | The VAE (Flux 1 VAE, you likely already have it) | ComfyUI/models/vae |
There are two ways to load it. The split version above keeps the diffusion model, the text encoder, and the VAE as separate files. The all-in-one checkpoint bundles the clip and VAE inside, so it loads from ComfyUI/models/checkpoints and needs a single file. The split version is worth using while you learn what a Z-Image graph actually needs, since you can see which text encoder and VAE feed the sampler. The all-in-one produces the same images with less wiring.
One detail that trips people up: in the Load Clip node, set the type to lumina2. That is the format the Qwen encoder needs so Z-Image reads the prompt embeddings correctly. Pick the wrong type and the model either errors or ignores half your prompt.
The settings that make Z-Image fast: steps, CFG, and shift
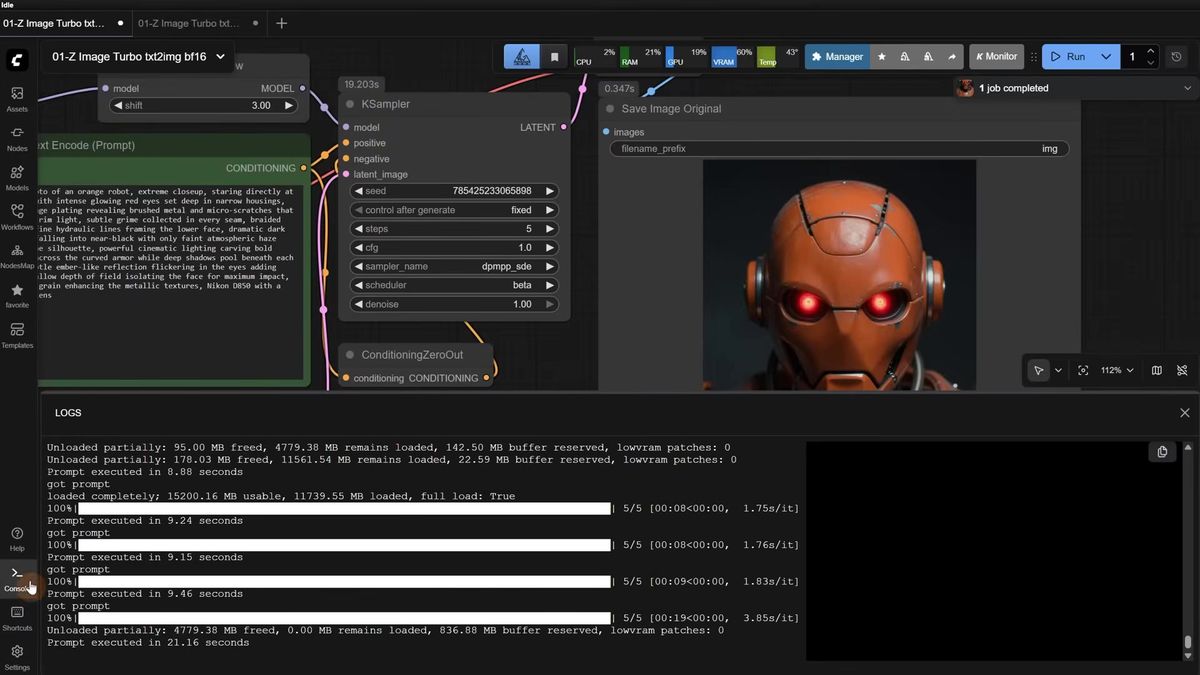
Z-Image Turbo is built for low step counts: 5 to 9 steps, CFG of 1, model shift of 3, and no negative prompt. Push past 9 steps and the image usually gets worse, not better, which is the opposite of what years of SDXL muscle memory tells you.
The CFG choice is the one that saves the most time. Z-Image runs without a negative prompt, so a CFG of 1 is both faster and cleaner. Drop it to 0.8 and colors desaturate. Raise it to 2 or 3 and you get more saturation and contrast, but generation slows down because the sampler now has to evaluate a second pass. For most realistic work, 1 is the number.
Steps interact with the sampler and scheduler. From the pixaroma tests, a few combinations that held up:
| Sampler | Scheduler | Steps |
|---|---|---|
| dpmpp_sde | beta | 5 |
| res_multistep | simple | 9 |
| euler_ancestral | beta | 9 |
The res_multistep and simple pairing tends to look sharper on some images. The skin on real people came out better on the lower-step dpmpp_sde and beta combination, so that became the default for portraits. There is no single right answer here. Fix your seed, run the same prompt across two or three combinations, and keep the one your eyes prefer.
A warning that comes straight from the model: Z-Image takes prompt words literally, the same way the Qwen image model does. One demo had "fire cracks on the face" appear because a sentence in the prompt described fire. Deleting that sentence fixed the face. If a generation has a strange artifact, the prompt is usually the first place to look, not the seed.
BF16 vs FP8: which Z-Image build to run on your VRAM
Use BF16 if you have 16GB of VRAM or more, and FP8 if you have 12GB or lower, but do not expect FP8 to always be faster. FP8 is the smaller file, almost half the size, yet on cards with enough memory the two run at nearly the same speed.
This is the part that surprises people. The FP8 version exists for VRAM-limited machines, not for raw speed. On a card with headroom, BF16 and FP8 came out at the same generation time in the pixaroma tests, even though FP8 is roughly half the size on disk. Where FP8 earns its place is the card that cannot fit BF16 at all. On those, BF16 either crawls or crashes, and FP8 is what keeps you generating.
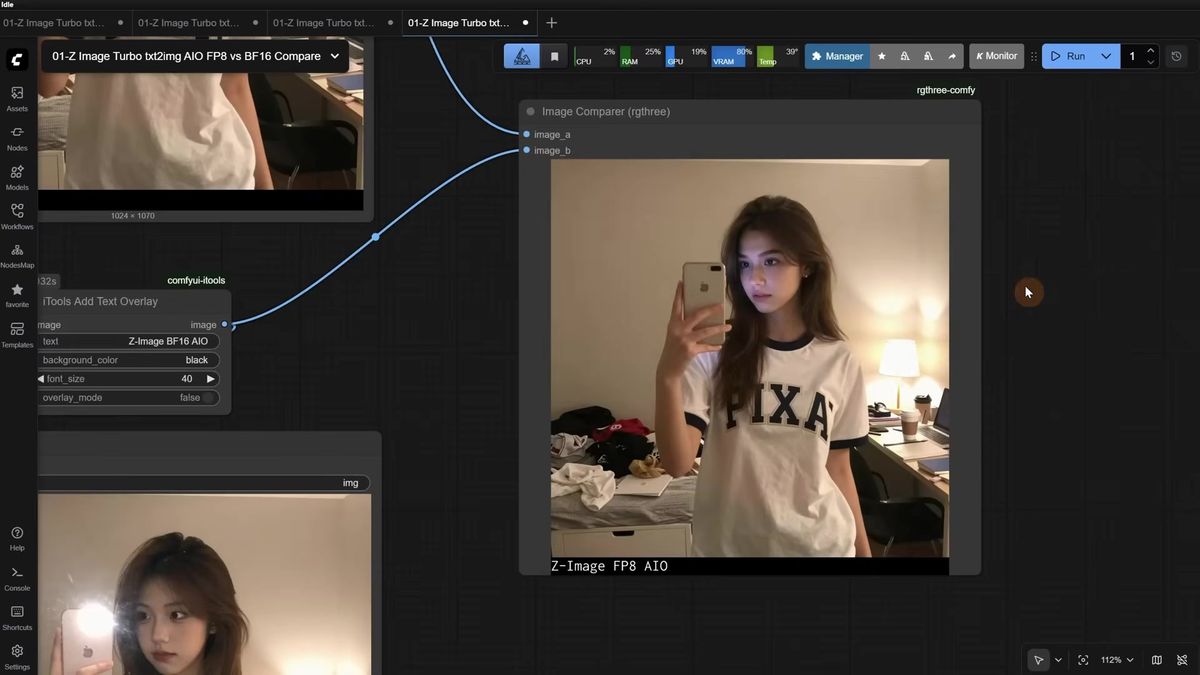
Quality is close but not identical. In a side-by-side image comparer, FP8 picked up small artifacts the BF16 build avoided: scratches on a robot head where BF16 rendered clean bolts, a slightly rougher and dirtier look on some seeds. FP8 was never far behind, and on plenty of seeds the two are indistinguishable. The honest summary: if you can fit BF16, run BF16 for the small quality edge at the same speed. If you cannot, FP8 is a genuinely good fallback rather than a compromise you resent.
One quirk worth knowing before you build a product around it. Z-Image leans toward generating Asian women when you ask for "a woman" without more detail, and like the Qwen image model, its seed variation is low, so two seeds give similar results. Add nationality, age, and specific features to the prompt to get range. That low variance is great for consistency and frustrating when you want twenty different faces from one prompt.
Full HD, the 8-pixel crop trick, and 2K upscaling
Z-Image refuses an exact 1080 width, so generate at a size it accepts and add a crop node after the VAE decode to trim the extra 8 pixels down to a clean 1920 by 1080. That is the whole trick for true full HD output you can hand to an image-to-video model.
The problem shows up the moment you need 1080p for a downstream model like Kling or Wan. Z-Image will not let you type 1080 into the width directly. The fix is to generate at the nearest size it accepts, then drop a crop node right after the VAE decode to shave the extra 8 pixels and land on exactly 1920 by 1080. Swap width and height in both the generation and the crop node for portrait full HD. The quality holds up well at that size.
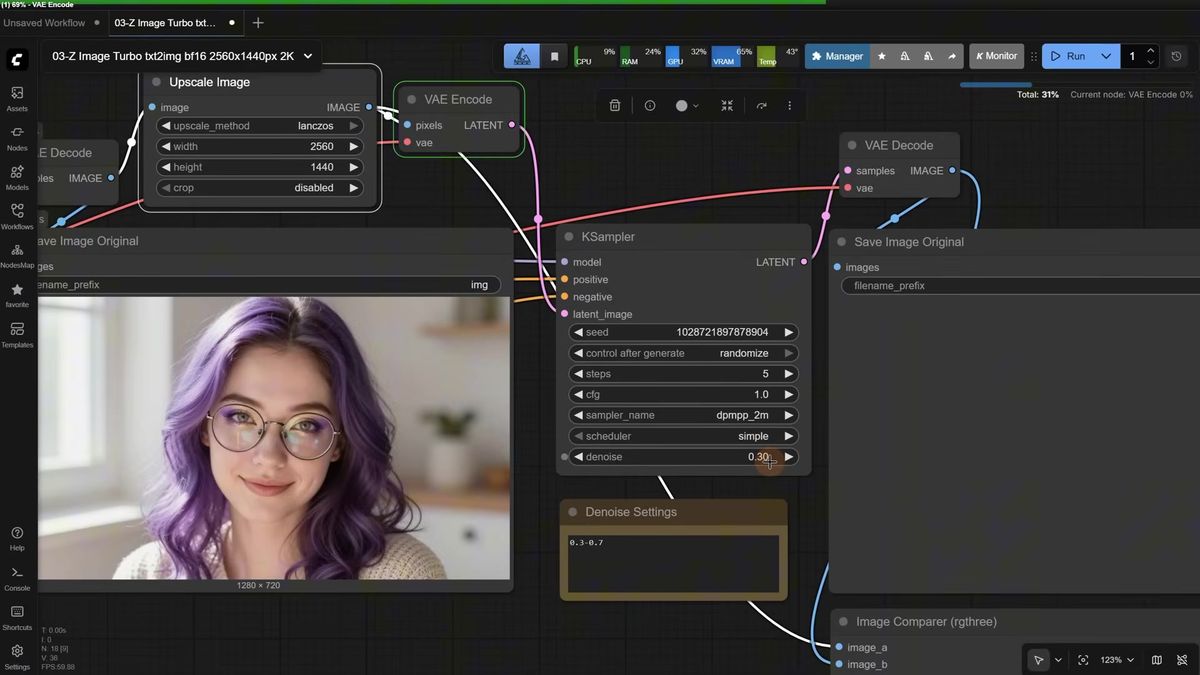
Resolution has a real effect on the look. Past a certain size, Z-Image starts to go soft and diffused, and colors desaturate when you push the canvas too large. For 2K, generating at full 2K from scratch tends to mess up the image. The cleaner path is to generate at a comfortable size, run an Upscale Image node to 2K, then pass it through a second KSampler at a low denoise of around 0.3 to keep it faithful. Raise that denoise toward 0.7 for more creative reinterpretation, at the cost of color and consistency.
There is also a dedicated upscale-model path for cleaning up images from other models. Feed in a Flux render with that plastic-skin look, downscale it so the model can work, then run an upscale model to double the size with a tuned denoise. It does not beat a dedicated restore model every time, but it adds real texture and realism on a lot of images. Like everything here, try a few seeds and denoise values before you trust it on a batch. If upscaling is core to your pipeline, the ComfyUI upscale workflow guide covers the Flux restore-and-sharpen approach in depth.
ControlNet and QwenVL prompting for more consistent output
Z-Image works with a Fun ControlNet Union model loaded through a ModelPatchLoader, and the canny, depth, and pose preprocessors all hold structure well at a strength of 0.6 to 0.8. Strength of 1 is too strong and the output gets stiff.
The ControlNet model is Z-Image-Turbo-Fun-Controlnet-Union.safetensors, and it goes in ComfyUI/models/model_patches. You load it with the ModelPatchLoader node, which is part of core ComfyUI, so if you hit an error on the QwenImageDiffsynthControlNet node, update ComfyUI first. From there it follows the pattern you already know: a canny preprocessor for edge maps, a depth-anything preprocessor for depth, and a DW preprocessor for pose skeletons. Keep the strength between 0.6 and 0.8 and write a prompt that describes what you want inside that structure. Canny kept an illustration consistent, depth held the composition, and pose tracked simple skeletons cleanly. Complex poses were not stress-tested, so treat those as your own experiment. This is the same control approach as the ComfyUI Flux ControlNet workflow, adapted to Z-Image's patch loader.
The other consistency tool is QwenVL prompting, and it solves a real limitation. Z-Image cannot see an input image. It only reads text. So to recreate something from a reference, you point a QwenVL node at the image, it writes a long detailed prompt describing that picture, and Z-Image generates from the text. It reproduced a cartoon bunny and a chibi character surprisingly well from description alone, with the caveat that a 2B vision model cannot always read an exact style. You can also flip QwenVL the other way: give it a short prompt plus a formula and have it expand that into a rich description, which adds the prompt variety that low seed variance otherwise denies you.
Training a Z-Image LoRA online for a consistent character
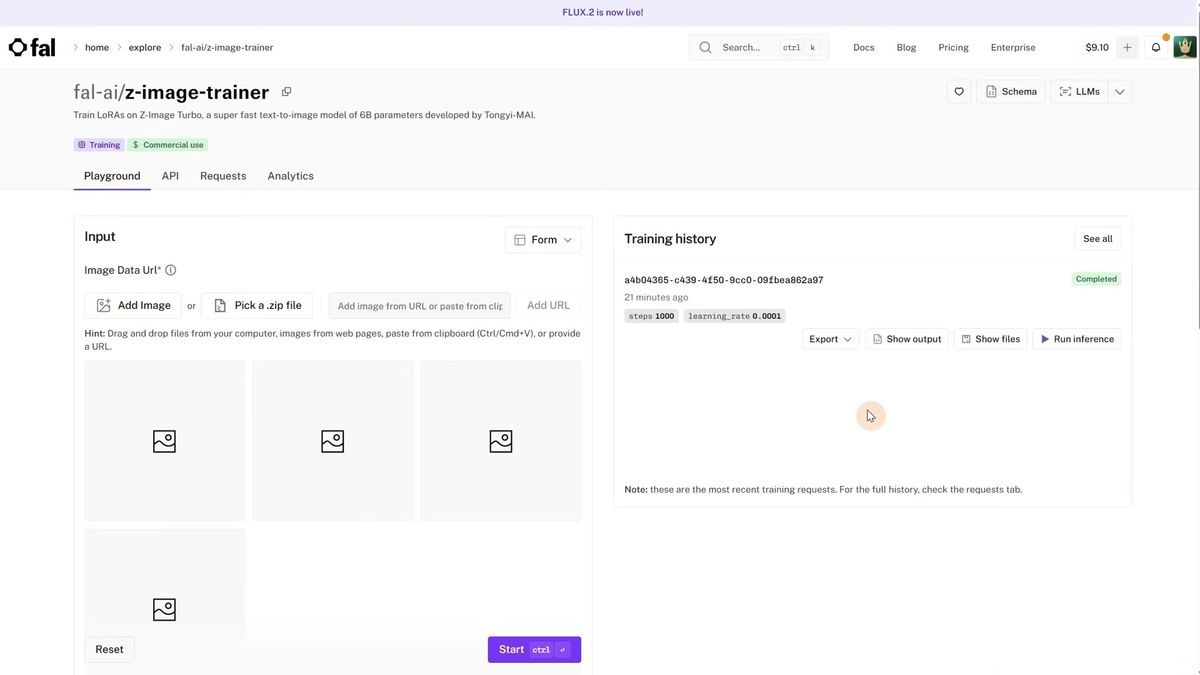
You can train a Z-Image LoRA in about 15 to 20 minutes on a hosted trainer for roughly $2 to $3, using 15 images, 1,000 to 1,500 steps, and a unique trigger word. No local GPU and no training rig required.
The walkthrough used a hosted Z-Image trainer, the kind where you upload images, set steps, and pay per run. The recipe that worked: 15 images of one character, a content training type for people and products, the default learning rate, and 1,000 steps, which came out to $2.26. The trigger word needs to be genuinely unique, so the demo took a normal word and swapped letters for numbers so it would never collide with a real token. A nice trick for building the dataset: generate the first image with Z-Image, then use Nano Banana to spin out different angles and variations of that same person, which gives you a consistent 15-image set without a photoshoot.
Two failure modes showed up, and they are the same ones that bite Flux LoRAs. Training a style on 40 mixed images at 1,000 and 2,000 steps did not work, because too much variation in subject and style confuses the model. The fix was 15 images of one subject type only, at 1,500 steps, with the training type set to style. And once a photorealistic character LoRA is trained, it fights you when you ask for a watercolor or pencil style, because the realism is baked in hard. The lever there is LoRA strength: drop it to around 0.8 and the painting styles come through while the character stays recognizable.
(We have watched teams burn a weekend trying to make one LoRA do both a specific character and a specific style at full strength. It rarely ends well. Two narrow LoRAs at tuned strengths beats one overloaded one almost every time.)
The part the tutorial skips: running Z-Image in production
A 6B model that answers in 7 seconds at your desk is not the same as one serving live traffic, because your single card has one queue, no failover, and no second worker when ten requests land at once. This is where the ComfyUI graph stops being the hard part.
We have run that math, and it does not end well for one machine. The local setup is perfect for designing the workflow, dialing in the sampler, and training the LoRA. The trouble starts when real users arrive. Each generation that took 7 seconds alone now sits behind a queue. The card that ran cool at your desk throttles when it never gets to idle. And the moment that GPU reboots or the model fails to load, every request behind it fails with it. There is no second worker, because you are the second worker.
The production answer is to keep the same model and move the serving off your own hardware. Runflow hosts a fast-moving catalog of text-to-image models behind one API, so a new model like Z-Image is a slug you call rather than a download you babysit, and the model catalog is the same shape whether you are calling Flux 2, GPT Image 2, or the next thing that ships next week. The dispatch, concurrency, and failover are handled, which is the work nobody films a tutorial about.
The call pattern is the same for every model. Submit a run, then poll until it succeeds:
# Submit a generation
curl -X POST https://api.runflow.io/v1/models/black-forest-labs/flux-2-klein-9b/runs \
-H "Authorization: Bearer rf_live_your_key" \
-H "Content-Type: application/json" \
-d '{
"input": {
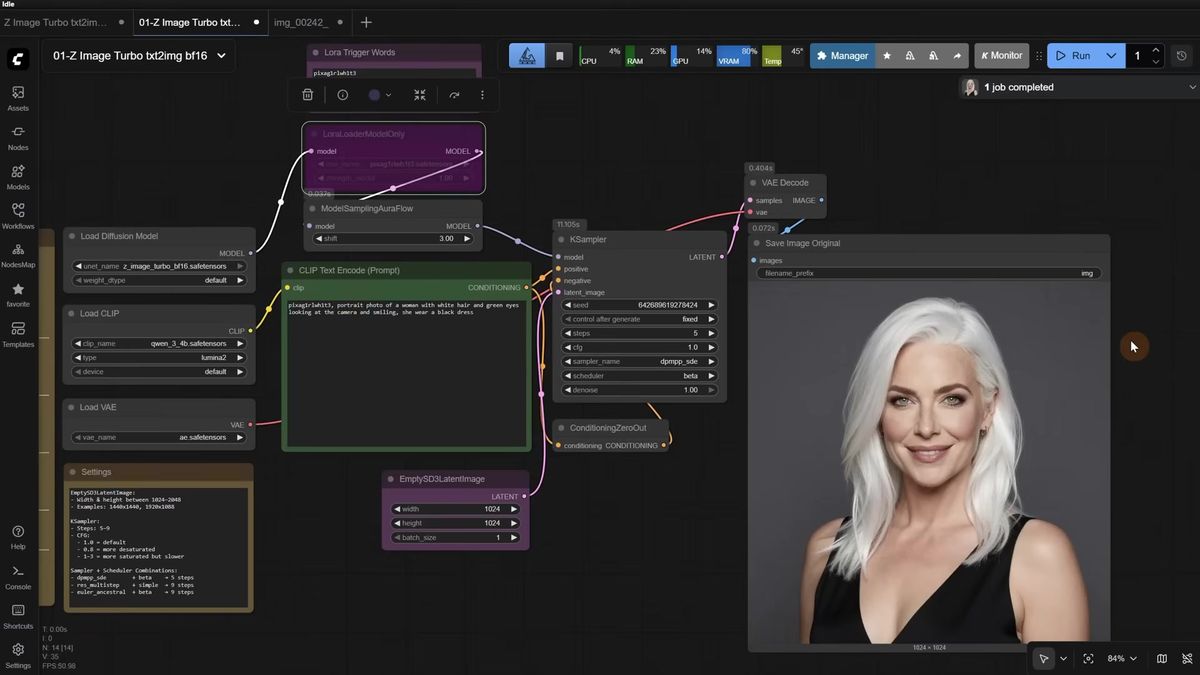
"prompt": "portrait of a woman with white hair and green eyes, smiling, black dress, soft studio light"
}
}'You get back a run ID. Poll it until the status reads succeeded:
curl https://api.runflow.io/v1/runs/RUN_ID \
  -H "Authorization: Bearer rf_live_your_key"
That is the whole integration. No GPU to provision, no model to keep warm, no 3am page when a worker dies. Run the model locally to design and test, then call it through the API once traffic is real. For the full integration patterns, the ComfyUI API developer guide covers auth, polling, and error handling end to end, and if you want to ship an entire custom graph rather than a single model, ComfyUI Deploy runs the whole workflow for you.
Z-Image vs Flux and Qwen: where it actually fits
Z-Image Turbo wins on speed and is strong on realism, while Flux and Qwen still win on prompt variety and editing, so the right tool depends on whether you need throughput or range. It is fast and good, not a universal replacement.
The speed is real and it is the headline. 5 to 9 steps versus 20-plus for Flux changes what you can do per minute, especially when you are iterating on settings or running a batch. Realistic skin came out genuinely good, and the model handles illustration and art styles too. The honest limits are also real. Low seed variance means you fight the model for variety, the same way you do with Qwen image. It reads prompts literally, so stray descriptive words leak into the image. And the base and edit variants are not out yet, so anything beyond text-to-image and ControlNet is still on the roadmap.
Here is a clean way to decide:
| You need | Reach for |
|---|---|
| Fast realistic generation, lots of iterations | Z-Image Turbo |
| Maximum prompt adherence and reference-image editing | Flux 2 in ComfyUI |
| Image editing from a source image today | Qwen image edit or Flux Kontext |
| One consistent character across many images | A trained LoRA on any of the above |
New model, fast, worth installing today. Just know what it does well before you bet a product on it.
Frequently asked questions
What is Z-Image Turbo?
Z-Image Turbo is a 6-billion-parameter text-to-image model from Tongyi-MAI. It is built for low step counts, around 5 to 9, and produces sharp realistic images much faster than Flux. Only the Turbo variant has shipped so far, with base and edit versions still coming.
What files do I need to run Z-Image in ComfyUI?
Three files for the split setup: the z_image_turbo diffusion model in models/diffusion_models, the qwen_3_4b text encoder in models/text_encoders, and the Flux 1 ae.safetensors VAE in models/vae. The all-in-one checkpoint bundles all three into a single file in models/checkpoints.
Should I use the BF16 or FP8 version of Z-Image?
Use BF16 with 16GB of VRAM or more, and FP8 with 12GB or lower. On a card with enough memory the two run at nearly the same speed, with BF16 holding a small quality edge. FP8 is for cards that cannot fit BF16, where it is a strong fallback rather than a downgrade.
How many steps and what CFG does Z-Image need?
Run 5 to 9 steps with a CFG of 1 and a model shift of 3, with no negative prompt. Going past 9 steps usually makes the image worse. CFG of 1 is faster and cleaner; raise it to 2 or 3 only when you want more saturation and contrast.
Why does my Z-Image output have strange artifacts?
Z-Image reads prompts literally, like the Qwen image model. A descriptive word can show up unexpectedly in the image, for example a sentence about fire adding cracks to a face. Delete the offending words from the prompt before changing the seed.
Can Z-Image do image-to-image or editing?
Not directly yet, since only the Turbo text-to-image variant has shipped and the edit model is still coming. To recreate a reference image, use a QwenVL node to describe the image as text, then generate from that text, because Z-Image cannot see input images.
How do I train a Z-Image LoRA?
Use a hosted trainer with 15 images of one subject, 1,000 to 1,500 steps, a unique trigger word, and the default learning rate. It costs roughly $2 to $3 and finishes in about 15 to 20 minutes. Keep one subject type per LoRA; mixing characters and styles in one dataset usually fails.
Does Z-Image support ControlNet?
Yes. Download the Z-Image-Turbo-Fun-Controlnet-Union model into models/model_patches and load it with the ModelPatchLoader node. Canny, depth-anything, and DW pose preprocessors all work; keep the ControlNet strength between 0.6 and 0.8 for natural results.
Can I run Z-Image without a GPU?
For local ComfyUI you need a GPU, ideally 12GB of VRAM or more. To run it without owning hardware, call a hosted text-to-image model through an API like Runflow, where dispatch, concurrency, and failover are handled and you only pay per generation.
Is Z-Image better than Flux?
For raw speed and fast realistic iteration, yes. For maximum prompt adherence, reference-image editing, and prompt variety, Flux and Qwen still lead. Z-Image is a fast, strong specialist rather than a full replacement for either.
Where to go next
You have both halves now: the Z-Image ComfyUI setup for designing and testing locally, and the API path for shipping it. The install was never the hard part. The real question is whether your own card is still the thing answering when the tenth user shows up, each generation queued behind the last with no worker to catch the overflow.
- Do the setup first: three files, three folders, set the Load Clip type to
lumina2, then queue a 5-step run. - Dial in settings at CFG 1 and 5 to 9 steps, testing two or three sampler and scheduler pairs on a fixed seed.
- Match your VRAM: BF16 at 16GB or more, FP8 at 12GB or lower, and expect similar speed on cards with headroom.
- For full HD, generate at the nearest accepted size and crop the extra 8 pixels after the VAE decode.
- Add ControlNet through the ModelPatchLoader at strength 0.6 to 0.8, and use QwenVL to turn references into prompts.
- Train a character LoRA online with 15 images and 1,000 to 1,500 steps before you build anything around consistency.
- When real traffic arrives, call the model catalog so concurrency and failover are handled, and deploy full graphs with ComfyUI Deploy.
Start free at runflow.io.
Want custom benchmarks for your workload?
We'll run our evaluation pipeline against your production data, for free.
Talk to Founders