ComfyUI LoRA workflow: from one node to API at scale (2026)
A ComfyUI LoRA workflow takes three wires and a trigger word. Running it for ten thousand users a day takes something else. Here is both halves.
Three wires. One trigger word. One strength dial set near 1.0.
That is the entire mechanical cost of a working ComfyUI LoRA workflow. You drop a Load LoRA node between the checkpoint and the prompt, route the model and clip links through it, type the trigger word, and the base model suddenly knows how to draw a thing it could not draw five minutes ago.
We learned the hard part later. The single node is free. Serving that same node to ten thousand image requests a day, on GPUs you do not own, without a queue that falls over at 9am, is the part that quietly eats a quarter. (We ran 36 million headshots through workflows like this before we admitted the second half was the actual job.)
This post covers both halves. First the LoRA workflow itself, built so you can follow it without the video. Then what changes the day a real product starts hitting it.
Start from img2img, not text-to-image
A LoRA workflow is easiest to reason about once you can feed your own image into the graph, so the first move is converting a text-to-image workflow into img2img.
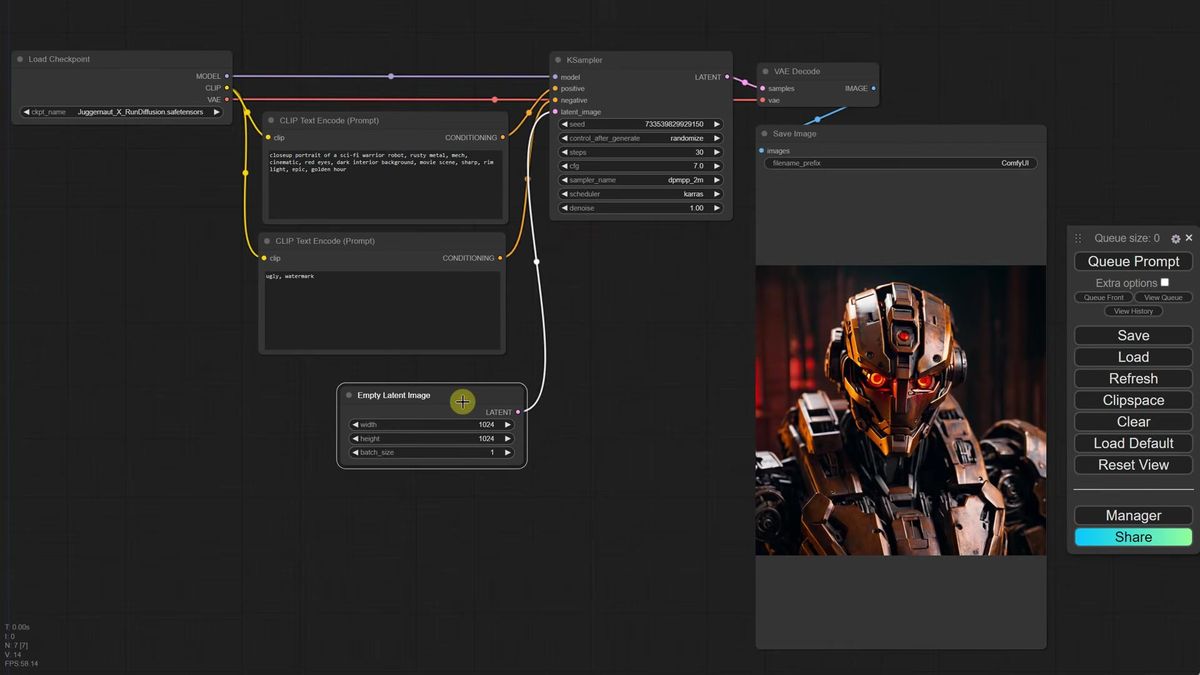
Here is the standard SDXL text-to-image graph most people already have: a Load Checkpoint, two CLIP Text Encode nodes for the positive and negative prompt, an Empty Latent Image, a KSampler, a VAE Decode, a Save Image. It makes pictures from nothing but words.
To work from your own picture instead of an empty canvas, delete the Empty Latent Image node and search for a Load Image node. The catch shows up the second you try to wire it: Load Image outputs pixels, but the KSampler wants a latent. They speak different languages. You bridge them with a VAE Encode node, which converts your pixel image into the latent format stable diffusion understands. Connect the VAE output from your checkpoint to the VAE Encode node too, or it has nothing to encode with.
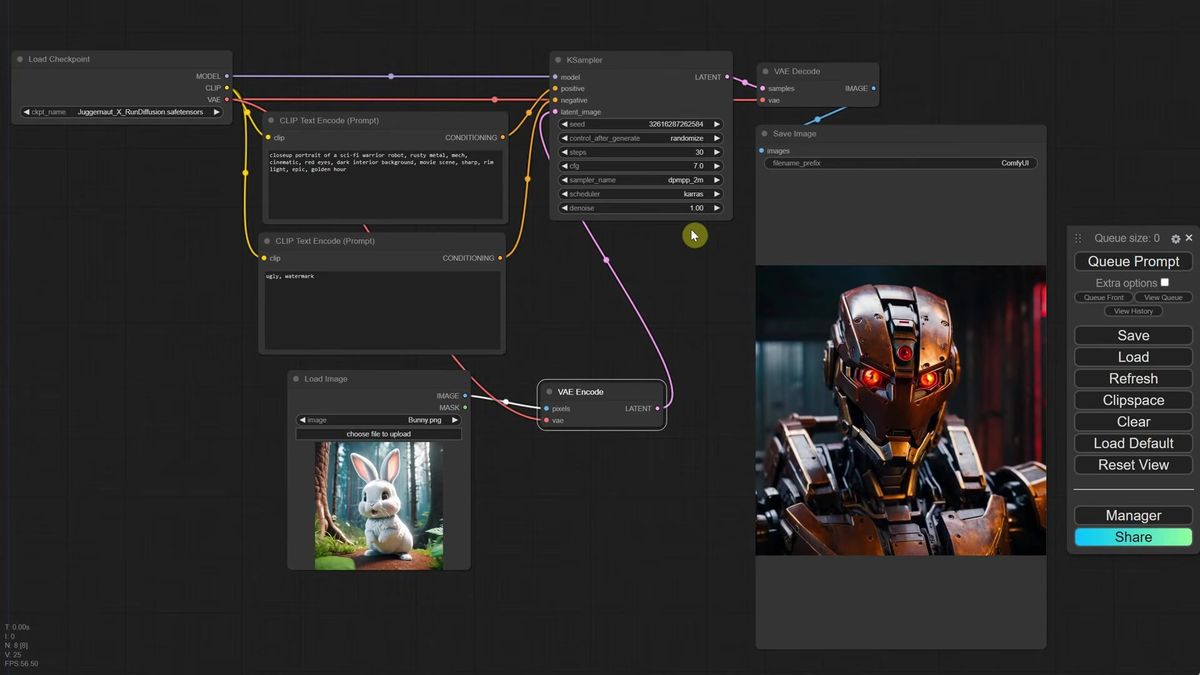
That is the whole img2img conversion. Three nodes touched. Your image now seeds the generation instead of pure noise.
Denoise is the dial that decides everything
Denoise strength controls how far the output drifts from your input image, and getting it wrong is the single most common reason an img2img run "does nothing" or "ignores the photo entirely."
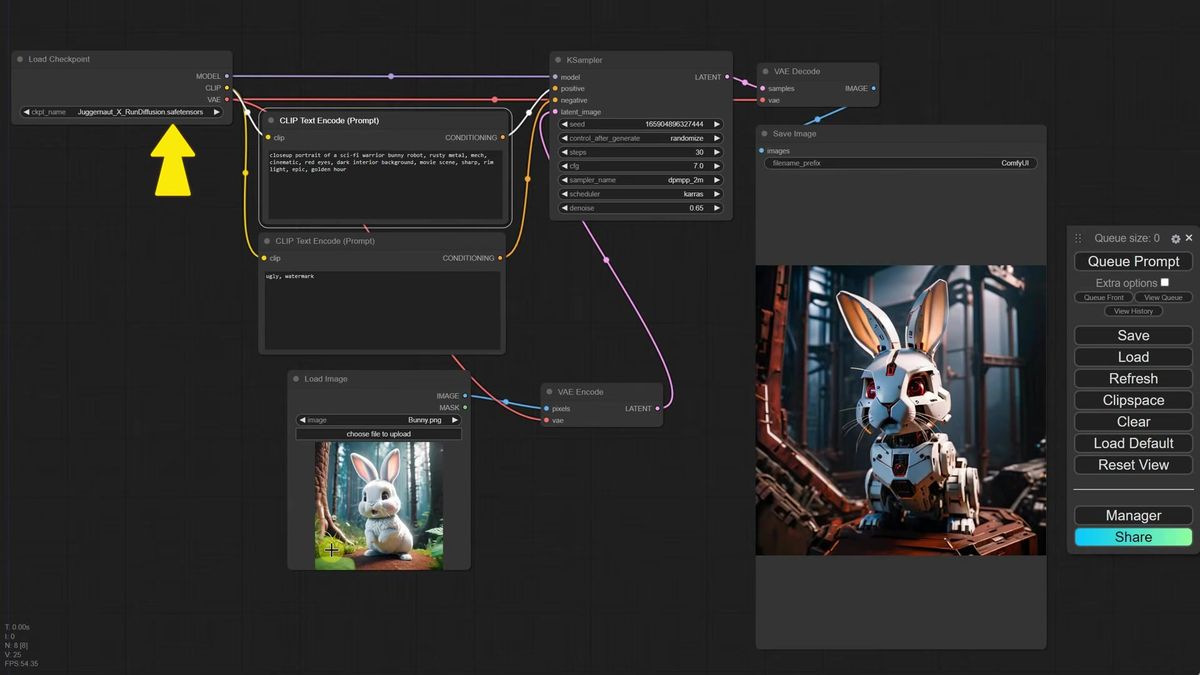
Run the bunny image through at denoise 1.0 and the original vanishes. The prompt takes over completely, because a value of 1.0 adds so much noise that nothing of the input survives. Drop it to 0.1 and the opposite happens: barely any noise, so the output is your input with a faint wash over it, and the prompt has almost no say.
Think of it as tracing paper opacity. Low denoise is near-transparent paper, you trace the original closely. High denoise is near-opaque paper, you draw something new on top. The term is "denoise" rather than "add noise" because the model adds noise first, then the real work is removing it to land on a clean image.
For turning a real photo into something stylistically different, start around 0.6 and adjust. At 0.65 with "robot bunny" in the prompt, the bunny keeps its pose and composition but becomes a machine in the scene you described. At 0.4 the change is too timid. At 0.9 you have lost the original entirely.
One trap worth naming before LoRA, because it bites everyone once: feed in an image that is far larger than your model's native size and the run crawls. A 4x-upscaled input on an SDXL model can take 200 seconds and run the GPU out of memory, versus 4 seconds at the right size. The fix is an Upscale Image node placed between Load Image and VAE Encode, set to roughly 1024 pixels with values divisible by 64. Same picture, 5 seconds instead of 200. Keep that in your pocket. It is the difference between a workflow that feels broken and one that feels instant.
What a LoRA actually is, in one paragraph
A LoRA is a small add-on file that teaches a big base model one new trick (a specific object, a specific person, or a specific art style) without retraining the whole model.
LoRA stands for low-rank adaptation. The base checkpoint stays frozen; the LoRA updates only a small, targeted slice of it. That is why a LoRA file is a few hundred megabytes instead of the multi-gigabyte checkpoint, and why people can train one on a consumer GPU in an afternoon.
The toolbox analogy holds up. Your base model is a full set of screwdrivers. A LoRA is a single specialized bit you click onto one of them to drive an odd screw you could not before. You do not buy a new toolbox. You snap on the one attachment that does the job. Want clouds shaped like animals, a particular person's face, an impressionist palette? That is one LoRA each, stacked onto a model that otherwise stays exactly as it was.
You can train your own, but for this workflow you only need to download one and wire it in.
Download a LoRA and put it in the right folder
LoRAs live on model-sharing sites like Civitai, and two details matter when you pick one: the base model has to match yours, and you have to copy the trigger words.
On Civitai, open the Models tab, then filter by model type LoRA and by your base model. If you are on SDXL, select SDXL, because an SD 1.5 LoRA will not load cleanly onto an SDXL checkpoint. Sort by a recent time window to surface current ones.
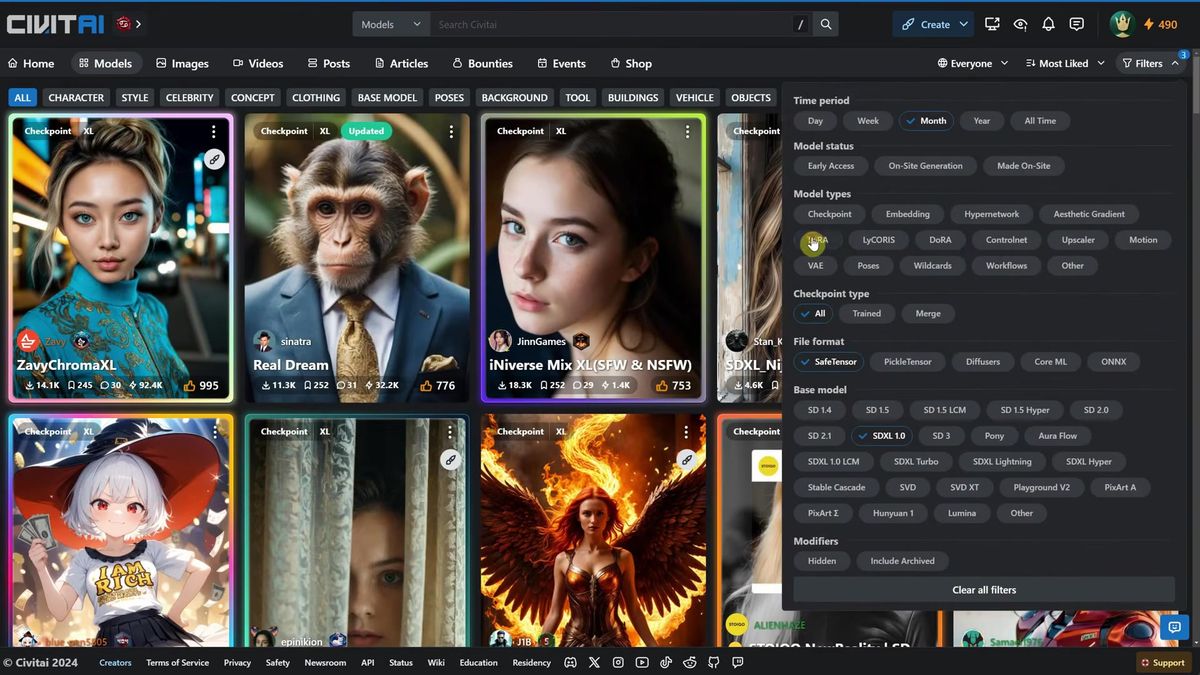
Open a LoRA's page and note two things before you download: the base model badge (confirm it says SDXL) and the trigger words. Trigger words are the exact phrases the LoRA was trained to respond to. Leave them out of your prompt and the LoRA does close to nothing. The page also usually recommends a strength to use. Write it down.
Download the .safetensors file and drop it into ComfyUI/models/loras. That folder ships with a put_loras_here placeholder so you cannot miss it. Two example LoRAs, one for clouds and one for fire, sit there once downloaded.
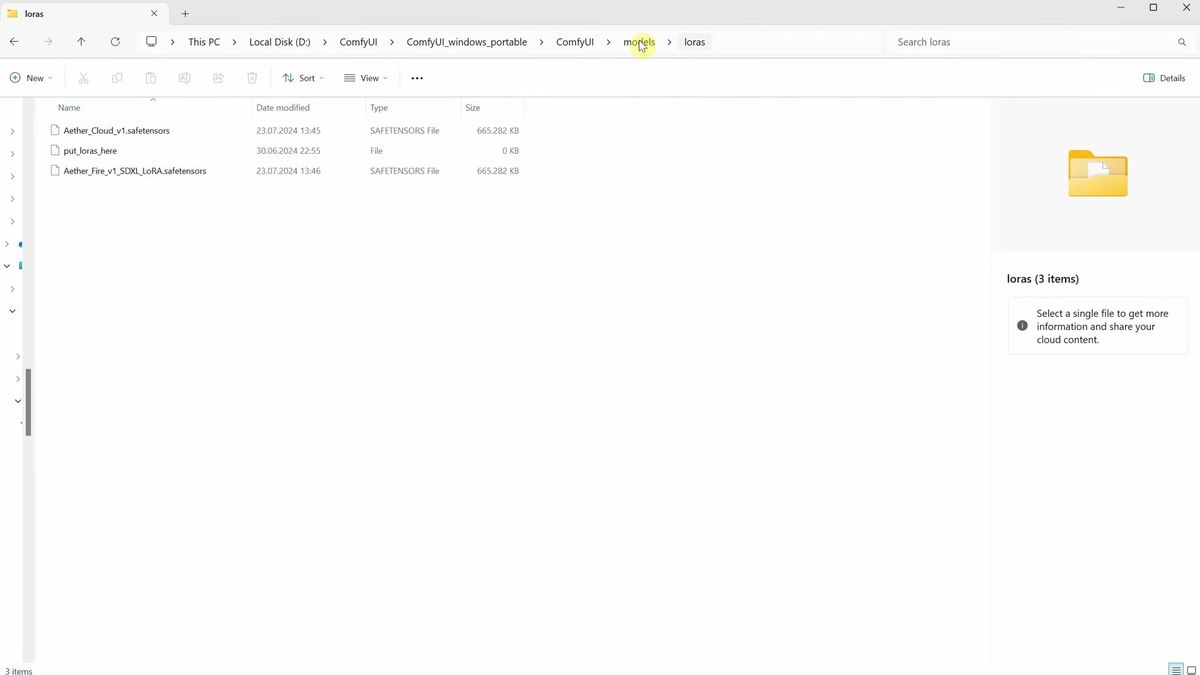
Back in ComfyUI, hit Refresh so the dropdowns pick up the new files. No restart needed.
Wire the Load LoRA node in the one place it belongs
The Load LoRA node goes between the Load Checkpoint and the prompt encoders, because the model has to be adapted by the LoRA before the prompt is interpreted against it.
Search for "LoRA" and add the Load LoRA node. It has model and clip inputs and model and clip outputs. The placement logic is worth understanding rather than memorizing, because it is the part people get backwards.
The clip output has to reach the CLIP Text Encode prompt nodes. The KSampler has no clip input, only positive and negative conditioning, so the LoRA cannot sit after the prompts. So: clip from the checkpoint goes into the LoRA, clip from the LoRA goes into both prompt nodes. Then reroute the model link the same way, deleting the direct checkpoint-to-KSampler link and sending it through the LoRA instead. A small detour through the LoRA node, on both the model and the clip path.
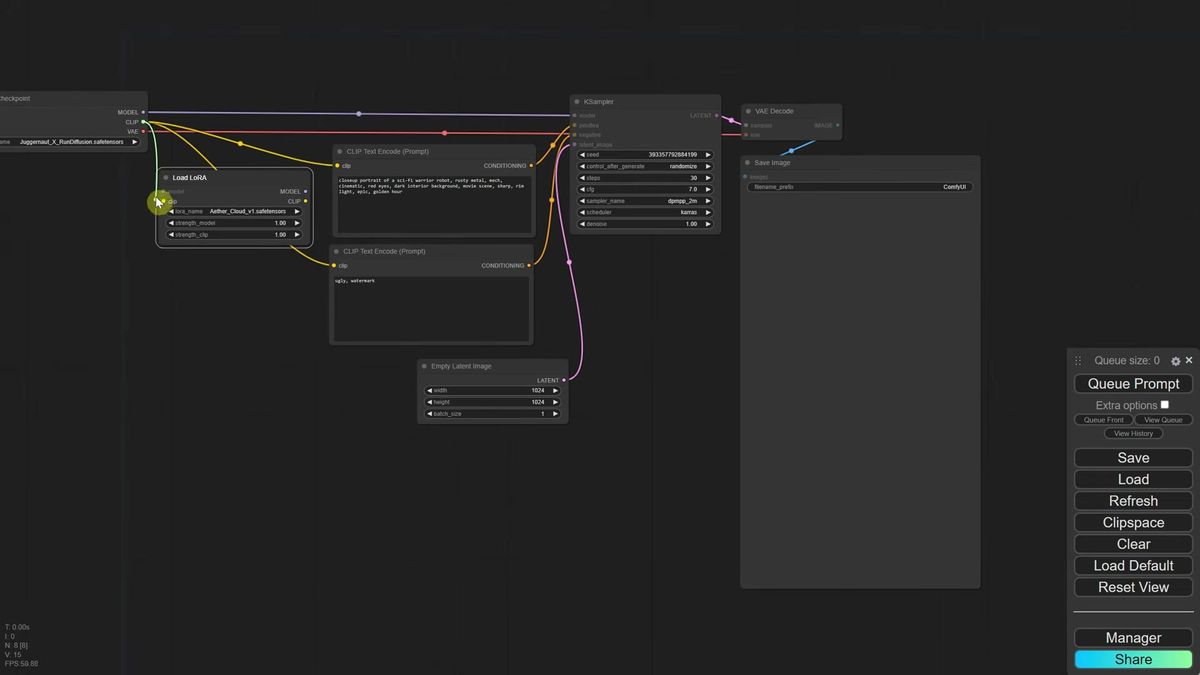
Why before the prompt? Because routing it there means the model is already adapted with the LoRA's adjustments when it reads your prompt. The modified model is what interprets the words, so the LoRA's knowledge shapes the result instead of being bolted on after the fact.
Now add your prompt with the trigger word. For a cloud LoRA whose trigger is "cloud that looks like," you might write "cloud that looks like a bull, blue sky photo." Fix the seed so you can compare runs. Bypass the LoRA node first: you get a plain cloud, no bull. Enable it: you get a cloud shaped like a bull. The LoRA is doing exactly one job, and doing it on command.
The other dial that matters is strength_model. It scales how hard the LoRA pushes. Keep it between 0.3 and 1.0. Push it to 2.0 and the image degrades into mush. Stay near the page's recommended value, usually around 1.0, and only nudge from there. You can stack a LoRA onto img2img too: convert the graph as above, add the trigger word, drop the denoise to around 0.5, and your loaded bunny comes out ignited in fire or rendered in clouds, your input's pose intact.
The part that changes when real traffic shows up
A single LoRA node on your desktop is free and instant. The same node behind a product means owning GPU supply, queueing, retries, and cost per image. That is where most teams stall.
Here is the honest gap. The workflow above runs in 5 seconds on a machine sitting idle with nobody else in the queue. A product does not get that luxury. Ten users hit it at once, your one GPU serializes them, the tenth person waits a minute, and your "instant" demo feels broken. Buy a second GPU and now you are paying for two cards that sit at 4% utilization between traffic spikes. (We have run that math more than once; it does not end well for a pile of always-on machines.)
This is the whole reason Runflow exists. You take the exact ComfyUI graph you just built (checkpoint, Load LoRA node, trigger words, strengths, all of it) and run it as an API endpoint instead of a desktop window. You send a request, you get an image back, and the GPU supply, queueing, and retries are somebody else's problem. The pricing is simple fixed per-call, so you can put a real number against each generation before you ship.
A run is a POST and a poll:
# Dispatch a LoRA-backed workflow run
curl -X POST https://api.runflow.io/v1/models/{owner}/{slug}/runs \
  -H "Authorization: Bearer $RUNFLOW_API_KEY" \
  -H "Content-Type: application/json" \
  -d '{
    "input": {
      "prompt": "cloud that looks like a bull, blue sky photo",
      "lora_strength": 1.0,
      "denoise": 0.65
    }
  }'

# Poll until the run is done
curl https://api.runflow.io/v1/runs/{run_id} \
  -H "Authorization: Bearer $RUNFLOW_API_KEY"
The dispatch-and-poll shape is the same for any graph you deploy. Your LoRA stack, your trigger words, your strength dials all travel with the workflow. For the full request and polling contract, the ComfyUI API developer guide walks through it end to end, and the production-ready ComfyUI workflows post covers which graphs are worth wrapping first.
If you would rather start from a hosted model than deploy your own LoRA graph, the SDXL and Flux base models live in the Runflow model catalog, and the broader image API covers the surrounding jobs you end up needing anyway: resize, background removal, format conversion. For the next ComfyUI techniques in this series, the ComfyUI IPAdapter guide covers identity and style transfer, and the ComfyUI Flux install guide gets you onto a faster base model than SDXL.
Frequently asked questions
What is a LoRA in ComfyUI?
A LoRA (low-rank adaptation) is a small add-on file, usually a few hundred megabytes, that teaches a base model one specific thing: an object, a person, or an art style. It updates a targeted slice of the model instead of the whole thing, so it is cheap to train and quick to load.
Where do I put LoRA files in ComfyUI?
Drop the .safetensors file into ComfyUI/models/loras. That folder has a put_loras_here placeholder. After adding a file, hit Refresh in the ComfyUI interface so the Load LoRA dropdown picks it up. No restart required.
Where does the Load LoRA node go in the workflow?
Between the Load Checkpoint and the CLIP Text Encode prompt nodes. Route both the model and clip links from the checkpoint through the LoRA, then on to the KSampler and the prompts respectively. It sits before the prompt so the model is adapted before your prompt is interpreted.
Why is my LoRA not doing anything?
The most common cause is a missing trigger word. Every LoRA is trained on specific phrases listed on its download page, and you have to include them in your prompt. The second most common cause is a base-model mismatch, like loading an SD 1.5 LoRA onto an SDXL checkpoint.
What is a good LoRA strength in ComfyUI?
Keep strength_model between 0.3 and 1.0, starting near the value recommended on the LoRA's page (often around 1.0). Higher values like 2.0 tend to degrade the image into noise and artifacts.
Can I use a LoRA with my own image instead of text-to-image?
Yes. Convert the workflow to img2img by replacing the Empty Latent Image with a Load Image node feeding a VAE Encode node, add an Upscale Image node to keep the input near your model's native size, then drop the denoise to around 0.5 so your input survives. Add the LoRA trigger words to the prompt as usual.
What does denoise strength do in img2img?
It controls how much the output departs from your input image. Low values (0.1) keep the input almost untouched; high values (1.0) discard it entirely. Around 0.5 to 0.65 keeps the composition while letting the prompt and LoRA restyle it.
Why does my img2img run take 200 seconds?
Your input image is almost certainly far larger than your model's native resolution, which can also trigger an out-of-memory fallback. Add an Upscale Image node before VAE Encode and set it near 1024 pixels for SDXL. Runs drop from a few hundred seconds back to a handful.
How do I run a ComfyUI LoRA workflow as an API?
Wrap the graph as an endpoint and call it with a POST to /v1/models/{owner}/{slug}/runs, then poll /v1/runs/{run_id} for the result. Platforms like Runflow host the workflow and the GPUs, so your LoRA, trigger words, and strengths run server-side at fixed per-call pricing.
Do I need an SDXL or SD 1.5 LoRA?
Match the LoRA's base model to your checkpoint. An SDXL LoRA needs an SDXL checkpoint; an SD 1.5 LoRA needs an SD 1.5 checkpoint. The base model is listed as a badge on every LoRA page, so confirm it before you download.
Where to go next
You have the full picture now: the img2img conversion, the denoise dial, the Load LoRA node and where it belongs, trigger words, and the path from one desktop node to a real endpoint. So where does that leave you, three wires and a trigger word later?
- Build the base img2img graph: swap Empty Latent for Load Image plus a VAE Encode node, and add an Upscale Image node to keep inputs near 1024px.
- Tune denoise to taste. Start at 0.6, push down for fidelity to the input, up for more prompt influence.
- Download an SDXL LoRA from Civitai, drop it in
ComfyUI/models/loras, hit Refresh, and copy its trigger words. - Wire the Load LoRA node between the checkpoint and the prompts, routing both model and clip through it, and set
strength_modelnear 1.0. - When traffic shows up, wrap the graph as an API with the ComfyUI API developer guide so the GPUs stop being your problem.
- Browse the hosted SDXL and Flux models in the Runflow model catalog if you want a base to start from without self-hosting.
Start free at runflow.io.
Want custom benchmarks for your workload?
We'll run our evaluation pipeline against your production data, for free.
Talk to Founders