ComfyUI outpainting: the workflow that hides the seam (2026)
ComfyUI outpainting adds new pixels to an image while matching the original. Build the node graph that hides the seam, then run it as a production API.
The seam is the whole game. Add pixels past the edge of a photo and the model has no idea what was there, so it guesses. Guess badly and you get a hard line where the old image stops and the new one starts. Guess well and nobody can tell you ever cropped it.
That line is what separates a ComfyUI outpainting workflow that works from one that looks like a bad collage.
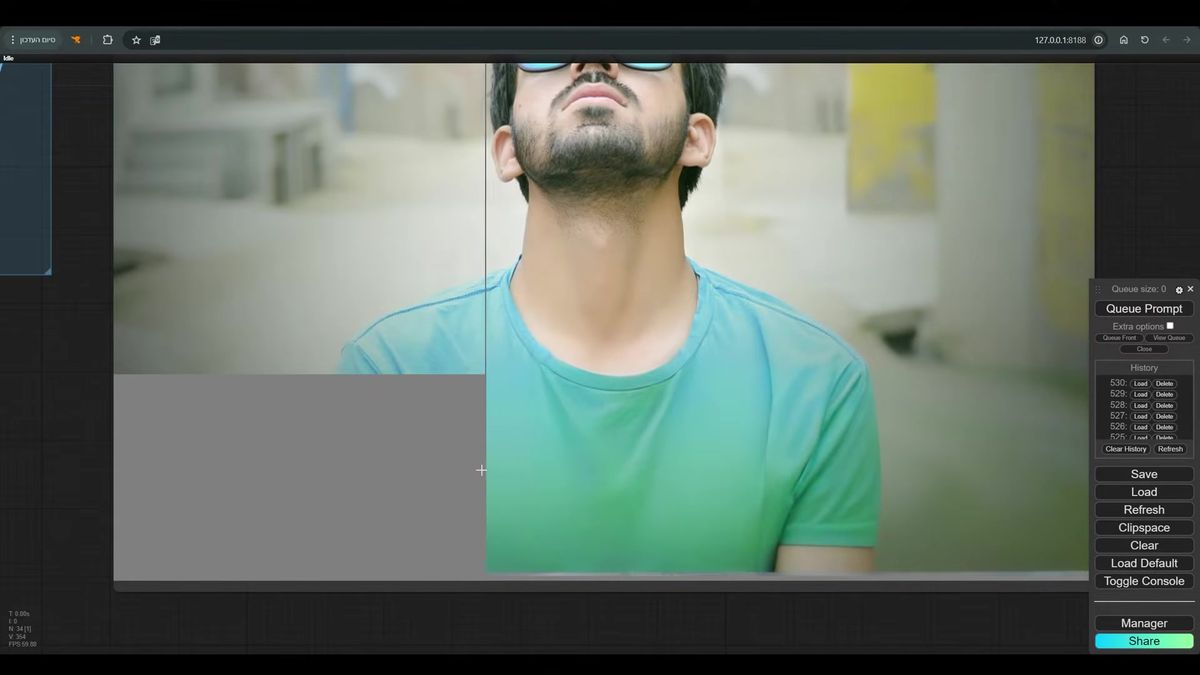
Outpainting means extending an image beyond its original borders while keeping the new content harmonious with what was already there. Inpainting fills a hole inside the frame. Outpainting builds new frame around the edges. Same diffusion machinery, different mask, and the failure modes are sharper because the model is inventing from less context.
This guide rebuilds the PixelEasel outpaint workflow node by node, explains why each piece exists, and then shows the part most tutorials skip: what happens when you stop running this on your own card and start running it for real users. We learned that second part the expensive way.
What is outpainting in ComfyUI?
Outpainting in ComfyUI is generating new pixels outside an image's original edges so the result reads as one continuous photo, not a paste-up. You start with a real image, pad it with empty space in one or more directions, mask that empty space, and let a diffusion model fill it using the original pixels as context.
The reason it's harder than it sounds: the model has zero information in the area you added. Run a naive pass and the new region comes out as noise, a color smear, or a scene that has nothing to do with the source. The craft is in feeding the model enough edge context and a soft enough mask boundary that the join disappears.
Three nodes carry most of the weight here: Pad Image for Outpaint, Fill Masked Area, and the inpaint conditioning that tells the sampler which region to rebuild. Get those right and the model behaves. Skip one and the seam shows up every time.
Step 1: resize the image so the canvas is sane
Resize first so the outpaint region lands at a resolution your GPU can actually sample. Outpainting adds pixels on top of whatever you start with, so a 4000px source plus a wide pad is a latent your card may refuse to process.
The walkthrough uses the Mixlab Resize Image node, which keeps the original proportions while you set a target. You tell it portrait or landscape, it computes the new resolution, and you scale that number to the compute you have. The graph also drops in a couple of Get Image Size nodes before and after so you can read the pixel dimensions at each stage and catch a runaway canvas before it costs you a generation.
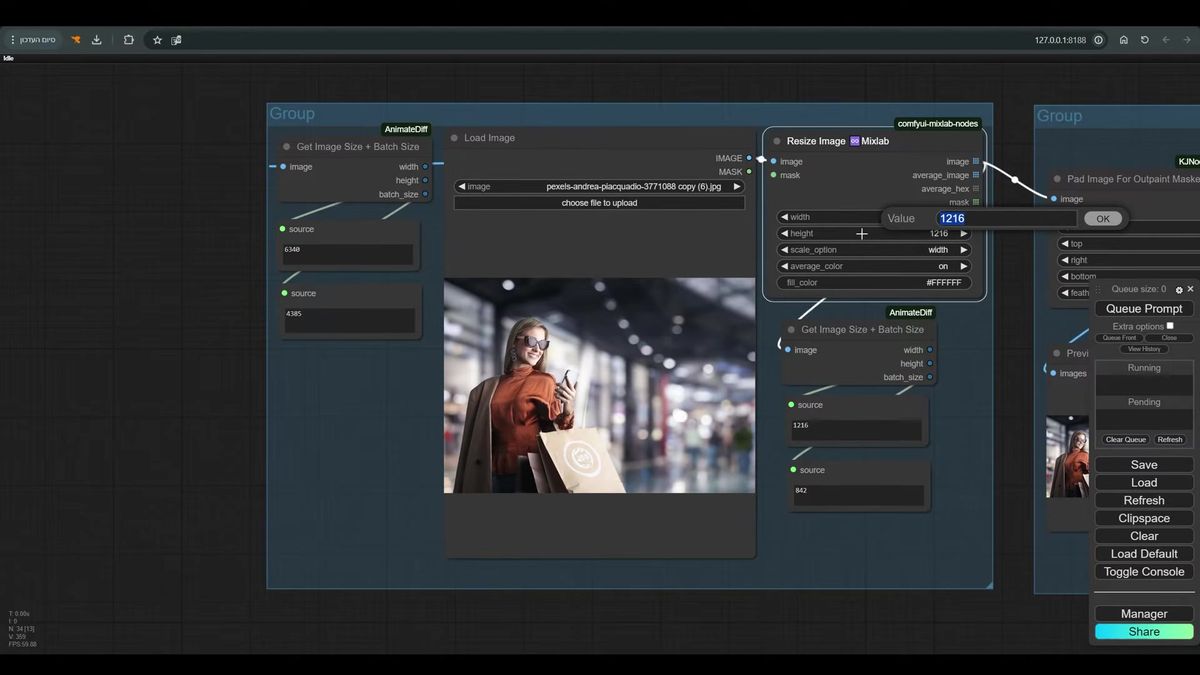
This step feels boring and it's the one people skip. Then they wonder why a wide outpaint on a phone photo takes 40 seconds and sometimes out-of-memories the worker. Set the resolution deliberately. A predictable canvas is the difference between a workflow you can run in a loop and one you babysit.
Step 2: pad the image and feather the mask
Pad Image for Outpaint creates the empty region and the mask, and the feathering value on that node decides whether your seam is invisible or obvious. This is the single most important setting in the whole graph.
You pick directions: left, right, top, bottom, in pixels. Round those to multiples of 64, because the latent space works in 8px blocks and clean multiples avoid edge artifacts. Want to expand 256px to the left, you type 256 into left, the node grows the canvas and hands you a black-and-white mask where white is the new area.
Then feathering. Set it to zero and the mask boundary is a razor edge. The model treats one row of pixels as "keep" and the next as "replace," and the transition shows up as a visible line in the final image. Bring feathering up to around 60 and the boundary becomes a gradient. The model blends across that gradient instead of slamming into it.
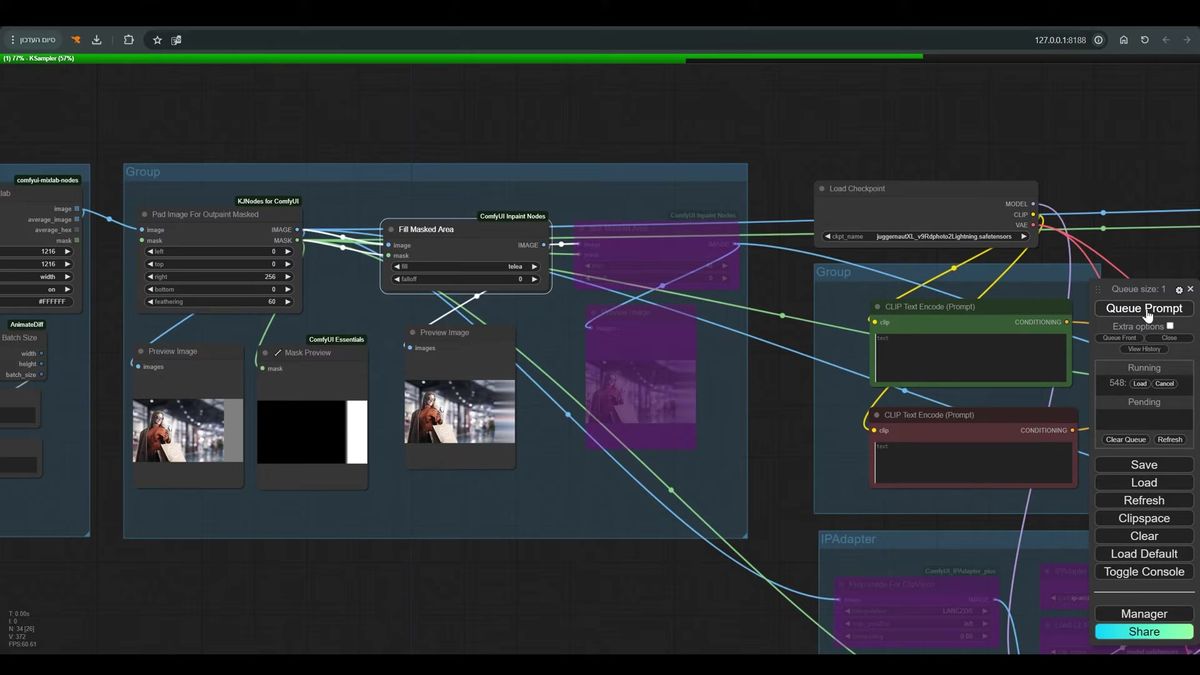
Don't set feathering too low. The honesty aside here: every clean outpaint I've seen had feathering in the 40 to 80 range, and every visible seam I've debugged had someone who set it to zero because the preview looked "sharper." Sharper mask, worse result. Bring it back up.
Step 3: fill the masked area before you sample
Fill Masked Area seeds the empty region with smeared edge pixels so the diffusion model has something to start from instead of nothing. Bypass this node and the whole thing falls apart.
Here's the experiment from the walkthrough, and it's worth running yourself. Put the fill node in bypass, queue the prompt, and look at the result. It's bad. The new region comes out wrong because the model had no information to anchor to. Now turn Fill Masked Area back on. It pushes the original image's edge pixels outward into the masked zone, a rough smear that's nowhere near a finished image but gives the sampler a coherent starting point. Queue again. The result is completely different and far better.
That's the node doing its job: not painting the final pixels, just refusing to hand the model a blank.
After the fill, Blur Masked Area smooths the join one more time. Even with feathering and fill done right, there's often a faint, weak line where old meets new. The blur node softens that boundary so the connection reads as continuous. On some images you'll want to push the blur amount up; on most, the default is enough.
So the prep chain is: pad, fill, blur. Three nodes, each fixing a specific way the seam can show. Skip any one and it comes back.
Step 4: sample with an inpaint-aware conditioning
The sampler needs inpaint conditioning, not a plain latent, so it rebuilds only the masked region and leaves the original pixels alone. This is where the ComfyUI-Inpaint-Nodes package earns its place in the graph.
The walkthrough runs Juggernaut XL Lightning, which gets usable results in a handful of steps, around 7 in the graph, with cfg near 2.0 and a dpmpp_sde sampler. You can swap in your own checkpoint. The model choice matters less than the wiring.
The wiring goes like this. The image, mask, prompts, and VAE feed into InpaintModelConditioning (the VAE Encode & Inpaint Conditioning node), which outputs two latents. One carries the latent, one carries the noise mask. Both flow into Apply Fooocus Inpaint along with the model and the Fooocus inpaint patch you downloaded. That patched model goes through Differential Diffusion and into the KSampler. The second latent connects to the sampler too.
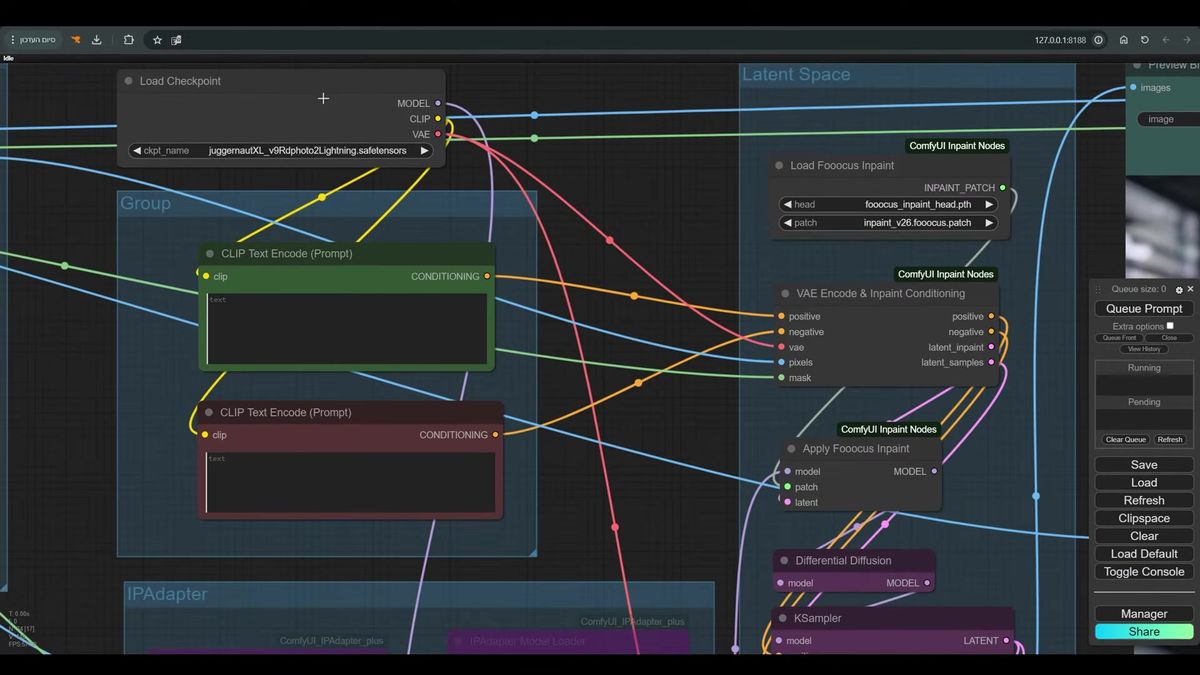
One detail that saves you a lot of confusion: the positive and negative prompts can be empty. Outpainting usually doesn't need a text prompt because the source image already tells the model what the scene is. In specific cases, naming what you want in the positive prompt helps. In most, you'll get a clean fill with no prompt at all. Start empty, add words only when a fill comes out wrong.
Step 5: composite back so the original stays untouched
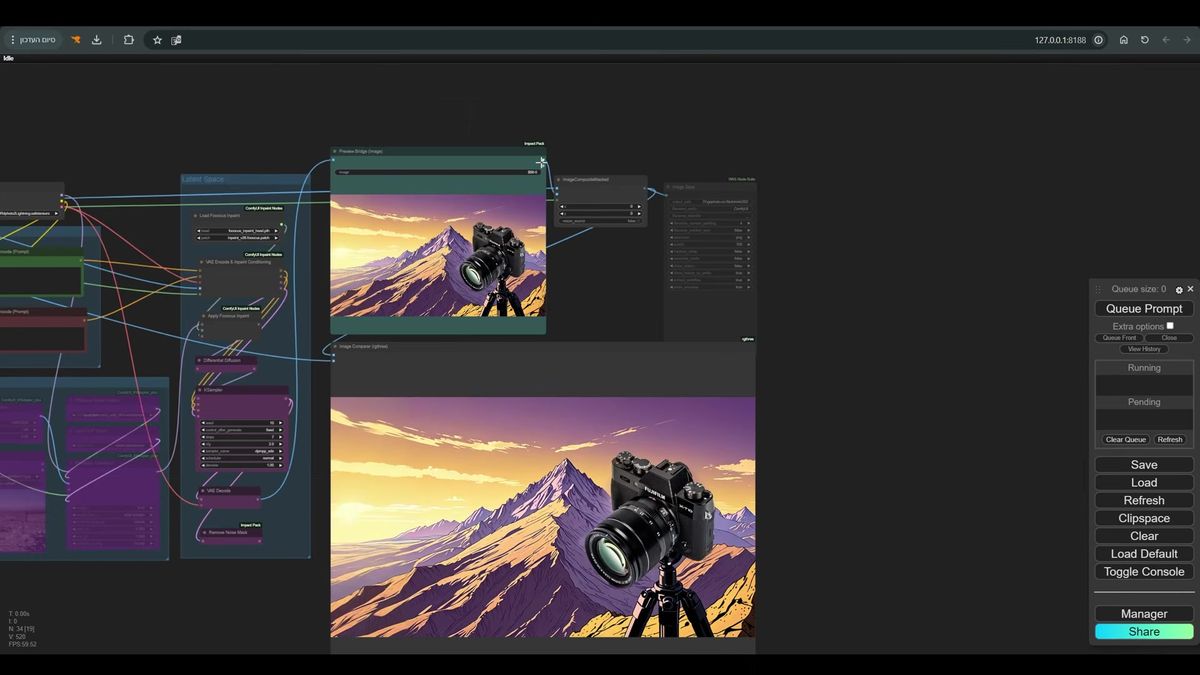
Encoding to latent and back nudges the original pixels, so composite the freshly generated region onto the untouched source at the end. This is the step that takes an outpaint from "good" to "lossless on the part that mattered."
Watch what happens with an Image Comparer node on the raw output. Expand an image to the left, look closely at a region far from the mask, the original part you never wanted touched. It changed, slightly. Colors shifted, detail softened. That happens because the whole image made a round trip through latent space and back to pixels, and that conversion isn't perfectly lossless.
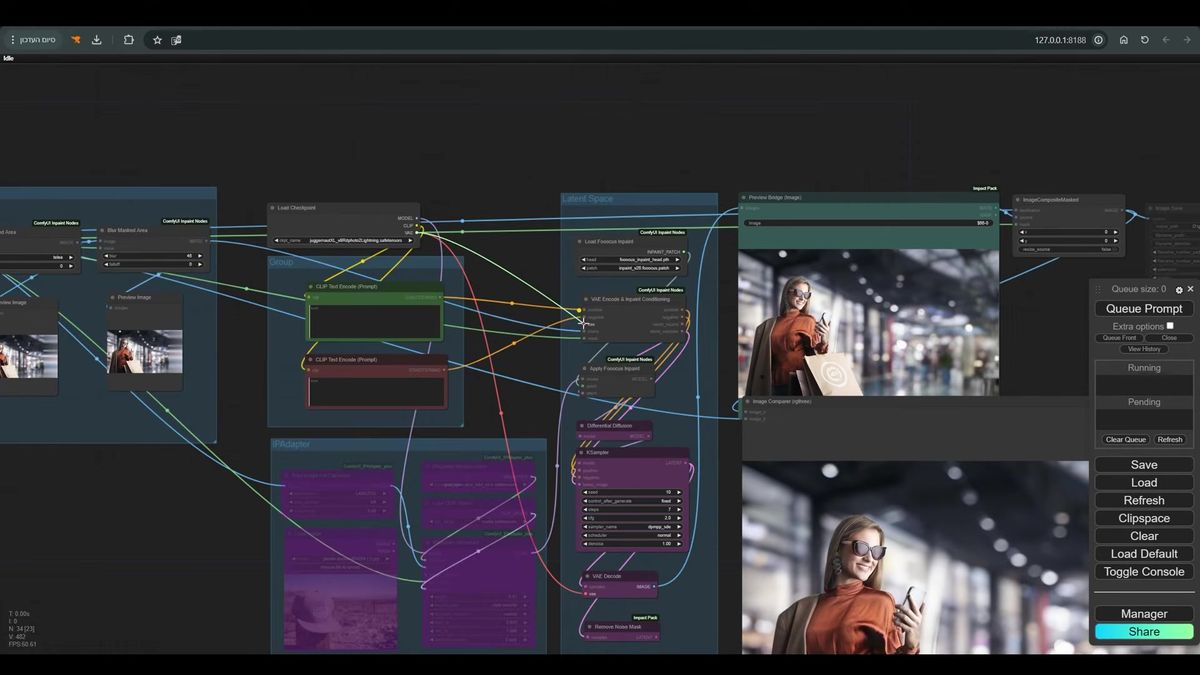
The fix is a composite. Take the generated result and the mask you already built, and paste the new region back onto the original image with ImageCompositeMasked. The masked area (the new pixels) comes from the generation. Everything else comes from the source, bit for bit. You keep the outpaint and you keep the original at full fidelity. The walkthrough shows it working on both a photo and an illustration of a camera on a tripod, the mountains extending out past the original frame with no seam in sight.
That's the full chain. Resize, pad, fill, blur, inpaint-conditioned sample, composite. Six moves and the seam is gone.
Running outpainting in production: where ComfyUI stops being enough
The workflow above is correct and it's also a liability the moment more than one person uses it at once. This is the part we learned the expensive way, and it's the honest reason this post exists.
Outpainting is a Juggernaut XL Lightning model plus the Fooocus inpaint patch plus a stack of custom nodes (Mixlab, ComfyUI-Inpaint-Nodes, KJNodes, Impact Pack). On your machine, brilliant. A few seconds per image, full control, nothing to pay but electricity.
Now put it behind a product. Ten users hit "expand image" in the same minute. Your one GPU processes them in series, so user ten waits for nine generations to finish. The card out-of-memories on someone's 4000px upload. A custom node updates and breaks the graph at 2am. You're now running GPU infrastructure, not a feature (we've run that math, and one machine doesn't end well).
This is the work that has nothing to do with outpainting and everything to do with shipping it. Queueing, autoscaling GPUs, pinning node versions, handling the upload that's too big, retrying the worker that died. It's a real engineering surface, and it's why teams that just want the outpaint result reach for an API instead of a server they have to babysit.
Runflow runs the same class of image models behind a single endpoint, with simple fixed pricing and no GPU pool for you to manage. You send the image and the region you want filled, we run it on infrastructure that's already there, you get the result back. The pitch is narrow and honest: you skip the part where you become a DevOps team for one feature, and it tends to land around 70% cheaper than building that team in-house. No AI team required, and the workflow doesn't fall over when ten users show up at once.
If you want the full version of this path, the ComfyUI API developer guide covers how a graph like this becomes a callable endpoint, and the Runflow Solutions API lists the editing endpoints that already exist.
Calling an outpaint-style edit as an API
You run a model with a POST, then poll a run ID until the result is ready. Here's the shape of a Runflow call for an image edit, the same async pattern an outpaint workflow uses behind an endpoint:
# Kick off the run
curl -X POST https://api.runflow.io/v1/models/{owner}/{slug}/runs \
  -H "Authorization: Bearer $RUNFLOW_API_KEY" \
  -H "Content-Type: application/json" \
  -d '{
    "input": {
      "image_url": "https://example.com/source.jpg",
      "prompt": "extend the scene to the left, keep lighting consistent"
    }
  }'

# Poll until status is "succeeded"
curl https://api.runflow.io/v1/runs/{id} \
  -H "Authorization: Bearer $RUNFLOW_API_KEY"
No queue to manage, no node versions to pin, no GPU to keep warm. The same logic that hides the seam in your local graph runs server-side, and you get a URL back. For the heavier ComfyUI graphs that don't map to a single model, you can also deploy the whole workflow with ComfyUI cloud deploy and call it the same way.
Local versus API: when each one wins
Build it locally to learn it and iterate; move to an API the moment it has to serve other people. Here's the honest split.
| Local ComfyUI | Outpainting via API | |
|---|---|---|
| Setup | Install nodes, models, patches | One API key |
| Cost | Your GPU + your time | Simple fixed per-call pricing |
| Concurrency | One job at a time per card | Scales without you managing it |
| Node updates | You patch breakages | Handled server-side |
| Best for | Learning, one-off edits, full control | Apps, batches, real users |
Neither is wrong. The local graph is the right place to understand outpainting and to tune feathering for your own images. The API is the right place to put it once a customer is waiting on the other end. Most teams do both: prototype the workflow in ComfyUI, then run the proven version through an endpoint. If you want more graphs worth keeping, the production-ready ComfyUI workflows roundup is a good next stop, and ComfyUI Flux Kontext editing covers the inpainting side of the same toolkit.
Frequently asked questions
What is outpainting in ComfyUI?
Outpainting in ComfyUI is generating new pixels outside an image's original borders so the extended image reads as one continuous photo. You pad the image with empty space, mask it, and let a diffusion model fill the new region using the original pixels as context.
What's the difference between inpainting and outpainting?
Inpainting fills a masked hole inside the existing frame. Outpainting adds new frame around the edges. They share the same diffusion machinery and the ComfyUI-Inpaint-Nodes package, but outpainting is harder because the model invents content from less surrounding context.
Why does my outpaint have a visible seam?
Almost always feathering set too low or a skipped fill step. Set the Pad Image for Outpaint feathering to roughly 40 to 80, keep Fill Masked Area enabled so the model has edge pixels to start from, and add Blur Masked Area to soften the join.
What does Fill Masked Area do?
It seeds the empty masked region with smeared edge pixels from the original image. The model needs a coherent starting point. With the fill bypassed, the new area generates from nothing and comes out wrong. With it on, the result is dramatically better.
Do I need a text prompt for outpainting?
Usually no. The source image already tells the model what the scene is, so empty positive and negative prompts often produce a clean fill. Add words to the positive prompt only when a specific fill comes out wrong.
What model should I use for outpainting?
The walkthrough uses Juggernaut XL Lightning for fast results in about 7 steps, paired with the Fooocus inpaint patch. Any inpaint-capable checkpoint works. The wiring through InpaintModelConditioning and Apply Fooocus Inpaint matters more than the specific model.
Why composite the result back onto the original?
Encoding the full image to latent and back nudges the original pixels slightly, even far from the mask. ImageCompositeMasked pastes only the newly generated region onto the untouched source, so you keep the outpaint and the original at full fidelity.
Why use multiples of 64 for the pad size?
The latent space works in pixel blocks, so pad amounts that are clean multiples of 64 avoid edge artifacts and rounding issues during encoding.
Can I run ComfyUI outpainting as an API?
Yes. You can deploy the whole graph with a ComfyUI cloud deploy, or call a hosted image-edit model with a POST to start a run and a poll on the run ID for the result. That removes the GPU, queue, and node-version management you'd otherwise own.
How much VRAM does outpainting need?
It depends on the resolution after padding, which is why resizing first matters. An XL Lightning checkpoint plus a moderate canvas runs comfortably on a high-end consumer card. Large sources with wide pads can exhaust VRAM, so set the canvas deliberately.
Where to go next
- Build the workflow above in ComfyUI: install ComfyUI-Inpaint-Nodes, Mixlab, KJNodes, and Impact Pack from the Manager.
- Download Juggernaut XL Lightning and the Fooocus inpaint patch, then wire the resize, pad, fill, blur, sample, composite chain.
- Tune feathering on your own images. Start at 60, watch the seam, adjust from there.
- Read the ComfyUI API developer guide to see how a graph becomes a callable endpoint.
- Compare ComfyUI cloud and online platforms if you're deciding where to host it.
- Browse the Runflow Solutions API for image-edit endpoints you can call today, no GPU to manage.
- Start free at runflow.io.
Want custom benchmarks for your workload?
We'll run our evaluation pipeline against your production data, for free.
Talk to Founders