How to use ComfyUI: a beginner's guide for 2026
How to use ComfyUI from a blank canvas: the interface, what nodes do, your first text-to-image workflow, and when to move from local to cloud and API.
You opened ComfyUI. It looks like a circuit board, not an image generator. You thought: now what?
That's the moment. Everyone hits it. Learning how to use ComfyUI stalls right there, because the screen throws a wall of boxes and wires at you before it shows you a single picture. The good news: the pieces are simpler than they look, and the second a few of them click, the whole thing opens up.
ComfyUI is a node-based tool for running AI image and video models. Where other tools give you one button that hides everything, ComfyUI hands you the wiring. You connect small boxes (nodes) that each do one job: load a model, write a prompt, generate the image, save the file. Sebastian Kamph's beginner walkthrough covers this well, and this guide builds on the same ground while adding the part most tutorials skip.
That part is the arc every serious ComfyUI workflow runs through: local to cloud to API. You learn it free on your own card. Then a use case shows up and your single GPU buckles under real traffic. We've lived that jump building image infrastructure, so the back half of this guide is the honest version of it. By the end you'll understand the interface, what nodes do, how to run your first text-to-image workflow, and the honest answer to "is my laptop enough." Watch the video first if you learn visually, then come back here.
What is ComfyUI and why use it?
ComfyUI is a free, node-based interface for running AI image and video models, where you build a visual graph of connected steps instead of filling out a single form. That graph is called a workflow.

The appeal is range. A workflow can do text-to-image, image-to-image, video, upscaling, face swaps, or all of them chained together. If a feature you want doesn't exist yet, someone in the community has usually built a custom node for it.
The trade-off is hardware. ComfyUI is free to download and free to run, but it leans on your GPU. A 5-second video or a batch of high-res images will push a consumer card hard, and some workflows won't fit in low VRAM. So the real cost is the machine you run it on, or the cloud GPU you rent when your own card isn't enough.
Sharing is trivial, which beginners love early. Drag a finished image back into ComfyUI and it rebuilds the workflow that made it. Save the workflow as JSON, send it to a friend, and they drag it straight into their canvas. The full recipe travels with the file.
Getting around the ComfyUI interface
The first time you open ComfyUI you'll see either a default workflow or a blank canvas, plus a small menu bar with the controls you'll use most: the workflow menu, templates, the Manager, the queue, and the run button.
The workflow menu opens past workflows, saves your current one, or exports it as JSON. Next to it, templates give you pre-built starting points: basic Flux, Stable Diffusion XL, a few video ones. Open one to see how a working graph is wired before you build your own.
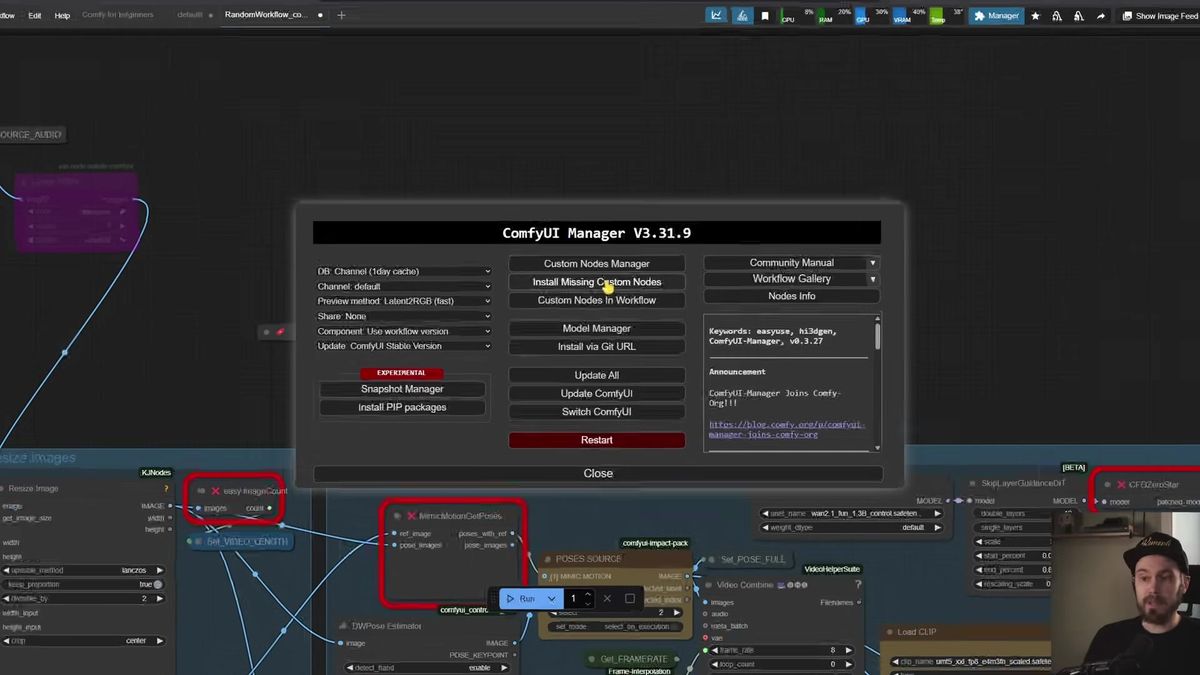
The Manager is the control you'll reach for constantly. It installs missing custom nodes, updates ComfyUI, and even installs models. When you load a downloaded workflow and the canvas lights up red with "missing node types," that's normal. Open the Manager, click install missing custom nodes, then restart ComfyUI and refresh the browser. The errors clear.
The queue shows what's rendering and what's done. The run button kicks off a workflow. You can set it to run once, run a fixed batch, or run instant so it keeps generating until you stop it. Leave it on instant overnight and you'll wake up to a folder of images.
Navigation is mouse-driven. Scroll to zoom, drag to pan, and if you get lost in empty canvas, hit fit view to snap back to your nodes. A toggle hides the link "spaghetti" when a graph gets busy, and there's a light/dark theme switch.
ComfyUI nodes explained
A node is a single feature box: it takes inputs on the left, does one job, and sends outputs on the right. You build a workflow by connecting the output of one node to the input of the next.
Direction never changes. Data comes in on the left, goes out on the right, always. A "Load Image" node outputs an image. A prompt node turns your text into something the model can read. A "Load Diffusion Model" node loads the AI model into memory.
You add nodes from the node library on the left, by pressing N, or by right-clicking the canvas. Stuck on what connects to an empty input? Drag a wire out from that socket and drop it on blank canvas, and ComfyUI suggests compatible nodes.
A custom node is one that doesn't ship with ComfyUI by default. Someone built it to add a feature the base install lacks, and the Manager installs it. That's why ComfyUI can do almost anything: the community keeps adding boxes.
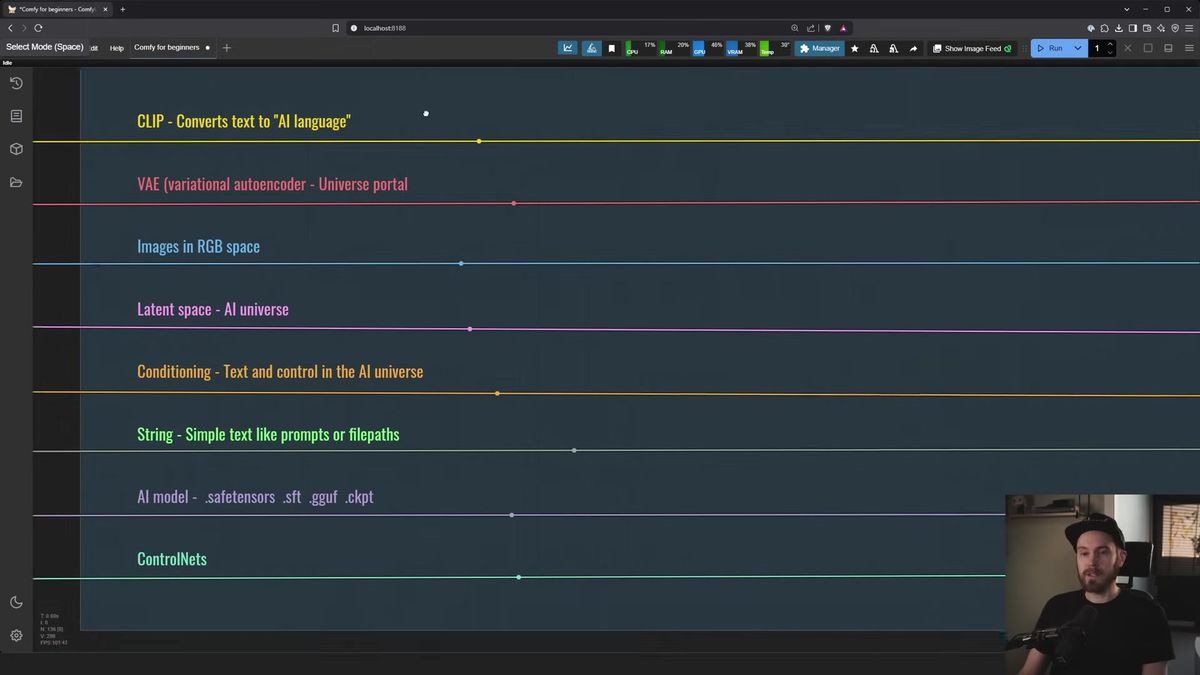
The connections are color-coded, and the colors are consistent across every workflow you'll ever open. Learn them once:
- Purple is an AI model (a safetensors or GGUF file).
- Yellow is CLIP, which converts your text into the model's internal language.
- Orange is conditioning, your text after CLIP has translated it.
- Pink is latent data, an image while it's still inside the model's working space.
- Blue is a normal image you can actually see.
- Red is the VAE, the part that moves images in and out of that working space.
- Green is plain text, like a prompt or a file path.
If a node's input socket is empty and colored, it almost always needs a wire of that color before the workflow will run.
Building your first text-to-image workflow
A basic text-to-image workflow connects four ideas: load a model, turn a prompt into conditioning, generate a latent image with a sampler, then decode that latent into a viewable image.
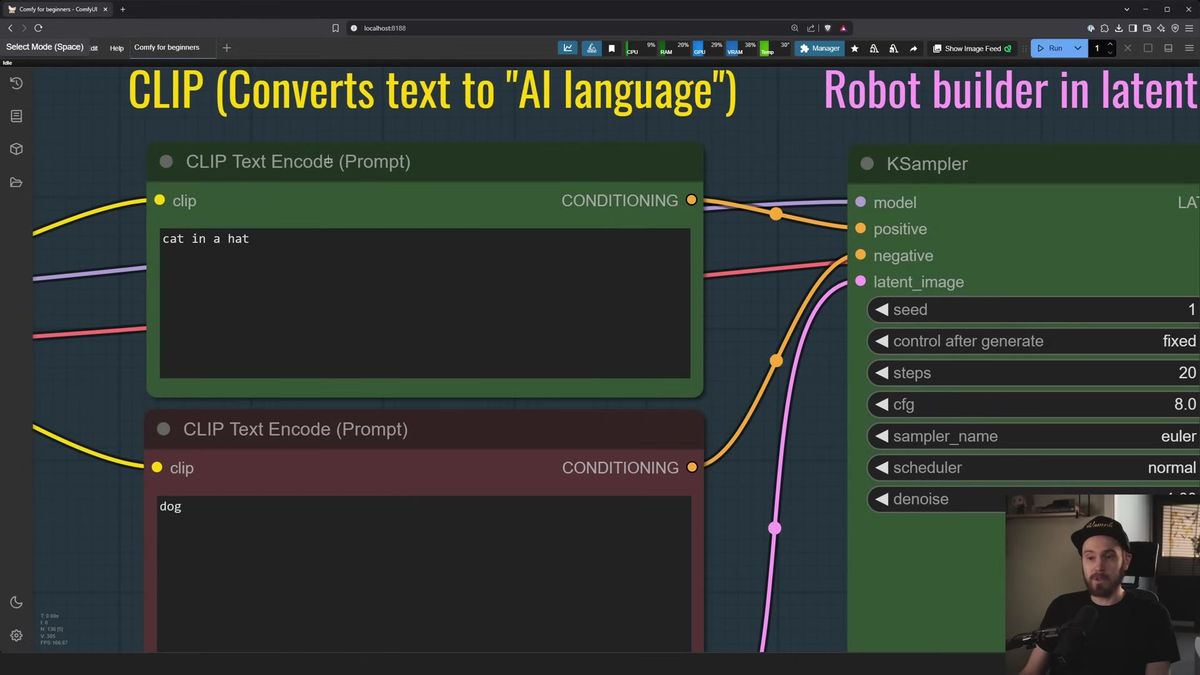
Walk through the default graph and it reads like a sentence. You load a checkpoint model. A positive prompt ("cat in a hat") and a negative prompt (things you don't want) go through CLIP into conditioning. An empty latent image acts as a blank canvas, where you set the size (1024 by 1024 for Flux, SDXL, or SD 3.5; 512 by 512 for older SD 1.5).
All of that feeds the KSampler, the machine that actually builds the image. It takes the model, both prompts, and the blank canvas, then generates a result inside the model's latent space. The VAE decodes that latent into a normal image, and a "Save Image" node writes the file to disk.
One note on prompts. A prompt is positive because it plugs into the positive input on the sampler, not because someone colored it green. Workflow creators often color positive prompts green and negative ones red as a courtesy, but the wiring is what counts.
Image-to-image works the same way with one change: instead of a blank canvas, you load a real image and send it in. The KSampler reworks it based on your prompt. How much it changes comes down to one setting, covered next.
The KSampler settings that actually matter
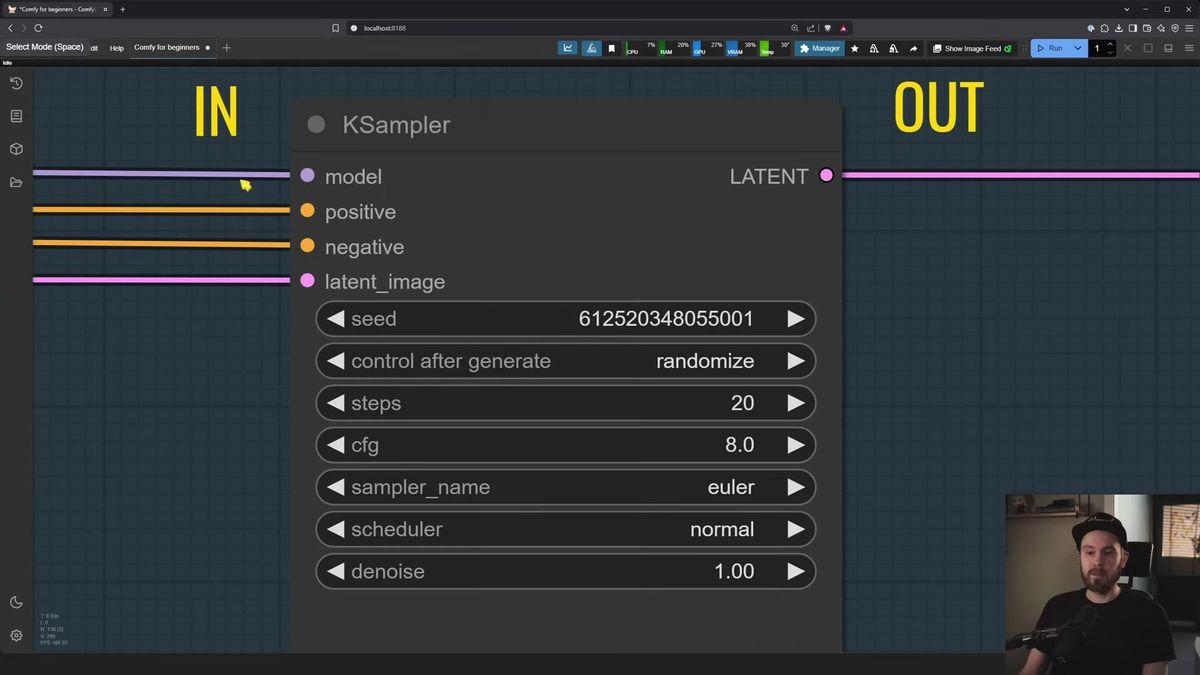
The KSampler holds the handful of settings beginners need to understand: seed, steps, CFG, sampler, scheduler, and denoise. Most of the rest you can leave alone.
Here's how to think about each:
- Seed sets the random starting noise, so every seed produces a different image. Leave it on "randomize" for variety, or fix it to keep the same base while you tweak other settings. No seed is "better" than another; one that nails your prompt was just lucky for that prompt.
- Steps is how long the sampler works. Roughly 20 is a solid baseline, with more steps adding refinement up to a point of diminishing returns.
- CFG is how closely the model follows your prompt, like a builder's blueprint. Low (around 3) gives creative room; high (around 10) forces strict adherence. For SDXL, 4 to 7 is common. For Flux, set CFG to 1 and use the separate Flux guidance value instead.
- Sampler and scheduler are the method and pacing the model uses. There are dozens, and most can stay a mystery. Use whatever the model or workflow creator recommends; Euler or Euler A handle most jobs fine.
- Denoise is the one to truly learn. It runs 0 to 1 and controls how much of the input gets rebuilt: 0 changes nothing, 1 is a from-scratch generation, 0.5 keeps half. In image-to-image, this dial decides whether your cat stays a cat or becomes a dog. Around 0.5 to 0.7 is a typical start, but it shifts per model.
Different models have different sweet spots, so treat these as starting points. Change one thing at a time and watch what happens. That's how the settings stop being mysterious.
When to move from local ComfyUI to cloud and API
Local ComfyUI is the best place to learn and prototype, but the moment real users depend on your workflow, you need cloud GPUs and an API, because a desktop card can't serve traffic reliably.
The local-to-cloud-to-API path is the honest arc of most serious ComfyUI work.
You start local. It's free, hands-on, and you learn how every node behaves. This stage is non-negotiable, since you can't debug what you don't understand.
Then a use case shows up: a headshot tool, a product-photo generator, an internal app your team uses daily. Suddenly your single GPU is the bottleneck. It runs one job at a time, it's tied to your desk, and if 50 people hit it at once they wait in line. Renting cloud GPUs fixes the hardware ceiling, and we compared the main options in our guide to ComfyUI cloud and online platforms.
The last step turns the workflow into something your code can call. Your app sends inputs, the workflow runs on a managed GPU, and the result comes back as a typed response. Runflow Deploy takes the exact ComfyUI workflow you built locally and publishes it as a REST endpoint, so you skip building the dispatch, queueing, and scaling layer yourself. For the full developer flow, see our ComfyUI API developer guide.
If your task maps to a common model rather than a custom graph, you can skip ComfyUI entirely in production and call the model directly. Runflow's model API covers 700+ image and video models behind one interface, with simple fixed per-call pricing. Here's the shape of a generic call:
# Start a run
POST https://api.runflow.io/v1/models/{owner}/{slug}/runs
Authorization: Bearer rf_live_xxx
Content-Type: application/json

{
  "input": {
    "prompt": "cat in a hat, studio lighting",
    "width": 1024,
    "height": 1024
  }
}

# Response includes a run id, then poll until it's done
GET https://api.runflow.io/v1/runs/{id}
Authorization: Bearer rf_live_xxx
The pitch for moving up the path is plain: you get GPU availability and reliability without hiring an AI infrastructure team, which tends to run around 70% cheaper than building and staffing it in-house. Browse the full Solutions API to see whether a ready-made endpoint already covers your task before you deploy a custom workflow.
Frequently asked questions
Is ComfyUI free to use?
Yes. It's free to download and free to run on your own machine. The only real cost is hardware, since it relies on a capable GPU, so a weak card means hitting limits or renting a cloud GPU.
Do I need a powerful GPU to use ComfyUI?
For learning and small images, a mid-range GPU is fine. For high-resolution batches, video, or many models chained together you'll want more VRAM, and a cloud GPU or managed API is the usual fix when your card can't keep up.
What is a node in ComfyUI?
A node is a single feature box that takes inputs on the left, does one job, and sends outputs on the right. You build a workflow by wiring the output of one node into the input of the next.
What is a custom node?
A custom node is one that doesn't ship with ComfyUI by default, built by the community to add features the base install lacks. You install them through the Manager, usually to fix the "missing node types" errors after loading a downloaded workflow.
What does the KSampler do?
The KSampler is the node that generates the image. It takes the model, your positive and negative prompts, and a latent canvas, then builds the result step by step. Its key settings are seed, steps, CFG, sampler, scheduler, and denoise.
What is the denoise setting?
Denoise runs from 0 to 1 and controls how much of an input image gets rebuilt: 0 changes nothing, 1 is a fresh generation, 0.5 keeps half. It's the main dial for image-to-image work.
Why is my ComfyUI workflow showing red errors?
Red usually means missing custom nodes from a workflow you loaded, or an unconnected required input. Open the Manager and install missing custom nodes, then restart and refresh. If a colored input socket is empty, connect a wire of that color.
How do I install models in ComfyUI?
Use the model manager inside the Manager panel: search for what you need, like a ControlNet or a checkpoint, and install it. You can also drop model files into ComfyUI's model folders manually.
Can I run ComfyUI workflows as an API?
Yes. Tools like Runflow Deploy publish your local ComfyUI workflow as a REST endpoint your app can call, with GPUs and scaling handled for you. For common models, you can also call a direct model API instead of deploying a custom graph.
Which AI image models work best in ComfyUI?
It changes fast. As of mid-2026, Flux and HiDream are strong general picks, with SDXL and SD 1.5 still useful for fine-tuned styles and LoRAs. Check a current leaderboard, since new models ship every few weeks.
Where to go next
The circuit board doesn't look like a circuit board anymore. You can read the wires, build a graph from scratch, and turn a dial knowing what it does. The interface was never the hard part. The real question is the same one waiting on the other side of every workflow that starts working: when the tenth user shows up at once, is your own card still the thing answering? Build the mental model first, then decide where it runs.
- Open a built-in template and trace every wire until the graph reads like a sentence.
- Build a text-to-image workflow from scratch, then change one KSampler setting at a time and watch the output shift.
- Try image-to-image and sweep the denoise from 0.3 to 0.8 to feel how it controls change.
- When your card struggles, compare cloud options in our ComfyUI cloud platforms guide.
- When real users need your workflow, publish it as an endpoint with Runflow Deploy.
- If a standard model covers your task, browse the model catalog and the Solutions API before deploying a custom graph.
- Read the ComfyUI API developer guide for the full production integration.
Start free at runflow.io.
Want custom benchmarks for your workload?
We'll run our evaluation pipeline against your production data, for free.
Talk to Founders