ComfyUI WAN 2.2 image to video on 8GB VRAM (2026 guide)
ComfyUI WAN 2.2 image to video runs on 8GB VRAM with GGUF quants and Lightx2v. The honest local setup, plus the cost and speed math of offloading to an API.
181 seconds for five seconds of 480p video. On an 8GB card. 23 seconds per sampling step, six steps, one clip. That is ComfyUI WAN 2.2 image to video running on a laptop GPU that has no business touching a 14-billion-parameter video model. The default weights want far more memory than 8GB. Then the community shipped GGUF quants and the Lightx2v LoRA, and suddenly the thing runs.
We learned the rest of this the expensive way. The clip is good. The setup is slow, fragile, and it locks your machine for the whole render (three minutes, GPU at 100%, nothing else moving). Brilliant for a hobby. A problem the second you need ten clips, or 720p, or your laptop back.
So this guide does two things. First it walks the low-VRAM local path honestly, node by node, the way the AIdea Lab build lays it out. Then it shows the production path: keep designing in ComfyUI, but push the video generation to a GPU API once one render becomes a hundred.
A note on disclosure. Runflow is our product, and the API path below is Runflow's. The ComfyUI setup is provider-agnostic and works whether or not you touch Runflow.
What changed in WAN 2.2 for image to video
WAN 2.2 is a two-model image-to-video system: a high-noise expert that sets motion and composition, paired with a low-noise expert that fills in fine detail, both running inside one ComfyUI workflow.
The biggest practical change from WAN 2.1 is that image to video now loads two model files: a high-noise checkpoint and a low-noise checkpoint, each a 14B model. The sampler splits your steps between them. The first half runs the high-noise model to lock in camera movement and scene layout; the second half runs the low-noise model to clean up texture and detail.
WAN 2.2 also reads a wider prompt vocabulary: lens choice (wide, medium, extreme close-up), camera moves (pullback, dolly in, tracking shot, arc shot, handheld shake), lighting, and emotion (angry, fearful, happy). The AIdea Lab walkthrough this guide is built on shows these prompts landing reliably.
The other good news for low-VRAM users: the speedup LoRAs from WAN 2.1 still work, which is what makes the 8GB path viable at all.
Why GGUF and Lightx2v make 8GB possible
GGUF quantization shrinks each WAN 2.2 model so it fits in low VRAM, and the Lightx2v LoRA cuts a 20-step render down to roughly six steps, which is what makes generation tolerable on a small GPU.
Two separate tricks are doing the work, and it helps to keep them apart.
GGUF is a quantized weight format. Instead of full-precision weights, you download a compressed version at a quant level that fits your card. The community publishes a full ladder: Q2 and Q3 for the tightest budgets, Q4 and Q5 for 8GB cards, Q6 and Q8 with more headroom. On 8GB, Q4 is the safe default and Q5 is often reachable. You need a GGUF for both models, matched at the same quant level.
Lightx2v is a different lever, a distillation LoRA carried over from WAN 2.1 that collapses the step count. WAN 2.2 defaults to 20 sampling steps; with Lightx2v you get clean output at about six. That is the difference between a render you will wait for and one you will abandon.
Together, GGUF handles "does it fit in memory" and Lightx2v handles "does it finish before you give up." Neither alone gets you there on 8GB.
Files you need before you start
A working low-VRAM WAN 2.2 image-to-video setup needs five files: the high-noise GGUF, the low-noise GGUF, the Lightx2v I2V LoRA, the WAN 2.1 text encoder, and the WAN 2.1 VAE.
Here is the full shopping list, with where each piece goes:
- High-noise GGUF (14B). Pick a quant that fits your card; Q4 is the 8GB default. Goes in
models/unet. - Low-noise GGUF (14B). Same quant level as the high-noise file, also in
models/unet. These two get paired in the workflow. - Lightx2v LoRA, the image-to-video (I2V) variant. Rank 32 is a solid start; 64 and 128 exist for experimenting. Goes in
models/loras. - Text encoder. The WAN 2.1 text encoder works fine for the 14B model; no new one needed for 2.2. Goes in
models/text_encoders. - VAE. Use the WAN 2.1 VAE for the 14B model. The 2.2 VAE only matters for the 5B model and runs slower, so skip it. Goes in
models/vae.
One setup step trips people up: update ComfyUI first. Open the manager, run the update, restart, refresh the browser. You want a recent build so the WAN 2.2 templates show up in the video template browser. The AIdea Lab video uses the official WAN 2.2 14B image-to-video template as a base and extends it, which is the same starting point we recommend.
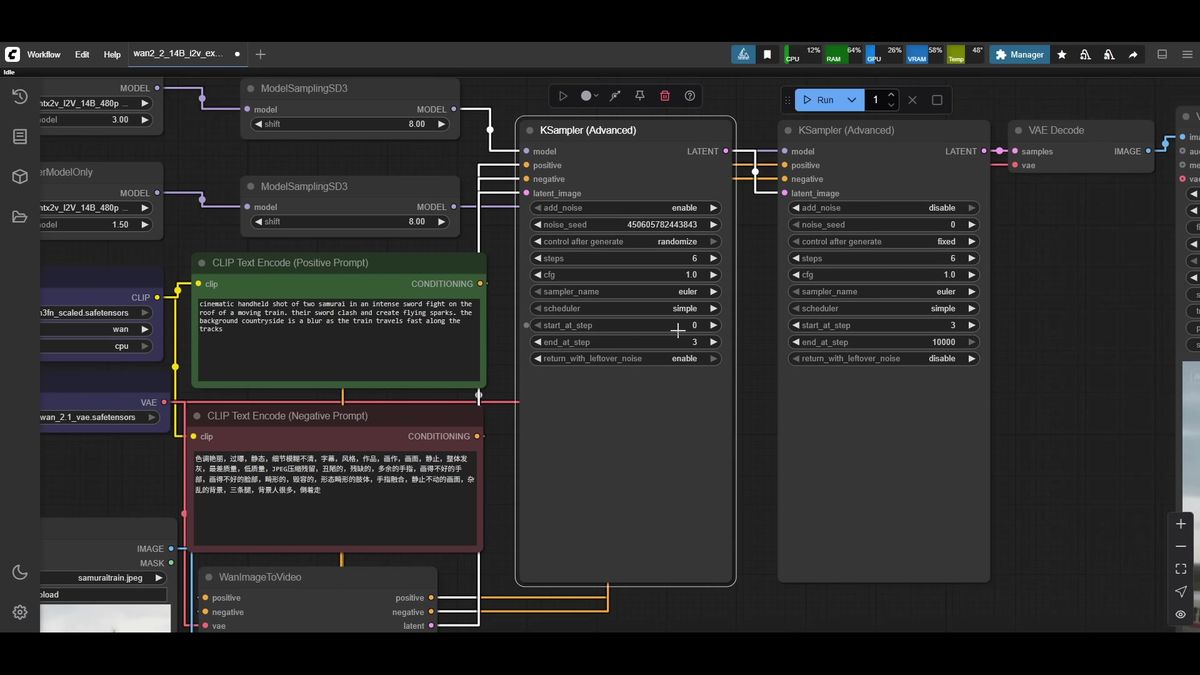
Wiring the low-VRAM workflow
The workflow loads each GGUF through a dedicated loader, applies the Lightx2v LoRA to both, then routes each model into its own sampler: the first samples steps zero to three, the second picks up from three to the end.
Walking the graph left to right keeps it manageable.
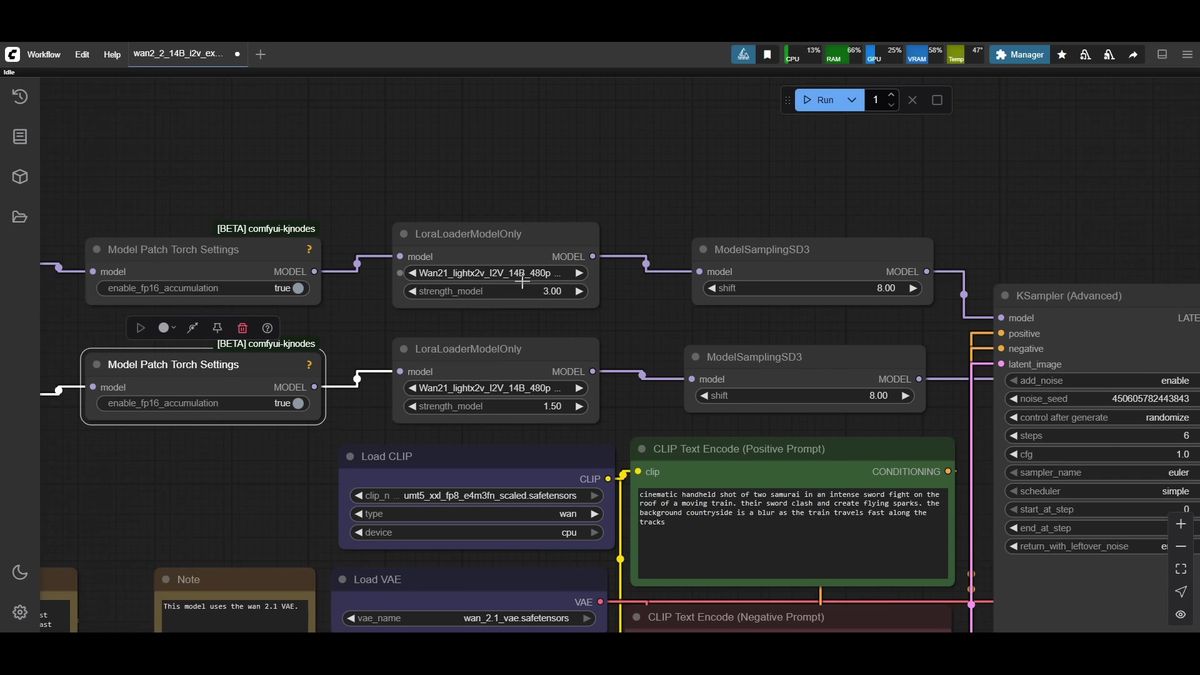
Start with two GGUF loaders, one per model. If you have Sage Attention installed, add the attention and speedup nodes after each loader; if not, bypass them and the workflow still runs, just slower.
Next, apply Lightx2v with a LoRA loader on each chain. The community-settled values are strength 3 on the high-noise path and 1.5 on the low-noise path. Both then pass through a shift node, left at the default of 8.
Now the two samplers. The high-noise sampler holds the seed and the standard settings: six steps, CFG 1, Euler sampler, simple scheduler. The key part is the step window: start step 0, end step 3, with residual noise left on so it hands off. The low-noise sampler takes that latent, matches the same six steps and CFG, and runs its window from step 3 to the end. No seed needed; it inherits from the first.
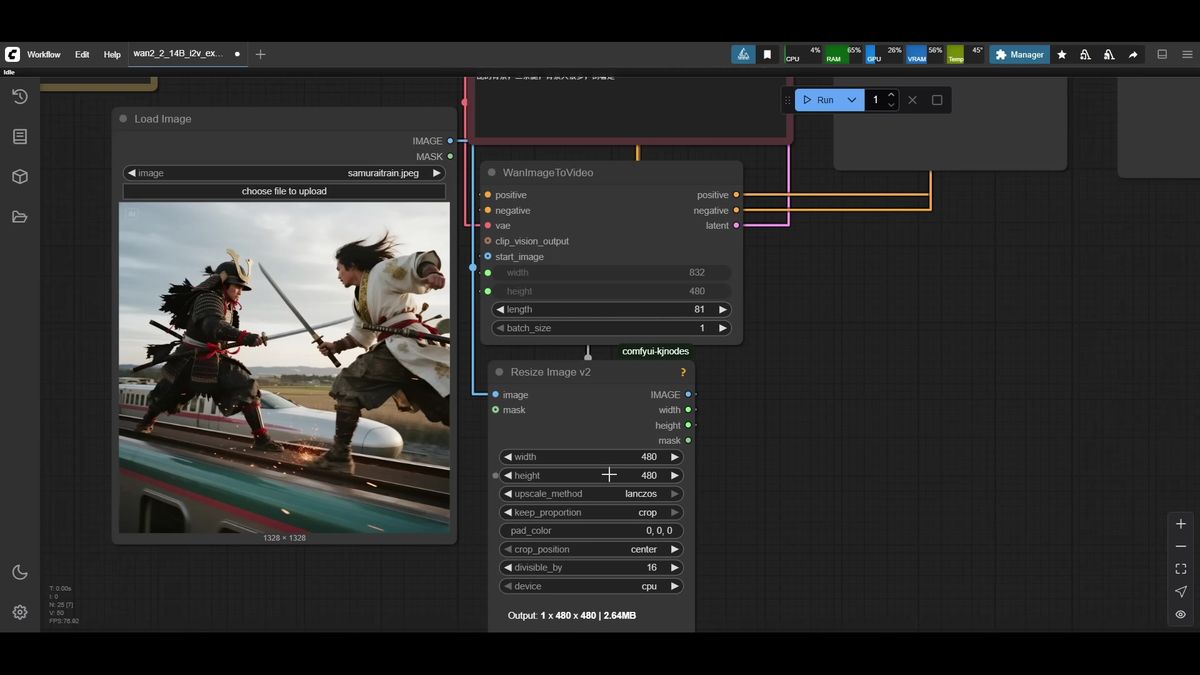
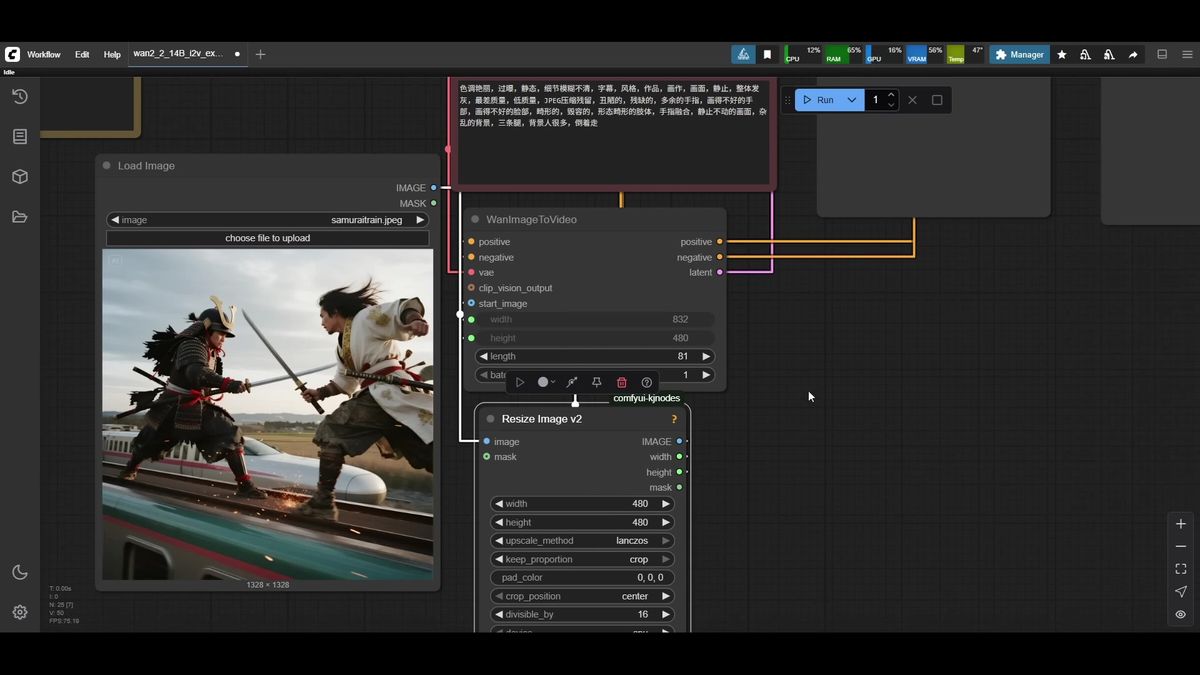
For inputs, load your source image, run it through a resize node so you control output resolution, and feed that into the WAN image-to-video node. The 14B model runs at 16 fps, so clip length must be a multiple of 16 plus 1; 81 frames gives the standard five seconds. On 8GB, keep resolution modest: 480x480 or widescreen 832x480. 720p is the ceiling and needs more memory than a small card has.
For how ComfyUI graphs map to API parameters, the ComfyUI API developer guide covers that translation in detail.
The honest cost of running this locally
Local WAN 2.2 on 8GB works, but a single 480x480 five-second clip takes around three minutes on a warm run, your GPU is fully occupied the whole time, and first runs are slower because of model loading.
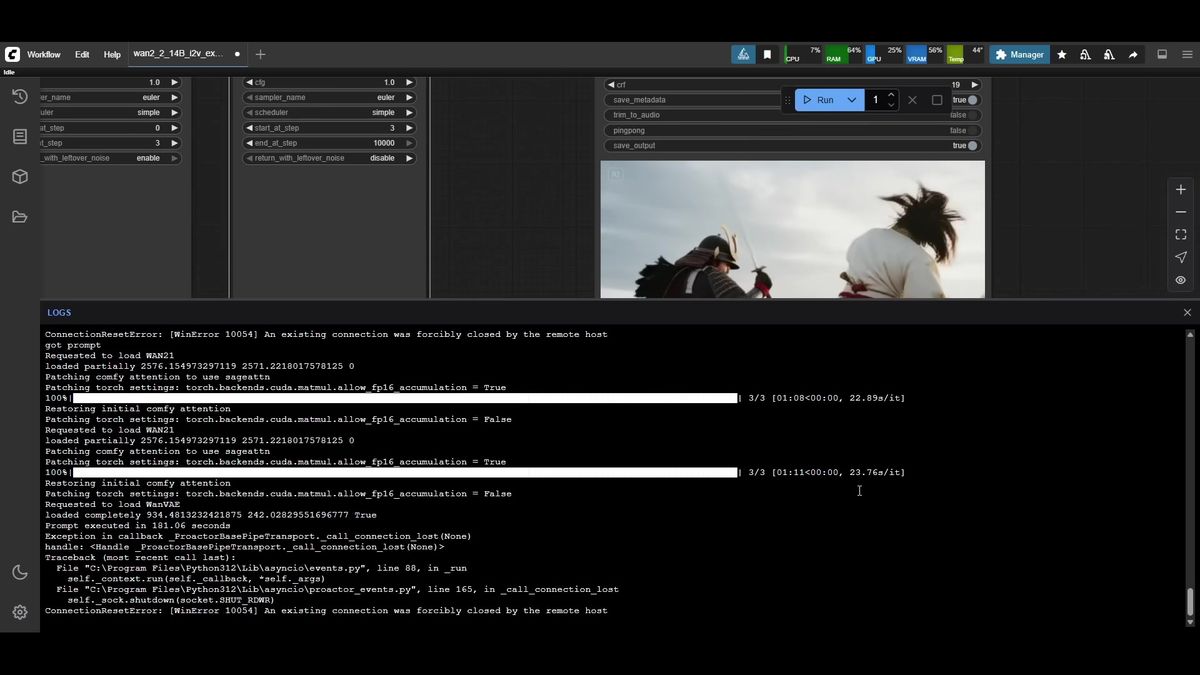
The AIdea Lab test is a fair benchmark. A 480x480, 81-frame clip ran at roughly 23 seconds per iteration and about 181 seconds total, three minutes flat. That was a warm run with models already loaded; cold runs are slower because the GGUFs and LoRA load first.
Three minutes for five seconds of low-resolution video is fine for hobby work. It stops being fine the moment you need volume, higher resolution, or your machine free. A few realities of the local path:
- Your GPU is locked for the full render. No other GPU work happens while WAN runs.
- It scales linearly and badly. Ten clips is half an hour of your machine doing nothing else. A hundred is your evening.
- Higher resolution is often out of reach. 720p wants more VRAM than 8GB, so you are capped at 480p locally.
- The setup is fragile. A ComfyUI update, a node bump, or a mismatched quant can break the graph.
None of this makes the local path wrong. For learning the model, testing prompts, and one-off renders, it is the cheapest way in. It just does not survive contact with production.
When to offload WAN video to an API instead
Once you need video at volume, at higher resolution, or without tying up your own hardware, calling WAN through a GPU API removes the VRAM ceiling and the render queue from your machine entirely.
This is where the math flips. Local generation costs nothing in cash but everything in time and a locked GPU. An AI video generation API costs per call but returns your machine and removes the resolution cap, because the model runs on a data-center GPU.
Runflow is an AI image and video model API plus a ComfyUI deploy platform. It runs 700+ models, including WAN video models, behind one endpoint. You send an image and a prompt, you get back a video. No GGUF downloads, no quant juggling, no Sage Attention install, no three-minute render holding your GPU hostage. Pricing is simple fixed per-call, and the usual reasons teams move off self-hosting apply: reliability, GPU availability without buying hardware, no AI infra team needed. For teams that would otherwise run their own GPU stack, the API path tends to land around 70% cheaper than building in-house.
The call pattern is submit-then-poll. POST the run, get an ID back, poll until it finishes:
# 1. Start a WAN image-to-video run
curl -X POST https://api.runflow.io/v1/models/{owner}/{slug}/runs \
  -H "Authorization: Bearer $RUNFLOW_API_KEY" \
  -H "Content-Type: application/json" \
  -d '{
    "input": {
      "image_url": "https://example.com/source.jpg",
      "prompt": "two samurai in an intense sword fight on a moving train, tracking shot",
      "num_frames": 81,
      "resolution": "832x480"
    }
  }'

# Response: { "id": "run_abc123", "status": "queued" }

# 2. Poll until the run finishes
curl https://api.runflow.io/v1/runs/run_abc123 \
  -H "Authorization: Bearer $RUNFLOW_API_KEY"

# Response when done:
# { "id": "run_abc123", "status": "succeeded",
#   "output": { "video_url": "https://cdn.runflow.io/.../out.mp4" } }
This is not local-or-cloud forever. Most teams keep ComfyUI local for prototyping, then route production traffic to an API once a workflow earns its keep. If you would rather deploy your own WAN graph as a private endpoint than call a hosted model, Runflow Deploy turns your local ComfyUI workflow into a typed REST API with the GPU handled for you. To compare the managed-API and self-deploy routes across the wider market first, the ComfyUI cloud and online platforms comparison lays out the options honestly.
Frequently asked questions
Can WAN 2.2 image to video really run on 8GB VRAM?
Yes. With a Q4 GGUF quant for both models plus the Lightx2v LoRA, WAN 2.2 generates five-second clips on an 8GB laptop GPU. Expect around three minutes for a 480x480 clip on a warm run. Output quality is good; speed and resolution are the trade-offs.
What is the difference between the high-noise and low-noise models in WAN 2.2?
WAN 2.2 image to video uses two 14B models. The high-noise model runs the early sampling steps and sets motion, camera movement, and composition. The low-noise model runs the later steps and fills in fine detail. The sampler splits your steps between them, for example three each in a six-step render.
Which GGUF quant should I pick for WAN 2.2?
On 8GB VRAM, Q4 is the safe default and Q5 is often reachable. Q2 and Q3 work for tighter budgets with some quality loss; Q6 and Q8 are for cards with more memory. Always match the quant level between the high-noise and low-noise files.
What does the Lightx2v LoRA do?
Lightx2v is a distillation LoRA that cuts WAN's step count from a default of 20 down to about six, with clean output. On a low-VRAM card that is the difference between a render you wait for and one you abandon. Use the image-to-video (I2V) variant, rank 32 as a starting point.
Why does WAN 2.2 need two model files when 2.1 needed one?
The two-expert design is the core architectural change in WAN 2.2. Splitting motion (high-noise) from detail (low-noise) improves prompt adherence and motion quality. The cost is that you download and load two GGUFs, and the workflow routes them into separate samplers.
What resolution can I generate on a low-VRAM card?
Realistically 480p: 480x480, widescreen 832x480, or portrait 480x832. WAN 2.2 supports 720p, but that needs more VRAM than an 8GB card has. For 720p on small hardware, an API that runs WAN on a data-center GPU removes the ceiling.
When should I use an AI video generation API instead of running WAN locally?
Switch to an API when you need volume, higher resolution, or your machine free while videos render. Local is cheapest in cash for learning and one-offs. An API costs per call but removes the VRAM ceiling and the render queue from your hardware.
Do I need Sage Attention to run WAN 2.2?
No. Sage Attention and the related speedup nodes make generation faster, but you can bypass them and the workflow still runs, just slower. They are an optimization, not a requirement.
Can I deploy my own WAN ComfyUI workflow as an API?
Yes. If you want your exact graph, nodes, and models behind a private endpoint rather than a hosted model, Runflow Deploy turns a local ComfyUI workflow into a typed REST API with the GPU managed for you.
Where to go next
Pick the path that matches where you are with WAN 2.2 right now.
- Learning the model? Build the local 8GB setup above with Q4 GGUFs and the Lightx2v I2V LoRA. It is the cheapest way in.
- Hitting the resolution wall? If you need 720p and your card caps at 480p, move WAN video to a data-center GPU.
- Generating at volume? When three minutes times ten clips becomes half an evening, route generation to an AI video and image model API so your machine stays free.
- Comparing where to run it? Read the ComfyUI cloud and online platforms comparison for an honest look at the options.
- Want your own graph as an endpoint? Use Runflow Deploy to publish your local WAN workflow as a typed REST API without managing GPUs.
- Budgeting a switch? Check Runflow pricing to weigh simple fixed per-call costs against the time and hardware cost of local rendering.
- Wiring it into a product? The ComfyUI API developer guide shows how ComfyUI inputs map to API parameters.
The local 8GB build is a genuinely good place to learn WAN 2.2 and dial in prompts. The render math was never the hard part. The real question is whether 181 seconds on a locked laptop is still the thing generating your hundredth clip, or your first one at 720p.
Start free at runflow.io.
Want custom benchmarks for your workload?
We'll run our evaluation pipeline against your production data, for free.
Talk to Founders