ComfyUI sketch to image: the 2026 workflow
ComfyUI sketch to image turns a scribble into a finished illustration with Flux or SDXL ControlNet. Build the workflow locally, then run it as an API.
A four-line bottle drawn by a stranger on Discord. Twenty seconds later, a finished bottle render with shading, color, and a label. No redraw, no Photoshop, one prompt. That is ComfyUI sketch to image, and it is the closest the open-weight world has come to a "make my doodle real" button. You load a rough sketch, write what the final illustration should look like, and a ControlNet-guided Flux or SDXL model paints over your lines while keeping the shapes you drew.
We learned where this gets expensive the hard way. The Flux path needs Flux plus a ControlNet model plus a preprocessor model, so the VRAM bill climbs fast and a slow card turns a 20-second render into a coffee break. Fine on your desk. A real problem the second a hundred users upload sketches into the same workflow at once (we've run that math, and one GPU does not win it).
So this guide does two things. First it walks the ComfyUI sketch to image workflow the way the pixaroma episode lays it out, node by node, the four sub-workflows and the preprocessor choices that decide the whole look. Then it shows the production path: calling the same thing as an API so the feature keeps answering when your card is busy.
What ComfyUI sketch to image actually does
Sketch to image takes a hand-drawn sketch plus a text prompt and renders a finished illustration that follows your lines, using a ControlNet model to lock the composition while the base model fills in color, light, and detail.
The drawing supplies the structure. The prompt supplies everything else: style, palette, materials, background. ControlNet is the glue that stops the model from ignoring your sketch and inventing its own picture.
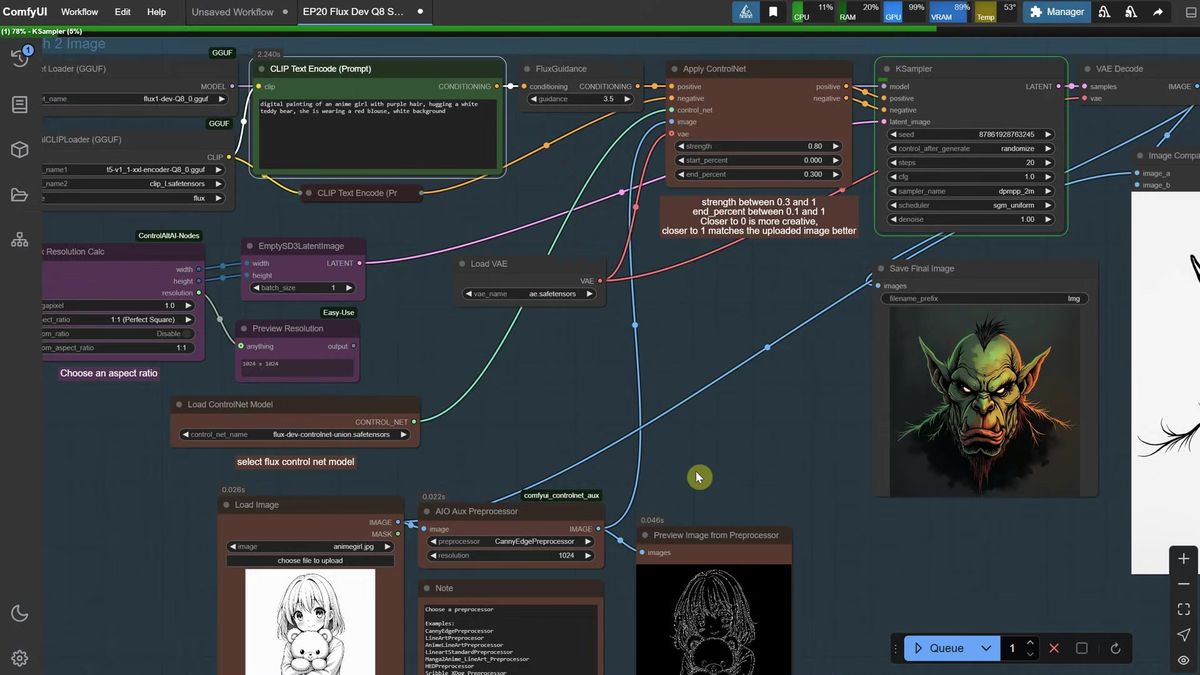
The pixaroma build is one all-in-one graph with four sub-workflows you toggle like light switches, keeping exactly one active at a time. Sketch preparation cleans up a photographed drawing. Image variation explores alternates of a sketch. Sketch to image is the main event, the ControlNet render. Draw your sketch to image lets you scribble directly in a canvas tab when you have no drawing to load.
Where it shines: turning a child's house drawing into a greeting card, an architect's massing sketch into a render, a four-line bunny into a colored character. Where it struggles: the messier the sketch, the more the model guesses, and a busy line drawing can fight the prompt for control.

How to set up the sketch to image workflow in ComfyUI
You install one custom node for the draw-in-canvas feature, update ComfyUI, then load a base model plus a matching ControlNet, because Flux ControlNet only works with Flux and SDXL ControlNet only works with SDXL.
Open Manager, go to custom nodes, search "canvas," and install the Canvas Tab node. That one powers the draw-your-sketch tab later. Then update ComfyUI (Manager's update-all, or the update_comfyui.bat file in your update folder if Manager stalls) and restart so everything is current.
The model pairing is the part people get wrong. Load a Flux base model with a Flux ControlNet, or an SDXL base model with an SDXL ControlNet. Mix them and you get a model-mismatch error every time. The episode ships both a Flux graph and an SDXL graph for exactly this reason: SDXL is the faster, lighter path, Flux is the slower, sharper one.
One detail that matters for Flux: it renders best at sizes that are multiples of 64, which is why the workflow ships predefined aspect ratios instead of letting you type any number. Match the ratio to your sketch and you avoid soft, off-size results.
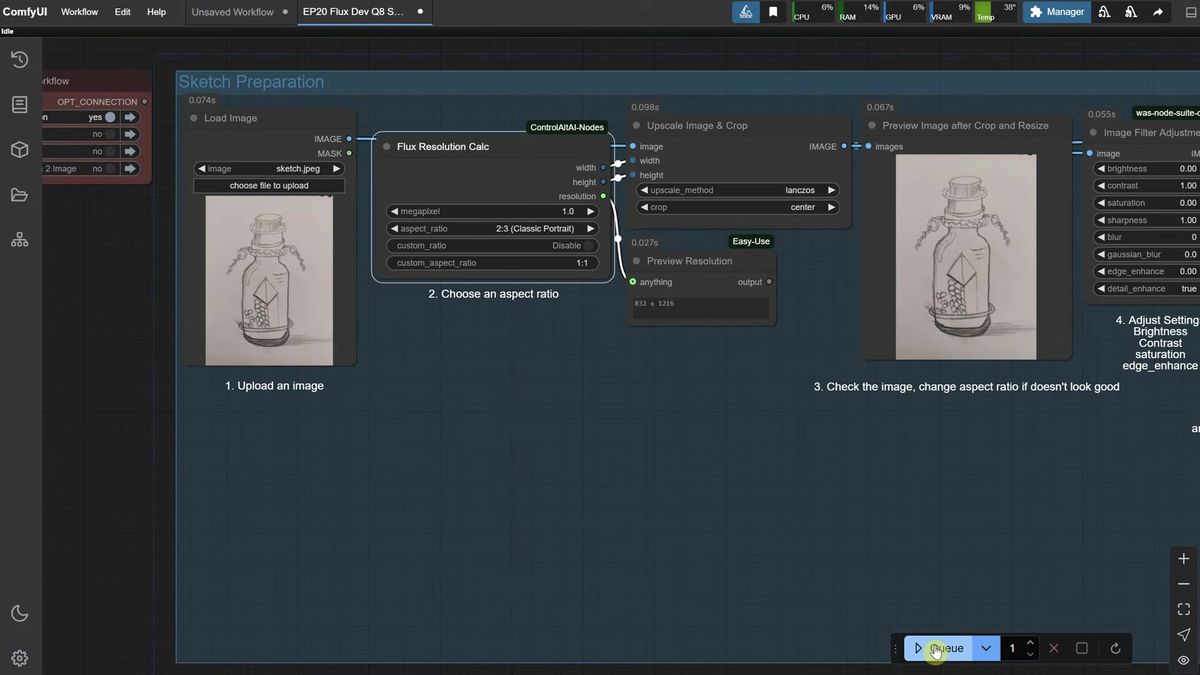
How to prep a sketch before you render it
The sketch preparation sub-workflow crops your drawing to a clean ratio and pushes contrast and luminosity so the lines read sharply, which is the difference between a model that follows your sketch and one that loses it.
A photographed sketch usually arrives with a warm tint, a soft gray background, and junk in the corners. The model treats all of that as signal. Cleaning it up first is not optional polish, it is what makes the ControlNet pass land.
Three moves do most of the work. Pick an aspect ratio that frames the subject and trims stray marks (the same ratio you will reuse downstream). Drop saturation to zero so the drawing goes black and white, then lift brightness so the background reads as clean white. Nudge contrast and edge sharpness until the lines stand out, stopping before the image goes "overcooked" and starts eating the top of the drawing.
The before-and-after slider in the node is your check. If you do not run Photoshop, this sub-workflow doubles as a sketch cleaner for social posts. Copy the cleaned image and paste it straight into the next workflow with a load-image node.
How preprocessors decide the entire look
The preprocessor converts your sketch into the control signal the model reads, and swapping it (canny, line art, depth-anything) changes the output more than almost any other setting.
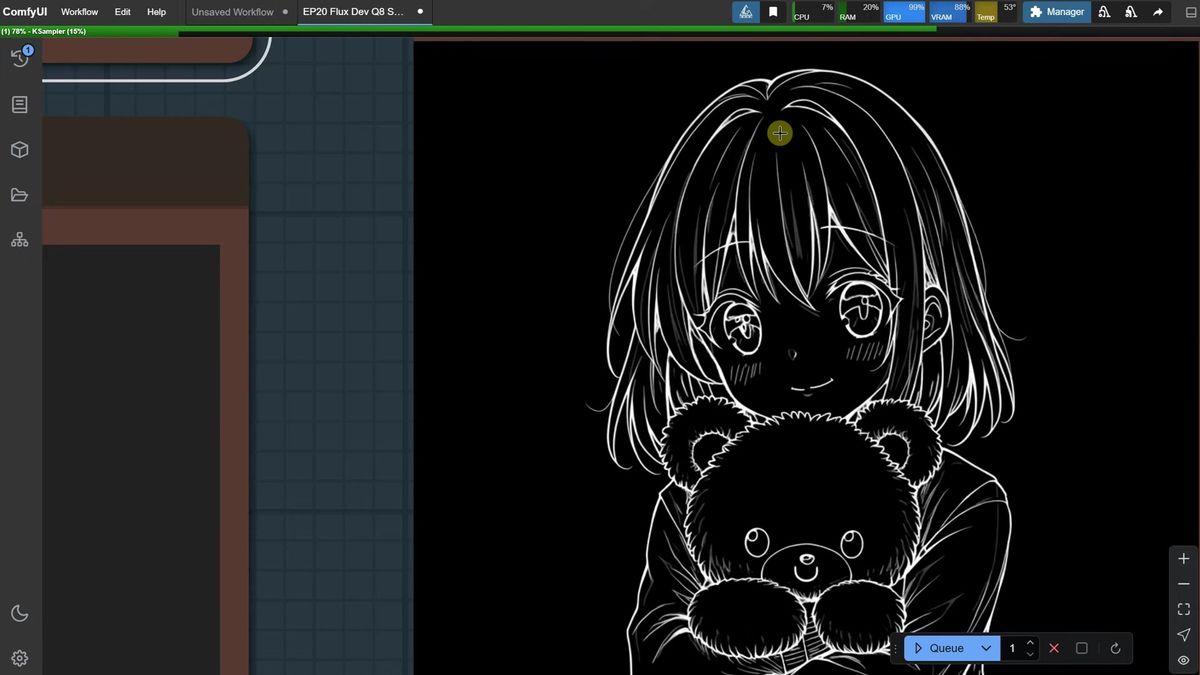
This is the lever to pull first when results disappoint. Canny traces hard edges and keeps your drawn lines visible in the final image, good when you want the sketch to show through. Line art and the anime/manga line-art variants extract fewer, cleaner lines for a softer illustrated finish. Depth-anything ignores fine lines entirely and builds a depth map, which is the move for a rough or over-detailed sketch where you want the main forms but not every stray pen mark.
Some preprocessor models download from Hugging Face on first use, so the first run of a new one is slow and large. On Windows, enable long-path support or the download can fail with an "incomplete" error.
Two more knobs ride alongside the preprocessor. ControlNet strength controls how hard the sketch constrains the model: lower it for more creative freedom, raise it to hug the lines. The end-percent setting releases ControlNet partway through (around 30%) so the model has room to add color and shading after the structure is locked. For denoise: a pure sketch-to-image render runs at denoise 1, while the variation workflow lowers it to stay close to an existing image.
How prompting changes a sketch render
A good prompt names the subject, the colors, the style, and the setting, and a quick trick is to paste your sketch into ChatGPT and ask for a Stable-Diffusion-style prompt describing the look you want.
The model knows the shapes from your lines. It does not know you wanted a fantasy forest behind the bunny or a macro-photo finish on the snowflake until you say so. Describe hair color, materials, lighting, and background, and the render obeys.
The ChatGPT shortcut is worth stealing. Paste the sketch, ask for a detailed image prompt, ask it to strip the quotes so it pastes clean, and you get a long, specific prompt that plays well with Flux. The architect example in the episode goes from a bare building sketch to a full render this way.
When the sketch is too busy and the lines bleed into the result, you have two fixes: lower ControlNet strength so the model ignores some lines, or switch to depth-anything so the lines never enter the control signal in the first place. Fix the seed once you like a direction, then iterate on the prompt to dial in the final image.
How to draw a sketch with no drawing at all
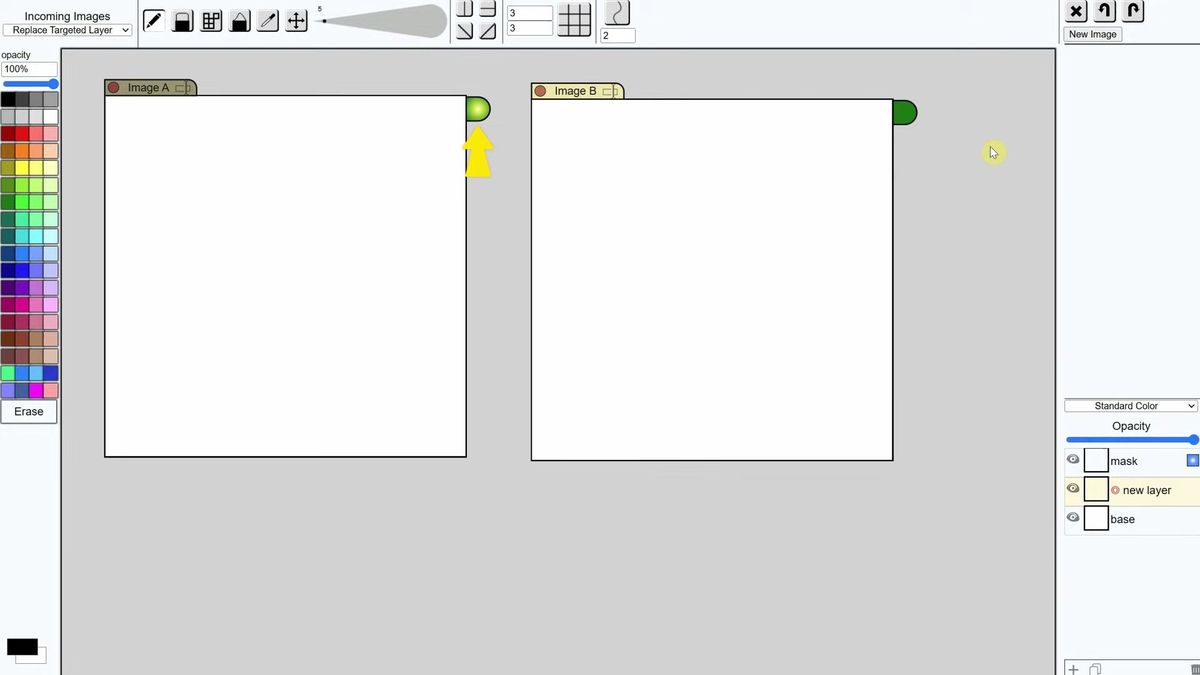
The draw-your-sketch-to-image sub-workflow opens a canvas tab where you scribble directly, and only the layer with the green gradient dot enabled gets sent into the workflow.
This is the path for "I have an idea but no sketch." Click the node's edit button, a canvas opens in a new tab with two image slots, and you draw. The green dot is the catch that trips everyone: the image carrying that dot is the one ComfyUI reads. Draw on a layer without it enabled and nothing reaches the graph.
Practical canvas notes from the walkthrough. Use undo rather than the eraser, because the eraser also clears the background. To "erase," paint over with a big white brush in the background color, then switch back to your line color. Add new images with the new-image button and a size, zoom with the mouse wheel.
Even a messy scribble produces something. The episode draws random lines and the building workflow still pulls a coherent structure out of them. Better sketch, better result, but the floor is surprisingly high. This is the fastest way to test whether ComfyUI sketch to image fits an idea before you commit to drawing it properly.
Why this workflow breaks behind real users
A desktop ComfyUI install renders one sketch at a time on your card, which is perfect for you and falls apart the moment a product feature sends real traffic.
Three things change when a hobby graph becomes a feature in software other people use.
Concurrency. ComfyUI runs one job at a time, so ten users uploading sketches at once means a nine-deep queue, and a 20-second render becomes a multi-minute wait for the last person in line.
Uptime. A live sketch-to-image feature needs an endpoint that answers at 3am, not a workstation that has to be awake with the GPU free.
Cost and operations. Keeping a Flux-capable card warm for spiky traffic is wasteful, and the second card is the moment you are running GPU infrastructure instead of building product. The AI and DevOps work to manage a GPU fleet is the line item most teams underestimate, which is why running this hosted lands around 70% cheaper than the in-house version with no AI team required.
None of this is a knock on ComfyUI. It is the right place to design and tune a sketch-to-image graph, and the wrong thing to be the live backend.
How to run ComfyUI sketch to image as an API
You POST your prompt and sketch to a model run endpoint, poll the run ID until it finishes, and never touch a GPU.
Runflow runs Flux (with ControlNet), SDXL, and the rest of the catalog as hosted models you call over HTTP. Disclosure: Runflow is our product, but the ComfyUI method above works with or without us. The shape is identical for every model: POST inputs, get a run ID, poll until done. For the "edit by instruction" variant of this, Runflow's prompt-based image editing solution wraps the behavior behind one endpoint.
# Submit a sketch-to-image render
curl -X POST https://api.runflow.io/v1/models/black-forest-labs/flux-1-dev/runs \
  -H "Authorization: Bearer rf_live_your_key" \
  -H "Content-Type: application/json" \
  -d '{
    "input": {
      "prompt": "a cartoon bunny, bright colors, fantasy forest background, soft lighting",
      "control_image_url": "https://yourapp.com/uploads/bunny-sketch.png",
      "controlnet_type": "canny",
      "controlnet_strength": 0.8
    }
  }'
You get back a run ID. Poll it until the status reads succeeded:
curl https://api.runflow.io/v1/runs/RUN_ID \
  -H "Authorization: Bearer rf_live_your_key"
Wrapped in a small loop, that is the whole integration:
import requests, time

BASE = "https://api.runflow.io/v1"
HEAD = {"Authorization": "Bearer rf_live_your_key"}
MODEL = "black-forest-labs/flux-1-dev"

run = requests.post(
    f"{BASE}/models/{MODEL}/runs",
    headers=HEAD,
    json={"input": {
        "prompt": "a futuristic glass building at sunset, architectural render",
        "control_image_url": "https://yourapp.com/uploads/building-sketch.png",
        "controlnet_type": "depth",
    }},
).json()

run_id = run["id"]
while True:
    r = requests.get(f"{BASE}/runs/{run_id}", headers=HEAD).json()
    if r["status"] in ("succeeded", "failed"):
        print(r)
        break
    time.sleep(2)
Concurrency, retries, and failover are handled for you, so the tenth user is not stuck behind nine others. Pricing is simple fixed per call, which keeps cost predictable per render instead of per GPU hour. Flux sits alongside the other models in the Runflow model catalog, and the same request shape works against any of them by swapping the slug. The ComfyUI API developer guide is the pillar to read next.
If your real graph is more than one node (a preprocessor, an upscale, a face fix), you can deploy the entire ComfyUI workflow instead of rebuilding it call by call. ComfyUI Deploy takes your exported workflow JSON and runs it as a hosted endpoint on a real GPU, so the four-sub-workflow graph you tuned ships as-is. For a tour of graphs worth hosting this way, the production-ready ComfyUI workflows roundup is a good map.
Frequently asked questions
What is sketch to image in ComfyUI?
It is a workflow that turns a hand-drawn sketch plus a text prompt into a finished illustration. A ControlNet model locks the composition to your lines while a Flux or SDXL base model fills in color, lighting, and detail.
Do I need Flux or SDXL for sketch to image?
Either works. SDXL is faster and lighter on VRAM, Flux is slower but sharper. The one rule: pair a Flux base model with a Flux ControlNet, or an SDXL base model with an SDXL ControlNet. Mixing them throws a model-mismatch error.
Which preprocessor should I use?
Start with canny to keep your drawn lines visible. Use line art or the anime line-art variants for a cleaner illustrated finish. Use depth-anything when the sketch is rough or over-detailed and you want the main forms without every stray line.
What does ControlNet strength do?
It controls how tightly the render follows your sketch. Lower strength gives the model more creative freedom and lets it stray from the lines. Higher strength hugs the sketch. The end-percent setting releases ControlNet partway through so the model can add color after the structure is set.
Why does the model ignore my sketch?
Usually the sketch is too noisy or the contrast is too low. Run it through the sketch-preparation step first to crop, desaturate, and sharpen, then raise ControlNet strength or switch to a preprocessor that traces stronger edges, like canny.
Can I draw a sketch directly in ComfyUI?
Yes. The draw-your-sketch-to-image sub-workflow opens a canvas tab where you scribble in the browser. Make sure the layer with the green gradient dot is enabled, because only that image gets sent into the workflow.
How long does a sketch to image render take?
On a capable local GPU, an SDXL render is quick and a Flux ControlNet render is slower, since it loads a base model, a ControlNet, and a preprocessor. The first run of a new preprocessor is slower because the model downloads from Hugging Face.
Is there a sketch to image API?
Yes. You can call it over HTTP by posting your prompt and sketch to a model run endpoint and polling for the result, with no local GPU. Runflow hosts Flux with ControlNet, SDXL, and the rest of the catalog this way.
Can I run the whole four-workflow graph as one API, not just one model?
Yes. ComfyUI Deploy runs your exported workflow JSON as a hosted endpoint, so a multi-step graph with a preprocessor and an upscale ships without being rebuilt as separate API calls.
Where to go next
You've got both halves now: the ComfyUI build for designing a sketch-to-image pipeline, and the API for shipping it. The workflow was never the hard part. The real question is whether your own card is still the thing answering at 3am when the tenth sketch lands in the queue.
- Install the Canvas Tab node, update ComfyUI, and load a matched base model plus ControlNet.
- Run a photographed sketch through the sketch-preparation step to crop, desaturate, and sharpen it.
- Render it with the canny preprocessor first, then swap to line art and depth-anything to feel the difference.
- Tune ControlNet strength and the prompt until the illustration matches what you pictured.
- Try the draw-your-sketch tab to test an idea you have not drawn yet.
- When real traffic arrives, call the render through the Runflow model catalog so concurrency and failover are handled for you.
- For the full multi-node graph, deploy it with ComfyUI Deploy and read the ComfyUI API developer guide.
Start free at runflow.io.
Want custom benchmarks for your workload?
We'll run our evaluation pipeline against your production data, for free.
Talk to Founders